Dye Your Hair Jet Black Using The Water Color Method! |15 Minute Dye
- Posted on 04 May, 2020
- Color Lace Wig
- By Anonymous
Hey Beautes! Open ME !!
This tutorial is a how to on How To Dye your Hair Jet Black Using the Water Color Method! This was my first time trying to use this method on Jack Black Hair and as Beginner, this was super easy ! I hope you guys enjoy this tutorial, and you can use it to get that sexy , sleek, Jet Black hair we all love !
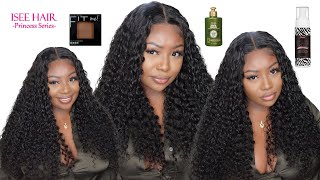
Hey guys welcome back to my channel, so today's video is going to be a tutorial on how I get my units to be super jet black. So me, personally, I love color, but when I'm doing black, I like my hair to be super, super dark black and shiny. So I'm just gon na be showing you guys how I use a water color method to achieve that. Look. So, as you guys can see, I'm just running my hands to my wig, making sure I don't have any kinks or anything like that, and it's gon na be easy for me to come through once it's wet. So what I'm gon na do is remove my wig from my mannequin head and flip it inside out. You want to do this because we are gon na do a protective layer over our lace closure and we want to make sure the entire closure is exposed and flat. So I'm just gon na pull my wig down snug into my closure. It'S nice and exposed and easy for me to work with so now, I'm just gon na be taking my guys to be gluten free spray and spraying my lace closure. You want to do this because what we're doing is building a protective layer over our lace closure. This is because the watercolor met that pretty much stains your hair, that's what you're doing, but we don't want our lace to be stained because then it won't look realistic, like scout, so I'm gon na do a protective layer using the free space. So I like to spray at least three layers to make sure that you know is: there's a nice amount of buildup on the lace closure. However, you can definitely spray more, so what I'm doing is just going in and spring and then letting it dry in between. So that I get that nice hard layer on top so now what we're gon na do is move over to the sink, as you guys can see. I already have my bucket ready to go rinsed out in my sink. I got this bucket from the dollar store from Dollar Tree. It was literally a dollar, so I think if we use bigger ones, but it's honestly not necessary, and now I'm going to be going in with my adore black velvet semi-permanent hair color. Now you can use any hair color that you like to use me personally. I love a door because their products are cheap and they have a nice range of colors, but you can use any dye that you want to and actually, if you use a permanent hair dye, this process will come out even better for you, because semi permanent hair Color tends to bleed especially a door, but to each his own. So now what I'm going to be doing is just pouring my dye in the bottom of my bucket and, as you guys can see, I'm actually filling up my haircolor bottle with water to get any excess dye out of the bottle. Now, usually, if I was dyeing my hair with the brush - and I I wouldn't do that - because I don't want to dilute my color but because we are using the water color method, you can use as much water as you'd like. So I'm just trying to basically get other products out of my bottles, and for this week I use two bottles of die. However, my wig was already pretty dark, but if you want your wig to be nice and dark like mine - and you have not previously dieded before, I will recommend at least using three to four bottles. So now what I'm going to be using is my rat tail comb and I'm just gon na go ahead and get my mixture a nice little mix of rule just to make sure I don't have any lumps of dye into my mixture and that you guys can See our mixture is nice and thick with no lumps, and that's because we added in our diverse instead of the water, if you add in the water first you're. Obviously, gon na have those little chunks of dye floating around you're gon na have to be a little bit more time. Mixing it so now we're gon na do is at our boiling hot water to our dye mixture. You want to make sure that you boil more than enough water just so that you can make sure that your wig can be completely submerged into our water color, because if not, then obviously your entire wig will not be evenly dyed. So I just poured a little bit of extra on top to make sure my whole weight could fit into the mixture. So now it's time to go ahead and put our week into the water color and what I'm doing basically is you're starting to dunk my ends. First and that's because I just want to ensure that the product is gon na be evenly distributed throughout the wig. So, as you guys can see, I'm dunking the bottom part making sure that's nice and submerge, and I'm gon na take my comb and comb it out and then dunk a little bit more and just kind of ease it into the water. You can't, I guess, just drop it in if you wanted to, but this is a much more control method. So this is what I recommend and remember we do have this lace closure on top and though we have a protective layer, you still don't want to get any unnecessary black dye on your closure. As you guys can see, I got a little bit of dye on my closure. I just read a little bit of water over it and it ran right off, so you want to make sure that you're not getting any dye on that closure. Even though we have a protective layer, it's not a repellent! So if you let that die, sit on that closure for too long it will eventually eat through the layer, and then it will eventually stain your closure as though you still want to be careful. So I'm just dunking my wig into my solution, just to make sure that you know the product is spread throughout the week evenly. This part is somewhat optional, but I try to be a perfectionist, so I'm just taking my time and making sure that you know everything is gon na be evenly colored. So what I like to do to it to again ensure that my lace closure is not gon na be stained. Is I like to make sure that the hair is nice and combed out so that it can sit evenly or sit up right into the water solution? And then I kind of push it to one corner or the other, and then what I'm gon na do is actually take a hair, clip and kind of pinch, my closer together just so that I can make sure in the event that my wig starts to fall Into the water or slip down, my closure will be pinched together. The lace will be pinched together, so it will not, you know, be stained or be completely submerged into the water. I hope that makes sense, but you guys are gon na see me. Do it right here so, as you guys can see, I just clipped it together. Now I'm gon na make sure the wig is kind of sitting upright and then just let it chill and do its thing. So I personally like to let my wig sit in my water for about anywhere from fifteen to thirty minutes. Now it's totally up to you how long you want to let your sit, I think the longer you let it sit, the darker or more opaque your color is going to be, but it's totally up to you. You can definitely get this done in about 15 minutes, because this process works by using that boiling hot water to open up the hair shaft and in the color of the water which ever color you want to make. It is gon na go into the hair, shaft and stage the hair, so that's pretty much how that works, though it doesn't take long for it to process, but I usually like to leave to 30 minutes just so. I can make sure that my color is gon na last a little bit longer so after 30 minutes, as you guys can see, I'm just gon na come and check on my wig, I like to always like look at my hair. Look at the ends. Look at the middle of the shaft look at the root, because I want to see how the color has taken to the hair in the event that your color does not take for some reason. You can always start this process over and more dye to your water and continue to process your hair. But for me my hair looks pretty good. I'M just gon na go ahead and dunk my wig in just to make sure that the hair is colored all the way up to the root, and then I'm just gon na start to work out that excess water. Now this part is very important. Listening. You want to make sure that you rinse your hair with cold water because remember we opened up the hair shaft and stained the hair with the hot water, so cold water is going to close the hair shaft. Therefore, seal in that color so make sure when you rinse you're, taking your time you're getting out all of the excess water color that the hair will just sitting in and you rinse with cold water. Now this is also important after I do my water color, the the high water, has already pretty much cleaned your hair, it's literally steams your hair, so any grease or anything like that. More than likely it's already removed from your hair. Okay, it's literally been soaking in boiling hot water, so it is not necessary to use a shampoo I like to go in and use a conditioner, because now I want to nourish my hair, especially because I want to make sure that my hair is soft. After going through a coloring process, so my favorite conditioner to use is the silicon mix. I like it because it literally makes your hair so so silky and who does not want a jet-black silky wig. So I'm gon na use the silicon mix to go ahead and treat my hair, as you guys can see. I do like to use a the excess water. It just tells me to spread around the conditioner a little bit easier and I'm gon na let that process for about 30 minutes. Now after I have rinsed my conditioner out, all I'm gon na do is go in with a little bit of setting mousse. I, like the Nairobi setting mousse because it does not leave any type of film or sticky residue on your wigs or lace closure, so I'm just gon na use a little bit of this and basically start to set my party. Now. After doing this, you can change your parting, but setting your parting with mousse just literally helps your part to be so flat, and so you know need so. While my hair sweat, I like to go in with some setting moves in my rat tail comb and start to set my part now, as you guys can see, the wig is super super dark from the water color processor. So I know you guys have seen this on colored hair many many times, but it also works for jet-black hair as well. So I'm just gon na turn my wig as I'm parting, my closure just to show you guys different angles of the wig, so you guys can see that is consistently dark and jet-black throughout the entire week after I went ahead and set my part, I then placed My wig underneath my hooded dryer, and so that my wig to dry a little bit faster for me. So later I attached my elastic band, and then I saw my wig if you guys want to know the details on how I do my wig install on my TWA, then make sure you guys check out that video on my channel as well - and this is pretty Much what the color came out like so as you guys can see from any and every angle. The hair is completely and evenly dyed and it is super jet black and shiny. The hair looks so healthy and I love it because it doesn't take any time and this process does not damage your hair or leave it dry and brittle. So I hope that you guys enjoyed this tutorial. I love making these videos for y'all so make sure you show you girls, some love hit that notification bill before you go and make sure you subscribe. So you can be a part of the Slade family here you so I love you, guys awesome lunch and I will see you guys in the next video


Comments
KayAnn Kelly: I love the fact that you cut right into the point of what people clicked the video for. It was well explained. You have a new subbie❤️❤️❤️
gettingthere007: Extremely detailed explanation, one of the best hair tutorials I've seen
shekinah campbell: The way you explained everything was PERFECT!!! I HAVE to subscribe after this
Knowing Nikki Good life: Love this dying method, will be giving it a try
Buck Brightening Your Day: That looks so good! Thanks for the helpful video.
Crystyle: U did an excellent job explaining girl def finna try this
Michelle Davis: If I want to bleach my knots which one do I do first? Color or knots first?
Octaviar Latty: Hello hunny, do you suggest coloring bundles/frontal before you make a wig or after?
Raven Beckett: Very informative!! Can you post a tutorial on how to curl your wig ?! My curls never come out right in mine
Nikki V.: Turnt out absolutely gorg!!❤️ the best I have seen on YouTube jus subbed
Louise Williams: How many bottles should I use to dye a bob wig black?
Diamond280WW: Can I use this method if I messed up bleaching my lace frontal cause some of the knots and the roots got bleached and some did not so now it’s a mixture between bleached and non bleached
M Lo: You did a great job you got yourself a new subscriber ❤️❤️❤️
Robin Rigsby: Baby I loved this video so much I had to subscribe ❤️
jamaica sandrene: Should I use synthetic dye if I have synthetic hair?
tevion davis: The color is bomb!!
Mara Luboya: Great video!
helene xo: Does it have to be boiling hot water?
Love Jones: Can you use regular spritz
Kayla Morrison: Where’d you get the wig from?
The Duchess: Great video
Lalaiman: Thanks girl
Shardae Savage: That silicone mix what brand is it
Michelle Lynn: How do you dye the closure without ruining the knots?
el prater: If a short curly wig is used, if the method the same... dark brown to black?
MASANi: amazing
cptteacha1: Where did you purchase your mannequin head?
Louise Williams: Can someone tell me why my wig didn't take to colour? Did I not use enough water?
Tamara Rose: What silicone mix did you use
Mia Knox: How long is the hair ? ..... Can do a tutorial on how to make the wig ?❤️
Tameka Bennett: ❤️❤️❤️❤️❤️❤️❤️
Allana Mariie: I just want to know how you get that got 2 be off the lace afterwards
shanelle Wilkinson: Can you show how you made the wig ?
Akunne Evanmary: Please is the black or brown before you dey it