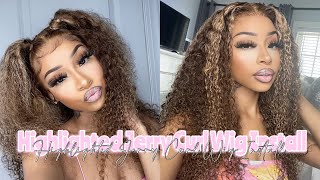
Perfect Blonde Highlighted Wig!!! Trying A New Hair Color! || Affordhair
- Posted on 26 June, 2020
- Color Lace Wig
- By Anonymous
***Welcome Back***
In this video I'll be installing this highlighted wig myself! This is my second video on my channel of me installing a wig, so once again I am NOT a professional!!! With plenty of practice I'll get better and better at installing wigs, but for now I'm just a beginner. I will also be uploading a video on how I customized the color of this wig to my skin tone, so be on the lookout for that video soon! Let me know if you like this new color, and what other colors I should try next!
Like, Comment, and SUBSCRIBE for more content from me!!!
WANNA SEE HOW I CUSTOMIZED THIS WIG??- https://www.youtube.com/watch?v=wQncoL...
*Make sure to watch in 1080p!!!
*Comment ANY video suggestions you have!!!
WIG INFO:
13x6 Lace Front
Length- 20 Inches
Density- 150%
Website for this wig-https://affordhair.com
Link to the same wig in video-https://affordhair.com/products/13x6-l...
More Videos from Me:
CURLY HAIR ROUTINE USING BLACK OWNED PRODUCTS- https://www.youtube.com/watch?v=wPJbch...
STREETWEAR LOOKBOOK 2020 -https://www.youtube.com/watch?v=PYGDsf...
HUGE SHEIN SUMMER HAUL 2020- https://www.youtube.com/watch?v=nYfzxc...
Items Used:
Wig Cap
Got2Be Freeze Spray
Got2Be Glued Gel
Rat Tail Comb
Denmen Brush
Pantene Hair Mousse
Edge Brush
Scarf/Bandana
SUBSCRIBE SUBSCRIBE SUBSCRIBE!!!
#highlightedwig #wiginstallation #installinghighlightedwig
Social Media-
IG:@aadiaa_
Snapchat:@CourtAdia
Twitter:@Courtney_adia
Hi welcome or welcome back to my channel so in this video, as you can see by the title, I will be installing this highlighted wig on myself, so this way came already highlighted. So I didn't actually highlight the wig myself, but I just toned it down and like customize it to my liking. I will have that video coming out after this video, so it might be up already, I'm not sure yet, but I will also definitely put that video out too, because I didn't film it, but with all that being said, let's go ahead and get on with the Video, where I install this wig, alright, so starting off, my hair is already braided up and I already have the wig cap on and everything - and this is what the wig looks like. I also have another video, that's gon na, be up in my channel soon of how I did the coloring. So this is how it looks. It is a 13 by 6 inch parting space, so first I'm taking my foundation, I'm using the same foundation. I use for my bald cap, I'm just putting that down on the actual lace so that it can blend into my skin or to the wig cap a lot better. So now this is what the lace looks like inside with the color. Obviously it matches my cap that I have on because I use the same color, but now I'm using I'm using just a brush or comb whatever and I'm just brushing my hair back. So don't have any flyaways or any hair get in the way. And then next, I'm gon na be cutting off the lace that is like laying on top of my ears. As you see, that's like extra lace or whatever that I don't need, so I'm just cutting it off and I'm just like just going in a straight line. It'S not really much to it just gon na cut and make sure that your ear is completely free and that no lace, no hair anything is over. If you have to cut hair, then you cut some hair off, but I'm doing that and you want to make sure that it's like flat against your hair. So that, like you, are able to like pull the hair, and it goes over your ears like how I'm showing in the video, because if you have the lace over here, then it's not going to lay flat. So you want to make sure you cut that off. All right so now I went ahead and I like flip the lace up, so I can get to the bald cap and then I'm using my got to be gel and then I also use I'm using the back of this calm. I eventually use my fingers, but I'm using this for now and I'm using and I'm trying to lay it even and kind of thin layer of the glue gel on the bald cap. And then I'm also using a blow dryers that the time could go by a little faster and you want to make sure that the glue is like tacky and get all the flyaways and everything out of the way. So you don't glue those down and I'm just pressing the lays down. It wasn't completely dry or tacky, so I didn't have to end up doing it again, off-camera, but I'm using that comb, I'm using like the end of the comb and I'm like tapping it down and make sure that it will stay. And then I cut the lace into three sections. So it'd be a little bit easier for me to see what I'm doing and to make sure nothing's in the way, and I'm just repeating those steps all over to the three sections and then also for this middle part. Right here. This one was a little bit hard for me to do as you can see it kind of was like bunching up on the side there, so I kind of like left it like that it wasn't completely flat at the end, but I don't know I just didn't Know how to get it completely flat. I guess next time I have to cut a little bit more lace off on the ends, but basically I'm just moving on to the next section and I'm doing the same steps also combing the hair back multiple times to make sure no flyaways or anything get caught In the glue and then also I'm using the blow dryer just to make sure that the lace is gon na stay dry because some parts of it it was a little bit still wet but yeah. That'S why I'm using the blow dryer but anyways um? All of it is laid flat to my liking. So now I'm using this little wrap thing and I'm just tying that around. I also put another scarf down just for extra security, and I left this on for maybe like 30 minutes, or so I kind of left it on for a while. Just so it could sit and everything will be laid when I take it off. So a couple minutes later or thirty minutes later or whatever I took off both scarves and this, how it's looking son, I'm gon na, go ahead and cut off the lace now. For this part, I was kind of doing it a little bit wrong. I was told you're supposed to go you're not supposed to go in a straight line for some parts. I kind of did I kind of forgot to not do that and I kind of just like went straight across so you want to like kind of do it. Like you know, zigzag or whatever, so that it's not in a straight line going across so yeah, I'm just taking it and cutting it me. Making those little marks to separate the three sections did help a lot but yeah I'm just continuing to cut the lace across and now this is how my hair is looking. I think it turned out pretty okay, it could have been a lot worse but anyways. I went and I took my hair down just so I could see if I cut enough or if I need to cut more. I did end up cutting more off off camera and now I'm using I'm using that Pantene mousse and I'm cutting some baby hairs out and doing some baby hairs. I ended up actually doing the whole baby hairs over. I did off camera just because I don't know it just wasn't turning out right on camera and I just had to turn the camera off and focus on it. So now I'm using a scarf and I'm tying down my baby hairs just to make sure they don't fly away or anything. That'S also for, like the lace too cuz, the lace was kind of lifting a little bit, but that helped it stay down. So I'm using that - and I also use another scarf just for extra security, so I ended up leaving these scarves on for a couple hours. I went ahead and did my makeup and everything and came back and this how it's looking. So that's the end of this video. I hope you guys liked the video and enjoyed it and saw me install this wig. Like I said, I will have another video of how I customized the wig and like tweaked it or whatever, but with all that being said, I hope you guys liked the video and if you did make sure to like comment and subscribe for more content for me And I'll see you guys in my next video


Comments
Courtney Adia: Make sure to Like, Comment, and SUBSCRIBE for more content from me!!!
Forever Baby: Ur so pretty sis! I love ur intro!
SHAUNTELL’S LIFE: Yesssss sis
chilynn howard: how long did it take to ship