How I Bleached And Colored My Curly Hair Red | Reshine Hair
- Posted on 19 August, 2021
- Color Lace Wig
- By Anonymous
●▬▬▬▬▬♡Reshine Hair♡▬▬▬▬▬●
Hair exclusive discount 6% off code: YTB
Video Hair Direct Link ➤https://bit.ly/3wJFfwk
Hair detail: Deep Wave 26inches/180% 13x4wig
Headband Deep Wave wig: https://bit.ly/3yT4Gx9
➤ Hot-Selling wigs http://bit.ly/3v0FiE7
☛Invisible HD lace wigs http://bit.ly/3qdfH75
☛ colored wigs http://bit.ly/3kI8ASS
☛No Glue & No Sew In #headband wigs http://bit.ly/3869Z0y
☛Full lace wigs http://bit.ly/2PxdvL7
Top-selling bundles with closure& frontal ➤ http://bit.ly/3bbRHwO
☛Affordable short Bob wigs http://bit.ly/3uPGV7j
Want to promoter Reshine hair?
contact with➤[email protected]
Whatsapp➤ +8615136839480
Facebook @reshine https://bit.ly/3eFdnRR
Instagram @reshinehairbeauty https://bit.ly/39u9qLS
Youtube @reshinehair https://bit.ly/3axajoh
●▬▬▬▬▬♡Reshine Hair♡▬▬▬▬▬●
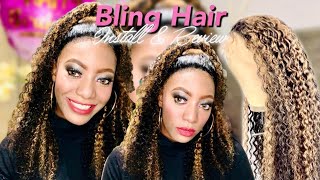
Hey you all welcome back to my channel. Thank you guys so much for watching another one of my videos on today. So i have this wig. I was sent from rishon hair big shout out to rishawn here for sending me out this wig um. They sent me out, i believe it's their it's, either their deep curly or their curly wig. Of course, i have all of the information in the specs in the description box um but yeah. I decided to color this hair, so i did the um the bleaching method, where you use a clear developer. I use 40 clear developer, i use two bottles and then i use some bw2 bleach powder and i put it in this bowl mix it up and then i toss the whole entire wig in the bowl and let it process for about 40 minutes um and then, After that, i went ahead and did the watercolor method to get the color y'all saw at the beginning. So this process, of course, was super easy y'all have seen. I mean this, these methods so many times on youtube, so i'm just giving y'all a quick rundown. Of course, of what i did to get this look um but yeah right here. I am just uh putting that wig into the developer and bleach mixer and let it sit for 40 minutes yeah 40 minutes. I was about to say yeah, i let it sit for 40 minutes and then it gave me a nice uh like a blonde like a brownish blonde, color more on the brown honey brown side, and then i used three different um three different shades of red. As you can see to get the color that i got, i just had some of these colors around the house and decided to just mix them together to get the color. I got um before i dipped this wig into the watercolor me uh, watercolor mixture. I did. I did um, i did go ahead and do the roots of the frontal first um. I didn't show that part, because you know i know y'all know how to do that too, but i went ahead and did the roots um around the lace and the frontal. First, that way, it wouldn't stain the lace if i just dump the whole wig into it, especially with this deep red color. So i hope you guys can kind of see what i mean right here in the front i did um. I did go in and color that first and then what i'm doing is i'm wetting the wig. So that way i can go ahead and put the whole wig in the color mixture that way. Uh, all of the hair can be the same shade and not. You won't have like too many different shades of that color um, so yeah uh, i dumped it. The wig and the water is. It is on the high side. I did put the water on the stove to boil um that pot, i'm using. I always use that pot when i'm doing water, water, coloring method, so um yeah. I did put some water on the stove top to let it get a little hot um. You don't have to do that. Of course you can use hot water or whatever you choose, but i just decided to do that um, but yeah after that. I got this shade here very, very easy and of course i put my wig on the glue this way. Y'All know how i do that, so i do hope. Y'All enjoy this video, any questions, comments or concerns for me. Let me know down below again. The information for this week is in the description box. Again, thank you to rishon hair for sending me out this wig. I appreciate you all, and i appreciate you all as well for watching this video. I love y'all, so much i'm gon na talk to you guys later is just wan na get. Is i wan na kiss you? Oh


Comments
Janisha Black: I swear I just said I'm doing this to one of my curly wigs!! You just confirmed my decision lol. Beautiful sis!!!!
Lauren Monty: It came out so pretty
Kadiatu Dumbuya: Looking beautiful Can you please do a review on Wiggins long water wave wig
KeishaDiamonds713: Can you do a video on reconstructing a wig with a lace frontal you’ve already cut
Food Meats Fashion: Do one for beginners because I don’t know how you did the baby hairs or the glueless part
Sam Bandz: looks so good
Kersha Beaver: Curly hair is your go to for real
Janisha Black: Btw.. everybody wants my hair dryer
Lee Smith: vot.fyi thrilling