Burgundy Curly Wig | Pre Colored 99J Frontal Wig Install Ft. Ali Pearl Hair
- Posted on 20 January, 2022
- Color Lace Wig
- By Anonymous
Hey Beauties
Welcome back to my channel Hope You Enjoy This Video !
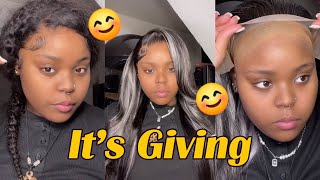
Soooo today I will be showing y’all how I installed this 99J Curly Frontal wig on myself featuring ALI PEARL HAIR. This is my first time trying a 99J Color Wig & yalllll I am in love with this wig and if you loved this install video/tutorial just as much as I did please give this video a thumbs up and a comment down below !... xoxo
Shop My Refurbished Wigs - https://stylesbydestiny.bigcartel.com
_ _ _ _ _ _ _ _ _ _ _ _ _ _ _ _ _ _ _ _ _ _ _ _ _ _ _
Hair Details/info:
Shop Now➤https://bit.ly/3pQpvqD
Hair Info: 24inch 99j burgundy curly 13*4 lace frontal wig 180% density
❤#AlipearlHair Official Store:➤https://bit.ly/3201IM1
1.Join FB Group, Win FREE HAIR➤https://bit.ly/3IZOijF
2.Lace Front Wigs for Sale!➤https://bit.ly/3scIDkp
3.Invisible HD Swiss Lace Wigs:➤https://bit.ly/3mf5W9m
#alipearlhairwig #alipearlhighlightwig #alipearlbodywavehair
Instagram @alipearl_hair: https://bit.ly/34I3Oyd
Youtube @Ali Pearl Hair: http://bit.ly/2H0Gmmc
Facebook @Ali Pearl Hair: https://bit.ly/3aKwxX3
WhatsApp: +86 15890076489 E-mail: [email protected]
———————————————————————————
BUSINESS INQUIRIES & COLLABS PLEASE EMAIL : [email protected]
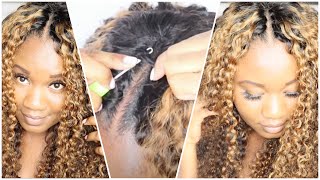
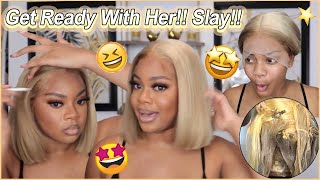
Hey: what's up you guys welcome back to my channel, it's your girl destiny and today i will be showing you how i installed this cute little 99j frontal wig from ali pearl hair. So if you want to see how i got this look then keep on watching bust down barbie on the bus you guys. So today's video is going to be fusion ali pearl hair, so they gave me a few goodies in my wig box. They gave me some eyelashes, an edge control brush an elastic band, a bag to put my wig in a stocking cap as well as those two satin head ties, and then they also gave me a care card on how to take care of the wig. So this is the wig right here. This is the 13x4 curly frontal wig in the color 99j, which is this burgundy color right here. So i didn't do much to this wig. I didn't pluck it and i did not bleach the knot. So first things. First, i'm going to be taking some cream foundation that matches my skin tone um and then i'm going to be applying that on the inside of the lace and then once i have my lace coated, i'm just going to plop the wig on as you've seen and I'M going to make sure it probably fits before i go in and actually cut my ear tabs around my ear. So once i finish cutting my ear tabs, i like to cut my wig while my lace in sections before i go and actually razor off my lace to me. It'S just a little bit easier um. So i pretty much just cut my lace in sections and then razor off each section as i go, so i'm going to be using this even wonderlace bond spray to lay down my wig. So, as you can see, i only cut the middle section of my lace because normally i have a harder time laying my end tabs down. So i like to cut those sections after i spray them and let those sit for a little bit. So i'm just going to spray my lace take my elastic band, let it sit and let it melt and get all curated before i go in and cut those other two sections. So once i finish tying down the lace with my elastic band, i'm just going to go through sections of the hair use. My wax stick and um press out the roots with my hot comb, just to make sure everything is super, sleek and flat. So, okay, so once i finish pressing through the roots of my hair and my lace has been sitting for a little while i'm just going to cut those um other sections off so after i finish cutting off the lace, i'm pretty much just going to start parting Out the sections for where i want my baby hair to be on each side and as i'm sectioning off each section that i want for my baby hair, i'm going to be using my hot comb just to press it out. I noticed that using a hot comb, it just helps your baby. Hairs lay flatter um when you go to like style them down with gel or mousse or whatever you use um to lay your baby hairs down. So that's pretty much all i'm going to be doing now. So once i have my baby hair sectioned off, i'm going to just take some more of that spray and i'm going to use that to spray any section of lace that looked like it was lifting and um tie that back down with my elastic band and while That is setting i'm going to be just taking my hot comb just to press out my hair a little bit more because we love a flat install over here. Okay, so um, that's pretty much all i'm doing, and i let it sit for maybe like five minutes. Not very long so now it's time to do my baby hair. So i'm pretty much just going to take a razor and cut down my baby hairs and then, of course, i'm going to be taking my mini flat iron to curl on each section of my baby hair and then i'm going to pretty much start. Swooping them in place do all right, so this is the gel that i'm going to be using to style my baby hairs with. So i'm pretty much just going to apply some of that onto each section and then use my edge control brush and pretty much just swoop them in place to my liking. So whenever i notice like as i'm swooping, if my baby hair is a little bit too long, i just take my mini scissors and just trim them down to my liking. To so, i'm going to be doing a middle baby hair like a little mini soup in the middle. Normally, i don't do this, but i didn't like the way the lace was looking, so i'm just going to take some hair from the middle and then just do like a little baby soup in the middle section right here. So after i finish doing my baby hairs, i'm just taking some cream foundation and a um a makeup brush and i'm going to just apply that onto the part just to make it look a little bit more realistic, um and natural. So now i'm just going to take those clips on my hair and i'm pretty much just going to begin styling, the hair um using some water and that's pretty much all i used on this hair just to you know, bring those curls back um to life or Whatever so, i'm pretty much just going to wet up the hair um do my makeup and then come back on camera. Looking like a baby, not playing but yeah, i'm pretty much just going to finish wetting up the hair and then i'm going to do my makeup and come back on camera. Alright. So now i'm just going to add the finishing touches, which is my oil sheen. I'M going to spray that on top of my hair and then i'm going to take my hot comb and just really press out the top of my hair because, like i said, we want a flat install only okay. So that's pretty much what i did um just add a little finishing touches, and this is what the hair looked like, but i decided to do something cute um. I never tried this style before. I really don't even know what to call it. I just pretty much just did like a flat twist in the front section of my hair and then just bobby pinned it to the back. Just to give this like a little cute little fun. Look! So that's pretty much what i did to um. You know just spruce this up a little bit all right, you guys. So this is the end of the video, and this is how my hair turned out. Super duper cute. So again, i want to thank ally pearl for sponsoring this video. This is their 13x4 um curly, frontal wig in the color 99j, which is this burgundy color. So if you are one like you, don't like coloring hair or you don't know how to color hair. You don't have to worry about it, because your hair comes pre-colored already, which is super duper clutch and also i did not bleach the knots on this wig and i literally barely plucked anything. So you can literally almost just throw this wig on straight out. The box um, like you literally, don't, have to do much to this wig and also because this hair is 99 j. That'S another reason why i did not bleach the knots you do not need to bleach the knots on hair, that's pre-colored! So if your hair is red and you bleach the knots all that's going to do is just brighten the shade of the red. You know what i'm saying like when people you know. I see people um bleaching the knots on 6 13. Here, it's like so cringy. It'S like the hair is already blonde like how lighter do you want it to go, so you don't have to worry about bleaching. The knots the wig came. Pre-Plugged and again the hair came colored, so you cannot beat that. So i hope you guys enjoyed this video again. Thank you to ali pearl. I will link all the information down the description box below and i will see you beauties in my next one. Bye,

Comments
Ali Pearl Hair: So fabulous!!! Love the style so much! Thanks so much for trying Alipearl Hair~❤
Aadivasi shorts: You looking beautiful
Denise Foster: was this gifted or did you buy it yourself?