How To:Dye Hair Burgundy W/No Bleach Tutorial! | Ft. Isee Hair
- Posted on 09 July, 2020
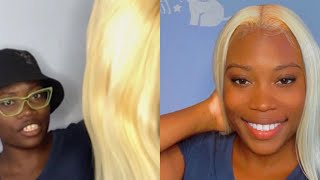
- Color Lace Wig
- By Anonymous
Hair info:
https://www.amazon.com/gp/aw/d/B07DWP2...
Hope you guys enjoyed this tutorial, stay tuned for more content on the way ❤️ !
Don’t forget to follow my social media’s @
Instagram: Ble_.ble
Snapchat: Blessing_loves
SUBSCRIBE TO MY CHANNEL ✨
Time, what's up, y'all welcome back to my channel, it's your girl blessing! You know who it is and i'm back again with another video, today's video i'll be showing y'all. How i make my black curly wig from black to burgundy and the hair that i'm using is icy hair and it's my second time using this hair blender, and i like the first one i had so i got it again because it's just really good texture and Stuff, so i got it again, so what i have is, i have a black mongolian, kinky, curly, 22 inches wig, and i don't like black hair personally, like i'm always having like some kind of color in my head, because i just don't think black hair is for Me so i have a 22 inches mongolian kinky curly, and this is how it looks. Y'All see it's a frontal, laced wig and i'm going to go ahead and make this wig burgundy. So if you want to see how i achieve the look go ahead and keep watching, let's go ahead and get into the video okay y'all, so basically the products you'll need will be a rat tail comb. You will need some foil developer um. You have to use this number 40.. You will need. I mean i'm going to use like a big brush just like for the end you're going to need some gloves, because you can't just touch the dye because it will stain your hands so get you some gloves, and then this morning i actually went to so hot. I went to sally's hair store and i got the um l'oreal high color highlights and i got the color magenta and i got five packs of it. So i'm gon na go ahead and mix the products together and then show y'all how it looks or how it's supposed to look after you're done mixing it. So so, basically you want to keep on pouring developer until you get it into a nice consistency and then you'll see how it looks whenever it's like more loosened up, and it's not so thick so yeah keep pouring it until you get it like this. Basically, so what i did is i split the hair in half and i tied up the back section and then i split the front section in half again so i'll just work on it by section, so it'll be more easier. So right here i had some pins because, like the wig was moving a little bit too much so i just pinned the lace down on the wig head, so it'll be more sturdy for me. So right here you want to start off with your first half and start dividing it into small sections and get it ready to apply the dye. You want to make sure the dye touches each strand of the hair, because you don't want any black strands left over. After you wash it out so so, basically during this part, i was just making sure i didn't leave any black strands out and i was adding some more dye to the point to the places that was needed. As you see, i got some foil and i wrapped that section up so that it will begin to process. I added some more pins to the back of the lace so that it will stop moving so much so during this part, you want to go back and make sure that you didn't miss any strands and then, if you have to, you can go back and add Some more dye to the parts that you feel like needs more dye. Eventually, i took off the foil and i went in with a shower cap and i let the hair sit inside of it for about 40 to like 45 minutes, and then i washed it out. I left it outside for about like 20 minutes or like 30 minutes until it was completely dry and then i went to go style it. I actually stained the lace while i was dying the hair, but there's a video coming soon on how i got the color out so stay tuned. So basically, i went in with a water spray and i watered down the whole entire wig and i made sure that it was like nice and wet and while it was wet, i actually detangled the whole wig with like a regular brush. I combed the whole thing out make sure it was like nice and detangled, and then i went in with some curling cream from cantu. This is for kids. I couldn't find the one like for regular hair, so i used the one for kids, but it still worked as y'all see and right now, i'm letting it like dry until i get this pattern back. So that's basically all i did to the wig and this other color came out. This is how it looked when it slid i'll show you how it looks whenever it gets like all dried up and stuff, but this is how it looks as of right now so yeah y'all. This is the final look on how the color came out and i am freaking in love with the color but, like i was saying, stay tuned to see how i got the color out. The lace don't forget to like comment and subscribe to my channel and i'll. Be seeing y'all later peace, you
Comments
94gabbygab: Looks great !! Love It
Kimberly Paul: After u color it did u wash the hair then let it dry or after you color it just leave it dry ?
Annie Seward: What colors did you use ? How many boxes?
Janessa Adams:
Video Troll: Spray got 2b glue hair spray on lace before adding color or vasaline so lace won't dye.
Nicole L Saunders: A for effort
Esther Norvil: Pewiod