How I Install And Curled This Pink Roots And Black Ends Frontal Wig Beginner Friendly Tutorial
- Posted on 08 November, 2021
- Color Lace Wig
- By Anonymous
FACEBOOK: Royale Douglas
INTAGRAM: Hairbyroyale.d
HAIR
WIGGIN HAIR 613 24,22,20,18 13X4 FRONAL
WIG MADE BY ME
WHAT I USED
NUDE STOCKING CAP
BOBBI BROWN BRONER
NEEDLE AND THRRAD
BONDHOLD ACTIVE LACE GLUE
SCISSORS
EYEBROW RAISER
91% ALCOHOL
HOT COMB
ELASTIC BAND
MAX STICK
BLOW BRIER
SEBASTIAN HAIRSRAY
GOT 2 B MOUSE
1 1/2 CURLY IRON RED BY KISS
3/10 PENCIL FLAT IRON RED BY KISS
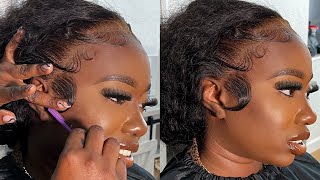
Hi guys welcome back to another video, so today's video i'm going to be showing you guys how i installed um this uni as well as curled it um i'm just going to get right into the things that i use before you know we get started um. I did use this right here. This is a. I think this is a one and a half inch um curler and um it's by red by kiss. I can't tell you guys how much this was. I always say just in my videos, because i really don't remember. I hadn't had it for so long and i think it was a gift as well, so i don't really know how much it was um, but yeah um. The glue that i use to install this is my boho active. I don't know if you guys can see this and i got it from the beautiful store, so it was like 32 um everything else. I did show you guys in the video uh and i will be listing everything else in the description. So if you have any questions you know just let me know or read the description because most of the time it's in the description but um yeah. I hope you guys really do enjoy this video if you guys do enjoy the video don't forget to like and subscribe, and i will see you guys in my next video bye, okay, guys first things. First, i went ahead and took my got to be spray and i just sprayed my hairline just to push back all of the excess hair, and then i went in with my blow dryer just to dry it in place. So all of my hair is pushed back. So when i do my ball cap method, i won't be accidentally cutting off any of my hair because we're both you won't want to do that. Okay, we don't have time to be losing no type of hair. Okay, so um, i'm one of you putting this cap on and baby this cat was small as heck. I'M like girl, did your hair grow or something because this cap took me a minute to put on. But once you get the cap on your head want to go in and cut your little ears out. Okay, because you need it to be flat around your ears and then once i did that i went in with my poppy bronze um and i just went over the front half of my cap just so it will look like a ball head. You can use any makeup of your choice alone as it match your complexion and it gives you the illusion that you don't got no hair because baby ain't, nobody trying to see your braids underneath your wig, the heck so yeah. You want to do that and then once i went ahead and do that you guys know i always put on my stocking cap in the back, because when i cut it off when i cut all the extra cap off, i ain't trying to have no pieces, like Just lifting in the back who got time for that, not the i. So you want to sew it out and i went like pretty much from behind my ear all the way around into the other side of my ear and then once i went ahead and did that i went in with my boho active um i. Finally, we stocked up on my boho active. You know, i ain't been using this for a minute, but i just pretty much took this and went over my hairline. Sometimes i do the got to be spray, but this time i decided just to do boho active and then i just went in with my blow dryer once i smooth the glue in i used like the back of my eyebrow tweezer, and i just pretty much just Smooth the groove um glue in and then i went in with my blow dryer because i have time to be waiting for this to dry. So i just went in with my blow dryer and just dried it up a little bit and then once i finish doing that, i just went ahead and cut off all of that excess cap. Because baby this cap was tight or this cat was tight as heck. So it felt like a relief as soon as i cut the part by my ears baby. I was in heaven i'm like yes, lord, yes, lord, because i don't know if my head got bigger or these cats was like stupid, small, but um ain't. Nobody got time for that, so you just want to cut off all of the excess cap and then, of course, i went in the back and cut um the extra cap that was in the back as well and then, once i finished doing that, i went in With my bowl active again and i just applied um that around my hairline and i went in with my eyebrow eyebrow tweezers again and i just smooth the glue out because bubble, i ran out of popsicle sticks and look so do what you got. Ta do use what you got ta use to smooth this glue out because you don't want it to be thick and cakey. So once that has dried clear, i went ahead and did two more layers. I was thinking about doing four layers, but i'm like i don't know how long i'm gon na keep this wig on. So i just did two more layers and if i decide to keep it on longer, i know how to you know touch it up a little bit, but i just went ahead and three three three layers, because i was blazing it was taking too long to dry And then everybody on top of that, so once you went into your third layer, you want to apply your lace, so i went ahead and applied it. I always apply my lace from the middle and then i work on the size afterwards. So oh yeah right guys, so i'm just making sure this lace is um pushed in into the glue um, and i didn't see like a little small little section over here. That was a lifting, so i just went in with a little bit of glue on the back of my eyebrow tweezers, and i just went in and applied it as well as to the side right here by my ears um. I just you know, put a little bit weighted to a dry, clear and then i just went ahead and tacked that puppy right on down and um yeah - and i just went in with my comb just to you - know, push the lace back into the glue because Yeah, nobody got time for yo. You know your lace to be peeling back, like you know what i'm saying and what i'm doing now is i'm just wrapping a piece of the stocking cap that i cut off off and i'm just put a little alcohol on it and just cleaning my forehead off. Just in case i had any extra glue because sometimes you know you'll be putting too much glue and you have extra glue. So you need to get that off your frame because it will turn black on you and it's not cute. So now you see that it looks white yet so don't walk around like that. That'S not cute! So i went in with my puppy brown bronzer and i'm just blending this lace right into my skin, because the other side is about as she is. I don't know what and that ain't cute you have, you really be walking around thinking, y'all laid and slayed, but you're, not blending that lace baby blend that lace, okay, i'll give it in what color you is that lace need to match your complexion so blend it. You got ta use the makeup concealer, i don't care blended, okay blend it blend, it blend it, but now i'm just going in here and um fixing. My part, i didn't want a semi deep side, part. It was kind of a little difficult to practice because i could not see my part good because it's just not was not doing it um. So before i go ahead and adjust my part and make my part look natural, i'm just going to go ahead and pull out any hair that i'm be leaving out for my baby years at first, i was just going to be doing baby hair on one side, But i was like nah cause your hair mine, you're, not blowing away, and nobody got time for not having baby hair on both sides and making them look. You know, even so, i went ahead and grabbed the hair on the other side as well, and i just pretty much twisted it underneath my chin. So you know it won't slide back when i'm um pressing this baby out. So what i'm doing now is i'm just going to pull my hair up into a ponytail, and i went ahead back in with my bobby pin bronzer and i went behind the hair. That'S you know, i'm be leaving off my baby hairs because it was still white and i just like look. We needed to be blended in okay and then i went in the back. You know i saw my wigs down because i like my weeks to feel, like you know, a sewing install, so i like it to be snug and tie down because baby ain't, nobody snitching my wig off and not about to happen. So so i like my own wigs to be tucked down, because i don't like my jacket to be flopping in the wind in the back. It'S just to me. It'S just not cute and then beyond me my nick little hairs in the backyard. It'S just because these braids is old, but anyways i'm going in, and i want to be applying my um sebastian hairspray around my hairline and then i just took my elastic band and i just tied that down. I pretty much left my elasti being on for about 15 minutes um. While i went ahead - and you know touched up my part and everything like that, so what you see me doing now is i'm just taking my wax stick and i'm just going over my hairline and i'm going to be taking my hot damn my daughter. She wanted to say hi to you guys, but i'm just pick taking my hot comb and i'm just pressing on my hair baby um, because i feel like this is the best method. If you want to get rid of all of your flyaways and stuff like that. So that's what i'm doing and then um, i kind of just pressed it out where the part is going to be at and then i went ahead with my comb and just you know made the part look a little better, okay guys. So, after about 15 minutes, i went ahead and took my elastic band off and then yeah we're going to touch up. This part like i said because baby it is not hot okay, so i did one like a curved side deep side part. So that's what i'm doing now, i'm just trying to make sure that none of my tracks is showing in the back and then i went in with my wax stick and then i also went in with my bobby brown bronzer and i just went over my part Because it was looking real ashy and, like i said, i want everything to look like scalp, so i just went with my brown bronzer and i just went over my part because you do not want no white part. Your scalp is not white. It'S like a pinkish, brownish, color um and then i'm just tripping up my baby hairs and stuff like that and pressing out the rest of the hair that i applied. The wax stick to i'm just pressing that out so it's flat and i can get rid of all of those flyaways. You know if you got flyaways, you need to slick the babies down because ain't nobody got time for that, so guys. I went ahead and tried this method, because the girl that i seen that did this color. This is how she did her baby hair. So i'm like, let me try it out and see if i even like it. So i took my small little flat irons and i just curled uh. My baby hair is going upward. I don't know who came up with this method, but it is a little weird, but i guess they supposed to give you the curl and you just pretty much push the curl down. I guess so that's what i'm doing, i'm just applying my got to be moose and i'm just going to try to curl these boys over well swoop these boys over um, like i would typically do it. When i do my videos, i typically don't curl them, but i say: hey with the hair imma try this out and see. If i even like it and honestly i didn't dislike it um. I really didn't find it no different than when i how i normally do it, probably because i've already mastered the way i do it. So i don't know i didn't really find it no big of a difference but to each on so yeah. I'M just making sure these baby hairs is the way i want them to be, and once i get them the way i want them to be i'm just about to go ahead, and i think i went back in and pressed my hair out a little bit more And i fixed up my part um, but i think i might have did it off camera but right now, i'm just about to cut my hair because right now it's a little too long and i think i cut about like six and a half inches off on Both sides um and then i also went in and um, touched up the back a little bit because in the middle it was just like a tad bit longer than what i wanted it to be. So i went ahead and did that as well. Okay, guys! So once i went ahead and finished touching up the back, i'm just pressing on my hair again, because you know i like my junk to be sleek. Okay, i don't want to add no type of flyaways at all whatsoever. So once i finished doing that, i just went in again with my shebaskin hairspray and i just sprayed my hairline as well as the part area, and i just took two black strips tied them together and then tied up my baby hairs just so um. They can be flat a little bit and i just cut off the extra little pieces of black strips and then i just went in and um section my hair to get ready to curl. But before i do that, i'm gon na take a little bit of heat. Protectant and just put it all over my hair, just you know, for heat as well as to give my hair a little bit of shine, because it was looking a little dull y'all. I know i like my hair to look sleek and you know put together so yeah and um. Now i'm just going to move my hair out the way and clip that away and then get ready to start curling. So i am using my curlers, the one inch barrel um and i'm going to curl away from my face. I always tell you: this is the best way to curl when you want body, and you want like a feather look. You always want to curl away from your face and you want to make sure you get them. Curled them ends curled, okay. They should wrap all the way around. You do not want to leave your ends straight because when i tell you it's gon na look ugly and it's not gon na have body also guys do not comb your curls out until you're completely done curling your entire head. I promise your curls will last so much longer and they will have more body if you let them sit. Do not - and i repeat, do not try to comb your curls out until you're completely finished curling your entire head and, like i said, remember, you always want to curl away from your face. So right now i'm working on the left side of my head and i'm going to be curling away from my face on this side and then, when i get to the right side of my head, i'm also going to be curling away from my face, and this Is what's going to give you that feathered body look okay and um yeah, i'm just going to show you guys how i did it. I didn't show you guys how i curled every single piece of hair, but i did try to show you guys how i um curled the majority of my head, so you guys can get the gift on how i styled it and everything like that. Okay guys. So i did want to show you guys how i curl my bang area. So, as you guys can see, i took the curl upward and i just curled it going back away from my face because when it fall, it's going to fall with height as well as a lot of body. It'S going to be very, very feathery and that's what i'm looking for so once i got it curled all the way over and i got the ends tucked i held it for a little bit and just let the curl heat up and then once i remove the Curler, i just let it sit there for a second before i let the curl go and you can see how much body it has already and i haven't even combed the curler yet so i just wanted to show you guys how i did the other side. I just showed you guys a few curls on this side, um, so yeah um. You want to make sure you curl away from your face and see how i'm curling going away from my face. On the other side, you always want to curl away from your face. No matter what side you're working on, i promise you. This is what's going to give you a lot of body. My curls always have a lot of body because for one i always curl away from my face and for two i don't come to curl out now with this curl i kind of messed up, because i let the ends go before i curled all the way. Over and that made my ends straight, you do not want that. Okay, you want your ends to be completely curled over. So, as you guys can see when i did it again, i made sure that i held my ears all the way and, as you guys can see it's not as curled over as i want it. But it's curled enough to when i comb these curls out. It'S going to have body as long as your curls is not at the ends. It'S not straight, then you're good, a lot of times when you cut your hair, and you have that blunt end. It'S so easy to have that face up where you see people when they have it straight at the ends. I think that's the ugliest thing i've ever seen and i hate it and i just feel like it's not going to give you as much body when you keep them straight. Okay, so, as you guys can see you see my ends, they are completely curled. This is what you want if you want your hair to have a ton of body um, i do not like fish hooks at all, so yeah, i'm just going to finish, showing you guys how i do this. Like i said, i didn't show you guys how i curl this entire section over here, because it kind of gets. You know repetitive me saying the same thing over and over again so um yeah, i'm just going to let you guys watch yeah and i hope these guys. I hope it helps um yeah, i'm just working on these last two sections and i'm just going to let you guys watch how i do this do do okay guys! So once i finished curling, i went ahead and removed the black strips and instead of combing the curls out, i just um pretty much can't break them out with my fingers, and this is pretty much the end result. If you guys didn't see how i got, this color definitely go check out my last video on part, one of how i turned my lavender wig into this beautiful pink root with black ends, um yeah. So i hope this video was super super helpful. I hope you guys um learned something from this video um, definitely on how to curl people really really love my curls and um yeah. This is how i pretty much get them done so yeah. I hope you guys really did enjoy this video if you guys did enjoy the video don't forget to like and subscribe.

Comments
mylen shillingford: What dye did you use because I was going to get dusty rose by KISS titanium dye but it looks too light
kyoung im: I wont burn my nect with my curling iron anymore thank you
Bonnie: Who is the hair vendor for the hair?
Bonnie: There is nothing in the description box