How To Ash Blonde + Dark Roots On 613 Hair Tutorial Ll Beginner Friendly *No Stained Lace*
- Posted on 25 September, 2020
- Color Lace Wig
- By Anonymous
Hey Chrissy Crew!
Welcome back to my channel. Hope You Enjoy This!
---------------------------------------------------------------------------------------------------
SOCIAL MEDIA
Instagram: lulmammaa
Instagram Business Page:TemptedTouchCollection
Twitter: thrillestC
Snapchat: lulmammaa305
-----------------------------------------------------------------------------------------------------
ONLY Business Inquiries: [email protected]
-----------------------------------------------------------------------------------------------------
**I do not own the rights to any of the background music being played in this video. The background music is for entertainment purposes only**
-----------------------------------------------------------------------------------------------------
Thanks for Watching! See yall next time.
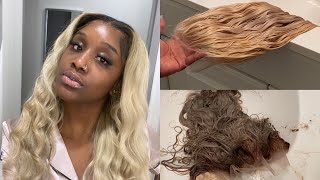
What'S up crazy crew? Welcome back to my channel today i'll be showing you guys how to achieve this ash blonde color with some dark roots that i did for one of my clients, so one thing that you absolutely will need is 6 13 hair um. This is a frontal wig that my client provided to me at the top of my head right now. I can't remember where she got it from, but after i'm done editing this video i'll make sure i find out and put it in the description for y'all. So i use box dye to achieve the color and the roots. This is all the colors that you will need, and maybe some twix, if you want chocolate like me, but so for the roots, we're going to take the revlon 57 and that's going to be the darkest color that we're gon na use. I didn't want it to be too light. I didn't want it to be too dark, because that's what my client wanted me to do. So i chose that color now we're gon na take the color and put it inside the developer. That comes with the box and then, after that, we're gon na close it and shake it up, and then, after that, we're gon na put it into my mixing bowl, because i rather put it in the mixing bowl. I don't know, if that's just me personally, then we're gon na mix it up a little bit, then we're going to start doing the roots. So what you're going to need is you're going to take a fine-tooth comb. I love using a fine tube comb for roots because it's like it just never gets on the roots. Like i guarantee you will not get on the roots, don't be rough with it, but it i promise you it will not get on the roots. So what you're gon na do is you're gon na section off the frontal part of the way, because that's really the only part that we really need to color the roots, because you know the back is bundled so you're not going to really see it, because you Can'T lift it up but yeah. So first you're going to section that off so after sectioning everything off you're going to pick what side you want to start on and you're going to section off the first piece that you're gon na do the roots on after that. You'Re gon na take the fine tooth comb and you're gon na dip it inside the die and with me i didn't want the roots to go so far out. So i was bit i wasn't doing it um so far down the piece. Just you know at the top, i didn't want it to be so you know you know what i mean like. I showed y'all in my first video, my first coloring video. What you want to do is take the color and put it at the bottom of the next section before you actually part it. So it could be a little bit easier for you and, as you can see right now, the color is really light, but, as time goes by, it's going to start getting darker you'll see in a little bit bye. As you can see with time, the dye did start getting darker, so i went ahead and did this exact same thing on the other side, so after leaving that color on for about 25 to 30 minutes, i washed it out, and this is how the roots were. Looking so far, so i went ahead and blow dried the hair out, and this is what it's looking like now, i'm going to start on toning the ends, so i took the colors 71 and 60.. I had two boxes of 71 and two boxes 60 and i went ahead and mixed both of the colors inside my mixing bowl. So first you're gon na want to section off the hair me. This part is, i don't know like i'm real messy with it, because it's like, i know how to distribute the color throughout the hair. But if it's your first time, i suggest you take your time, but also not to be slow with it, because if you want to get the exact same color that i got, then you don't really want to leave it on for that long, because i didn't want It to get too dark, but really all i do is just use my hands instead of using a brush, because i feel like the brush takes a little bit longer. You know we're on a time limit here, so i was just using my hands and distributing through as much hair as possible. Really, i would just look for like a blonde piece in every section and just put the dye on it. You know just to distribute it as much as you can so so so so when you get to the top part, what you want to do is you want to section out the frontal again so it'll be easier and you won't really mess up the um roots. That you already did, i would i would just i was just able to eye it, so i didn't really have to do that, but i suggest that's what you do so it could be easier. Oh after finishing um, with most of the head. All i did was just go back in with the rest of the dye and just find some spots like that spot right there. That needs some more dye and if it's still blonde, i just put it on there. So after i was done with that, i washed the dye out with shampoo and conditioner, and i let it air dry overnight. So here we are the next day, and this is how the color turned out. I was so so so happy with how it turned out. It was just perfect, i loved it, and i actually want to try it on myself, but this is what it's looking like blow dry, not blow dry air dried. I went ahead and did a half a pat down style on it just to take pictures, and you know just make it look cute, i'm so happy with how it turned out and my client loved it just as much. This is the end of the video. I just want to thank you all for watching and supporting me please, like comment and subscribe. I hope this helped. You guys a lot see you guys in my next video

Comments
india bradley: I love this best tutorial on this look I’ve ever seen ! Doing this for Christmas ❤️
Abigail N: This is the most perfect blonde tutorial I’ve seen I feel like I’ve watched all of them
Coco FR ✨: Products used- Revlon in 57 for roots and 2 boxes of 60 and 71 for hair
Amaka Emili: I loved this well done
A Purposeful Pursuit: Girl I hit the thumbs up as soon as you said section off the front you don’t need to do the back!!! just saved me a rack of time and stress!!
TheLoveableBritBrat: This is exactly how I want my hair ima try this my self !! I hope it comes out correct.. thank you
Jos Colon: This such a perfect blonde def trying this out
Nikia Bryant: Very talented, good job!!
Porsha X: This is exactly how I want my birthday hair to look just ordered my hair
arielleb77: Omggg it’s perfect, I’m gunna attempt this next week. Ima try and copy this video exactly, wish me luck
London x: This turned out so good
Angel Faith: Honestly best Ash blonde unit I’ve seen!!
Gloria Mills: Trying this today :') my birthday is this weekend, let's see how this goes
Kimberly Duckett: I been trying to find videos on how to do this specific color and this root. And everybody else videos they hair was coming out like too silverish after they toned it and finally I found a perfect video where they hair came out the exact color I wanted mine. I’m gonna try this as soon as my hair get here. Thank you
Destinyy Marilynn: How many minutes did you let the ash blonde dye sit in for?
Dreka Nicole: This is so pretty !! Did you wash it out with the purple shampoo or ?
Jazmyn Bouchey: How much do you charge for wig customizations?? I need this
Debs Maeva: Hey , did you mix the 60 and 71 together in one bowl ? Xx
Therealboujiebaby: Where can I purchase the exact unit that's used in the video
Johnae Roussell: Did you tone the hair before?
Aut1x: Super pretty
Shay and Daedae: So cuteee
Tyarah Delaney: How do I tone the knots?
TaylorTimeTv: Did you time with purple shampoo first or no?
Steph Warren: How long did you leave the ash blonde dye for ?
Tamika W: Is there a reason why you didn’t blow dry it? Like was it going to change the color? I’m trying to make sure I don’t turn my wig into that silvery blonde.
cakesglitterati: I would love for you to color my unit!!!!
Danasia S.: What company is this hair from.. It looks nice
Nikki Soto: What shampoo and conditioner do you recommend??
Cece: So you mixed box 60 and 71 together in the bowl right lol ? Love dis color !
Faith Udom: do you know where your client got the wig from?
Hazel Kaliati: Hey what is the density of the hair?
Mariah Henriques: How long did you leave the dye on after the roots you killed this btw
Queencess Gueye: Hello! I need help pleaseeee.!! I use the tintation honey brown for the roots, after washed out with purple shampoo it turned purple. How to remove the purple please… HELP. Thank you.
Mz Gemmy: Babyyy! Love it! I do hair reviews also check mine out ! New subbie love it !
Debbie Amosun: Hi hun, did you bleach the knots
Octavia Gadson: Where is the unit from?
Toodope Hair: Bomb
Courtney Trent: When you washed it out, did you use a purple shampoo or just a regular one??
brittany west:
Miami West: thank god i found this video before my birthdaaay
wt Paradise: shit fye. finna do my lil bob next
Ornella Kalusevi: Hello, What is in link of the wig please
Asia Nicole: Where did you get this wig ??
Sarah Lee: Where is the wig from
Monique Grant: Now long did u leave it on
Brittany Hammons: Where did she get the unit from
Amari Marie: How much do you charge to make wigs
Samantha: Where is this wig from ??
angel walker: What toner color was used
Lisa Kibalama: Where is the Hair from ?
S Grant: Where did she get he hair from hun
Janae Elizabeth: Where is the hair from
Monique Grant: U so rawww