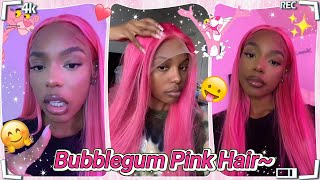
Recreating Nicki Minaj Pink Ombré Wig ||Step By Step Beginner Friendly | Nellyslays
- Posted on 13 November, 2020
- Color Lace Wig
- By Anonymous
Thank you for watching Slay Nation, My next video will be an install video of this look, it will be posted this Sunday ❤️. If you will like me to recreate more looks, DM a picture of a celebrity look to me on IG and i will get to it. Don’t forget to Slay All Day!!
You can achieve Nicki’s Pink ombré look with the color below.
Color: KISS Tintation - Pink Petal
Toner: Shimmer Lights Conditioner - blonde & sliver
Bundles: www.L2Icollections.com
Sharing this video would mean a lot to me.
Kindle like, comment, and subscribe.
Don’t forget to turn on your notifications.
FOLLOW ME:
INSTAGRAM:
- Personal: https://www.instagram.com/5x_nelly/
- Wigs: https://www.instagram.com/laid2impress...
Business Inquiries: [email protected]
*DISCLAIMER: I DO NOT OWN ANY RIGHTS TO THIS MUSIC*
Music: Pancakes
Musician: Jeff Kaale
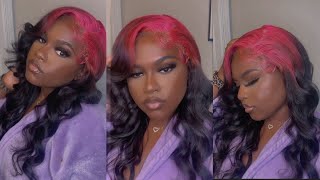
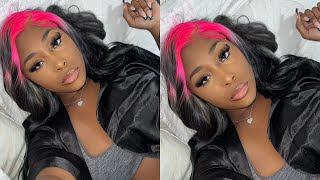
Hello, slay nation - i hope you guys are excited as i am as we recreate this nicki minaj pink ombre. Look today: okay, you're going to need the color pink petal by kiss colors temptation and a bow with a brush. I'M also going to use in that little brush. It looks like mascara to help me apply along the edges so that i do not tint the lace right now guys. I don't know why i parted down the middle, but you don't really need to because you're coloring the entire frontal, with the pink color in an ombre motion. I started off by testing the color first, so i put a little bit in the front and then i used a towel to wipe it off just to see what it was going to look like after i washed it, and it was perfect for me. It wasn't going to turn out to be such a ridiculously bright color as it looked like on the brush. So now i'm going to actually begin and color the wig, because i like what the end results are going to look like guys. I don't know who told me to start this coloring process without sectioning the hair um, but it's definitely a necessity, as you can see, it's not working out for me alright. So i grabbed my handy dandy comb. I'M going to start off by sectioning off little little pieces of the hair and holding the rest back. So it gets out of my way so you're going to section little by little and you're, going to saturate the hair that you are sectioning off very, very well. You'Re going to get to the roots as close as possible, using the little mascara looking brush to give it a more natural. Looking look so you don't want to have a harsh line by the roots and you don't want to have a harsh line towards the end of where you're putting the color as well um guys. I was literally putting such a small layer of color at first. I'M not so sure why i guess i was still really really scared as to how bright this color was going to come out. So i wasn't putting a deep layer of color. I wasn't really saturating the hair too much just because you know this is a vibrant color. So, no matter what it's going to show, the pink is going to show. I don't have to over saturate it and you'll, just as you guys saw, the results came out. So just keep watching. This is exactly how colored their entire wig. Eventually, i ended up switching from the little mascara brush to an actual color applicator brush, as you guys can see, it's a lot easier for me to apply the hair color with the applicator brush and it's a lot faster too, but with the applicator brush, i'm actually Working with a different method, since it's not like the mascara brush, where it literally can um feather the top for me without me having to do the work, i have to feather the top myself so that it gives it that natural look, as you can see, with The applicator brush, if you're using it on the flat end, you are going to get those harsh lines right at the roots of the hair. So you do have to feather it like i'm doing right now to get the very nice defined natural look on your roots, and you have to do it at the end of where you want your color to stop as well. You have to do it from the roots, and you have to do it at the end of where you want your color to stop just so just like that, just so that you see how it ended at the end right there guys, and it's that harsh line. I'M feathering the ends so that the line doesn't remain harsh so that, once i'm done once i rinse out the color, it doesn't just look like it went from pink to blonde. That'S not what you want. You want it to go from pink to a lighter, pink or feathery, looking pink to blonde so that it's transitioning very, very smoothly. That'S what you want guys, so i'm going to continue with this technique for the entire frontal, and once i finish with the front, so i'm going to come back and explain to you guys what i'm doing with the back of the wig and how i'm coloring it And why i chose to color it that way as well, so guys since i have shorter bundles, i don't have as much room to play with the pink color as nikki did on the wig she had on in the picture. So if you do have some longer bundles, you could actually bring the color down a little more just so that it gives you a better illusion of the color that she had in her video. It gives you it. You know it gives you as close as possible to the look that she actually had but um. If i really wanted to, i could have put some strips on the frontal entirely pink, instead of just doing the roots of the frontal pink. But i didn't want to do that guys, because i do have other plans for this wig as well, and i do i'm not going to tell you guys, but i do have other plans for this wig as well other than just the pink so be on the Lookout for the next concoction, i end up cooking up this wig. Okay, do now that we've finished, applying the pink onto the frontal of the wig, we're going to move on to the back, i'm only going to apply the pink on two of the tracks in the back, and mainly just on the roots. Basically, the exact same thing that you did on the frontal you're going to apply it right on the roots, but instead of feathering the roots you're going to saturate the roots, because these are tracks and not lace. Okay, so that you want it to actually look good because you're going to lay you're going to cover that anyway guys. But you still don't want it to look too blonde, make sure you also get the hair under lift up the track and get that hair under and then you're gon na um push that up a little bit and work on the second track. I'M only doing two tracks guys you can do a lot more if you want to, but i'm only doing two next, i'm going to in the middle of the wig and i'm going to take out one track and just put some color onto the ends of those Tracks um, if you guys paid attention in that little short clip that she blessed us with on instagram. She had some more pink almost towards like the end of her wig like an ombre effect dish. So that's what i'm doing right now and it's just adding a little bit of pink in the middle of the wig, so that it gives me more of an ombre effect. I only did this on about two tracks of the wig. I did that on that middle track, and i did that. I believe i also did that on like two tracks above it after that, i honestly just started picking up little blonde pieces and throwing pink on them on the ends. Just to add a lot more, you know um pink onto the hair, just so it's not too blonde, and it's not just sitting there blonde and in the front as well on the front toe. I went back as well and i just added really really um scanty pieces of pink on there just to just to highlight this is the second track i was talking about. This is actually the second track that i'm going to go ahead and put it um. The pink ombre on the entire row at the bottom - this is about the third track from the bottom. I believe it is so i went in and i added more ombre. I actually wish i made this entire track entirely pink from the roots to the ends, but it's okay guys. I still love how the end results were. So i actually went back in with my brush to add a little more pink to the roots of the frontal. Just because, if you guys remember, i didn't saturate too much but yeah, i'm going back in now, so i'm gon na let this sit for about 10 minutes and after that, i'm going to go ahead and um rinse out the color and come and show you guys. What'S next after the color is applied, there's more yes, alright, guys! So now we're going to tone the wig down a little bit. This is the end result of what the um color came out to be before i toned it um it's not that bright honestly, but it is still a little bright. I wanted it to be a little duller so and especially with the blonde as well. The blonde is a little bit too yellow for me. So what i'm going to do now guys is i'm going to tone the wig. Please don't ask me why i didn't tone the wig before um, but i'm toning, the wig now, because i also want to tone down the pink as well. So this is the little method that i came up with. Um is toning after i color, because then it brings the color of that you have on your wig down as well, so i just put in some shimmer lights conditioner and i'm going to just dip the hair in there little by little and then just boom. Just soak the baby in there because guys there's no reason to why are you playing around soak the hair in there? I'M just soaking her in and playing around in there making sure every single part of the wig gets wet um and you guys are gon na see it's gon na look a lot less brassy than it did before. The pink is gon na. Look a lot lighter. It'S gon na look a little more like a really light: fluffy cotton, candy pink, which is what i really wanted. Um so yeah, i'm adding a little more uh shimmer lights, just because the roots did take exactly how i wanted to and they sucked up all the um all the toner. So now i'm getting the middle as well, because it didn't catch the toner as much as the roots and then i'm just gon na go back and dip the rest of the wig in there. So that's all i did for this wig guys. After that, i went and rinsed off the toner from the hair and let my wig air dry and i'm going to show you guys. The final results all right nation, so that is the final results of the wig. Thank you for watching make sure you like comment and subscribe and i'll see you guys in the next video where i installed this beauty bye. It'S the can't do buying all the bottles what you trying to do supposed to be shining, but she noticed that my chainsaw
Comments
Orly Tsamezeu: Wow this was so informational I love it
Je Rell: Thank you for this. I’ve been wanting to recreate this
Sham Vas: why wouldn't this get more views not im scared to buy a nicki minaj inspired wig thats this same nature
Isiah Phoenix: literally the same. thank you
Yasmina Adamo desouza:
Kimmia Malani: yess, where is the hair from because i’m trying to find a 613 frontal