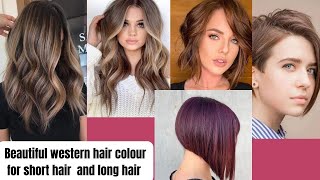
The Perfect Ginger Hair Color For Darkskin | 613 Blonde To Ginger Wig Transformation + Install
- Posted on 03 August, 2021
- Color Lace Wig
- By Anonymous
Hey Lovees✨
I wanna give a huge WELCOME to all my new subscribers!! Thank you so so much for all your love & Support❤️ Sending Love to you all & Stay Blessed!
Last Video: https://youtu.be/uU2r6_3gReU
Recommendations: https://youtube.com/playlist?list=PLLp...
P R O D U C T S:
Loyom Hair: 613 Blonde Lace Front https://www.amazon.com/gp/aw/d/B091HTJ...
5 In 1 Curling Wand Set: https://www.amazon.com/Curling-Ohuhu-I...
Channel Update:
Current Subscribers- 1,723
Subscriber Goal- 13,000
E D I T:
iMovie
A B O U T M E
Name: O(Liv)ia
Age: 21
Zodiac: Libra
Height: 5'6
Liberian Geh
Philly✈️ to Iowa
Iowa State ‘22
L E T's B E F R I E N D S
:: https://www.instagram.com/libby.o/
TikTok:: https://vm.tiktok.com/ZMJpueA59/
:: https://www.snapchat.com/add/libby.o16...
Business Email: [email protected]
Be(YOU)tiful & LoveYourself❤️
#Adoredye, #Gingerhairfordarkskin, #Dyingmyhairginger #Makeupforwoc #MakeupforGingers, college girl on a budget, college student vlog, black girl tag, black girl makeup, baddie makeup, baddie diy, Instagram baddie, box braids, natural hair, 4C hair, how to dress like a baddie, how to do your makeup like a baddie, how to be a baddie, cute baddie hairstyles, girl talk video, best advice video, must-watch video, fun YouTube channel video, beginner makeup, brown skin makeup, black girl YouTube, big sister advice, best girl talk video, how to be a teen, cute clothing hauls, black girl college life, everyday makeup look, let's be best friends, best curly hair review, synthetic wig, weekend vlog, travel vlog, how to be an Instagram baddie, how to have confidence, #GRWM #GirlTalk #Toxicrelationships #Trolls
**I do not own any of the music played. NO Copyright intended.
Yes, hi loves, i'm back again for another video and i'll be turning this 613 body wave wig into a ginger wig. So, let's get right into it, i'll be using the adore dies today in cinnamon, cajun, spice and french cognac i'll be mixing the dies together in this mixing bowl with this brush, that's used for dyeing and bleaching hair. First, i'm going to go in with the cinnamon, which is the darkest one and i'm just going to empty the whole bottle of this into the bowl. While i'm doing that, we can talk a little bit about the hair. This is a 13 by 14 lace, front. Wig this also comes pre-plucked and it's 18 inches. This wig also has 150 percent density. Next, i'm going to go in with cajun spice and we're just going to empty this in the same bowl. Now i don't believe i showed myself emptying the french cognac into the bowl, but i did use about a teaspoon amount into the bowl. I didn't want the hair to be too orange and i felt like cajun spice was already orange enough for the hair. So i just went in with about a teaspoon amount of french cognac, and once you're done, you can stir everything together and make sure that it's nice and mixed, so you might need a bigger bowl for this. It looked like it was about to overflow. It was like right at the brim where it might tip over, and then you may also want to use more french cognac. If you want a more orange look or you may want to add a little bit more cajun, spice or cinnamon, because some of my roots were a little lighter than the rest of the hair. I didn't care too much because a lot of it was in the back and you couldn't really see it, but if you want to get them roots and make sure that you're really dyeing them, then you want to add more now, i'm just separating the hair. Getting small sections that i can dye - and this is a very, very important step before dyeing the hair - make sure that you spray at least two three layers of got to be free spray or some type of freeze spray on the lace so that you do not Dye your lace and you can put the first layer on blow dry it and then on and on and on, but make sure that you're putting some type of protectant on your lace. Now i'm just going in with my brush and applying the dye to the hair, making sure that i'm getting the roots. I applied a generous amount of the dye onto the hair and then i use my fingers to massage the dye in and next you'll see me go in with a comb and just comb the dye through, and also try to get some of that dye onto the Roots of the hair, so as you comb through the hair with the dye on it, excess dye will come off and stick on the comb, especially if you're using a smaller comb. And then you can use that access dye to apply it to the roots, so that you're not over using the dye, because really this was not enough. That'S why i said you might want to add a little bit more cinnamon or cajun spice. So that way, you won't have to stretch your dye as much, but this way also help me avoid dyeing my lace or getting any dye on the lace. Yes, we sprayed it, but we still want to be careful. So once you're done that section you can move on to the next section. So once i got to the front of the lace, i divide it into three smaller sections to really focus on it. I use light light strokes because, like i said you really don't want to end up dyeing your lace, especially in the front, so i use light strokes and then i divide it into three sections, so it could be easier. So i can literally see where i'm applying the dye and by combing through the hair you'll have to apply less dye onto the actual roots, because the access dye in the comb will already touch up the roots for you. So this is what i'm doing here. Just making sure that i really got the dye in and any parts that are still blonde, i'm just going back in and touching it up. As you can see, there was a huge section where there was like a blonde there, so i'm just touching it up. Do you guys see how good this lace look do y'all see that? Do you see that i saw this and i was like oh my gosh, it looks so good and when they said pre-plug they meant pre-plug. I feel like because it was pre-plugged. I really didn't have to do much with the wig and i really loved that so after dyeing the hair and getting as close to the roots as possible, i went in with any excess dye and just massage the dye into the roots with my hands. I didn't want it to look ombre and have lighter roots than the rest of the hair. I want it all to be one color, so i just went in and touched up. The area, especially the middle area, was, is where i realized. I was running at a die, so i really try to focus on that area when i was going in with the die. This is how it looks after i finished dyeing it now. You want to put it in a plastic bag and let it sit for an hour once you're done. You can shampoo and condition or just condition, if that's what you prefer, and this is how it looks once it's done being washed and everything, and now i'm going to show you guys how i blow dry this here as it starts to dry. You start to see more of this gingery color. It doesn't look like brown anymore, it looks so good. It looks so vibrant and i really started to fall in love with it. Once i saw the color coming through, you absolutely do not have to blow dry this hair, it's actually better for you to air dry it, but i never really dyed hair before so. I wanted to blow dry it to see the real color and see whether i want to change it or dye it again or do something else with it. So that's why i decided to blow dry it and it also sheds a lot. The hair did shed a lot. That'S the only con of this here is the shedding and now i'm about to apply the hair. So first things first, i'm going to use this edge booster edge control to push back my edges before gluing down my wig. Now i want to apologize in advance for constantly looking at the side. I didn't have a mirror to look at, so i'm just continuously looking at the side, because that's where my mirror is - and i'm just applying more of the edge control, making sure that my edges are really slick back. I don't want them to get caught in the glue, because it's not fun picking out glue out to edges, i'm applying my cap now and these caps were way too small for our head. I think i ended up applying two caps, because this cap was just not big enough for my head, so definitely get a bigger cap. But now i'm cutting out holes for my ears and making sure that the cap fits perfectly around my head once we're done that. I'M gon na go in my got to be free spray and i'm just gon na spray. A generous amount of this on my hairline, making sure that i'm a little bit above my um hairline, but also that i'm right on it, so that it glues down the lace and nothing is revealing. Next, you want to blow dry until it's completely dry, continue to test it with your finger to make sure that it's nice and dry, and not still tacky or sticky, excuse my chewing, but now we're going in with our foundation or um foundation powder. Whatever you use to take your cap, and then you apply that all over your cap, as you can see, i applied the second cap because the first one just wasn't doing it. The sides lifted up. It was just way too small and i'm going in with my bold hold glue and applying about two to three layers trying to avoid the hair. That'S sticking out - and this is how i know that getting glue on your hair hurts and it takes a long time to get it out so make sure that you avoid having a cap. That'S too small or getting any type of glue on your hair and here's. How the wig looks um we're going to tint it, so i created this tint at home. It'S a diy! If you want to see in depth video, please let me know, but this tint was perfect for my skin tone and now you're just going to spray it all over your lace and then blow dry it. Now, i'm just going to cut off the excess lace in the back of the wig and then i'm going to apply the wig. Now you want to wait until the glue is clear for a better application, but i was in a rush. So that's why i just threw it on here now: i'm just combing the hair back to make sure none of the hairs are getting in the way or gluing in the wrong way. So you just want to comb. It back make sure all the hair is out of the way and then i'm going to blow dry it while still combing it backwards, so that the glue can dry, because, obviously i didn't wait for it to fully dry. So you just want to continue to blow dry and comb it back. Now, i'm just gon na fit the wig to my head by cutting out the ears area so that it goes perfectly around my ears um. So that's what i'm doing here, i'm just cutting that extra piece off so that it fits perfectly on my head once you're done fitting it to your head. You want to comb through it to get rid of any excess hair, and now i'm just parting. My middle part, of course i had to look in the mirror for this, so i'm looking sideways to do this, but once you have your middle part in it's to your lightning or your side, part whatever you like girl, you just want to comb through a little Bit and get rid of any of the axes here there was a lot of excess hair from cutting that one section so yeah this it might just have been the shedding, but i really don't know - and now i'm just parting, where i want to put edges. I wanted like minimum edges. I don't want to do the most, so i went for two on each sides. I took out my first edges um about an inch away from my part. Just to give you guys an idea of what i was doing here and then i took out my sideburns um any type of way. I didn't really measure that part, but i really wanted my edges to be close to the part, so you can still see if i had like loose curls or spiral curls or whatever, but you can definitely do this after you do this step, which is applying the Band to your lace, to make sure that your lace is nice and melted, but i just want to do it because it was easier for me, and it also gives me an idea of where i want to apply my edges at so. This is after i took off the band and i did my edges my little soups. As you can see, i did two swoops on each side, nice and cute, and i'm applying some lotta body mousse to my hair, so that i can flatten the hair with my hot comb. Do you guys see this? This looks so good, as you can see, on the top of the edges or by the root of the edges. You it's kind of a little lighter than you know, the ginger of the rest of the hair. Only on this side it kind of looked good. I don't know um. I had like mixed feelings about it, but i didn't really care after i applied the hair and i saw how nice it came out, but yeah, i'm just flattening the hair going all through the hair, making sure that it's nice and flat you're on no mountain or Yeah just to define our part, i'm using my um comb. I forgot what this comb is called. I just can't think about it. I apply some concealer on the comb and then i just slid it right down the middle, where i parted my hair, just to define my part a little bit to make it look nice and perfect um, but yeah. That'S all! I really did, and here i'm just going through the hair again with my flat iron. You can see the area where, like it's a little bit, lighter um like i said i didn't care that much but then again i had kind of had mixed feelings about it. I probably should have went in for a little bit of dye. It looked good at the end. That'S the only reason why i didn't care about it, but mixed feelings, mixed feelings, and now i'm going in with my curling iron and i'm curling this hair. If you guys want the link to this curling iron i'll put in the description box below but um, it comes with five or four heads. I believe it's five heads like a wand, curl two curling irons and then like two other one, one curls. I don't know if they're wine curls but like a smaller one and then a medium one. I put everything, but it's so perfect. It gets super hot super great for if you're going on, vacation or traveling, but yeah, i'm just gon na curl it and then i'm gon na put them in some flexi rods. Fyi, the curling iron is not sponsored, i'm not getting paid to promote it and i bought it with my own money just to let you guys know. I just think it's really nice really good and wanted to put y'all on. So if you guys want to purchase that i'll have in description box below and yeah, i'm basically just gon na do the same thing. Over and over again, i'm gon na curl the hair put some flexi rods in curl. The hair put some flexi rods in now. All the flexi rods were not the same size, so what i did is i tried to match it on the opposite side. So, like i use, yellow in the front, i'm gon na use yellow in the front. On the other side, i use orange for the second one, so i'm gon na use orange for the second one, the other side. So i tried to do that and for this curl i know a lot of people struggle this, so you can curl it the way it flows which is forward, but once you're done curling it you want to pull it backwards to get the same exact flow as The other curl, so you see how the other curl curled you know backwards. You just pull it out to curl it backwards. I hope this is making sense, because you know sometimes one curl is curled forward and the other one is curled backwards. So to get the right curl, you just pull it backwards, instead of pulling it out forward. I hope that makes sense because it could really help people if you know what i'm talking about, but yeah, i'm just going to continue curling my hair and go in with matching um flexi rods. That'S it that's all! So after i'm done curling my hair, i'm putting my flexi rods in i'm gon na go. Do my makeup. That'S part of the reason why i put the flexi rods in in the first place, plus it helps hold the heat um from the curls um and then i'm gon na go do my makeup and if you guys want my full makeup routine, that you guys will See at the end of this video make sure you check out my last video i'll. Have it somewhere screen as well as in the description bar below now to hold my curls i'm going to spray a little bit of this freeze spray on my hair. Do not spray too much because in your hair will be super hard and stiff, and you don't want that so yeah just spray a little bit and you'll be good, and this is how my makeup turned out. Oh my gosh, my makeup is so good, so dewy. So natural i loved it. I also tried to do a look that matched the hair. Can you see the little you know ginger in the eye shadow, it's so cute, but yeah i'm just going through and taking out all my sexy rods and you guys will see how that look? Do you see the first curl so i didn't do the flexi rod tie the knot tight enough on that curl that looks flimsy so yeah i had to re-curl it um, but it turned out so cute in the end, like i can't even be made. I can't even be mad, so i tried shaking my hair. Really didn't do anything i don't know who i thought i was but yeah it didn't do anything so you're, just gon na have to run your hands through it. I think i eventually went in with like a comb and even like comb through the hair lightly, but before i do any of that, i'm going to re-curl that curl in the front of my head, because it was not given. It was definitely not given and i'm doing the same thing that i did the first time, so i'm just curling it. However, it flows no. Actually, this time i curled it backwards so that it can flow in the right direction. Um, as you can see, and then it'll fall that way you see and now the first two curls match and then i'm also just applying the curler under the first part of my hair, to give it that little bump. I just like. I don't know what it's called, but i just like when hair had that little boom that little hill mountain that little off, i don't know what to call it, but it's super cute, and this is the final look. Don'T look so good. Thank you guys for watching. My video make sure you like comment subscribe and give me a big thumbs up and also put on your notification bell and, as always, remember, to be beautiful and love yourself.

Comments
NyaanTV: I did this exact mixture and it turned brown. Adore are not the move right now looks stunning on you though ✨
Angel Mcphaul: Hair color looks beautiful on you