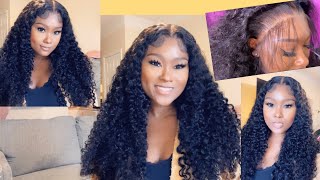
One Of My Favorite Installs Ever! *Must Try* 36" Deep Wave Hd Lace Wig Ft Asteria Hair
- Posted on 26 December, 2021
- Color Lace Wig
- By Anonymous
Hair Info: 36inch deep wave HD 13x4 lace front wig 250%density
Link To Hair➤https://bit.ly/3DOHq4T
Happy Holidays! Buy One Get One Free Wig➤https://bit.ly/31UVXyO
❤Using Special Code “xm12” To Get 12% OFF
Asteria Hot Selling Hair★ ★ ★ ★ ★
Top1 #asteriastraight Lace Wig➤https://bit.ly/3EKO9Ox
*More Invisible Skin Melt HD Lace Wigs➤https://bit.ly/3oQjzxA
30"- 40" Long Vac Wigs➤https://bit.ly/3yyGtNf
Affordable 5*5 Closure Wigs➤https://bit.ly/3oQUYbX
#AsteriaHair #asteriahair30inches #asteriawig30inches
Wholesale or promotion? Contact Asteria Hair:
WhatsApp: +86 15238065852 Email: [email protected]
Instagram @Asteria__hair https://bit.ly/3e1byzH
YouTube @Asteria Hair https://bit.ly/3m5EBoA
Music: “Call Boo” Marcus Musik
Soundcloud.com/marcusmusik
twitter - Iammarcusmusik
instagram-marcusmusik
Hey guys welcome back to my channel, so in today's video i'm going to be doing this install and i think i did pretty dang good okay. This wig is from mysteria hair. I love a cereal hair. They have some of the best best curly hair, so this wig right here is a 36 inch beautiful, beautiful wig. I absolutely love it. I over bleach the knots - and that is quite apparent here, but i kind of finessed it in the end to make it look a little decent. But then i went back in after this. Video was completely over and i decided to go ahead and color the roots jet black, so that it doesn't look like this. But for the sake of this video i just had to finesse. So here i'm just cutting off the excess lace from over my ears and that's just going to obviously allow for a flatter, install and i'm going to go ahead and do it on the other side as well, and then i'm going to go in with my eben. I believe that's what it's called even lace bond spray which i've been loving lately. This stuff is no joke. Okay, this stuff is it's gon na stay, okay, but i'm going to go ahead and press it in with the comb and then i'm going to actually spray. It again on top of this and then i'm going to put on something really really cool that i just discovered, and i was actually sent in my little goody bag for this video. So i'm going to show you guys that in a second, but as you can see, the knots are just cis over over over bleach, but makeup can do wonders. Okay, it can fix up that color. That'S just not looking right in the end, but here is a edge melting band that was sent inside of the package, and this is genius i usually use, as you guys have seen in previous videos, just an elastic band, literally that i have to tie in the Back which is so difficult to do with all the hair in the way, but this right here just has velcro, so you just velcro that bit and it literally is a game changer. I know people have used these and this has been a thing already. I just never had one for whatever reason, but this is some of the stuff that came in the package with the hair, so you know the edge brush a little scarf to put around your edges. Wig cap lashes, you guys know the whole nine and then it all just fits in this cute little baggie. So here i am about to take off this edge melting band and you guys are going to see that the lace is just a hot mess. Okay, but you guys will see the final product so here i am going to be cutting off the lace and, as you guys can see, that spray is no joke. Okay, i don't even do like crazy amounts of spray either. I just do like a little bit and i don't be going in with the layers and layers and layers and this stuff is it's gon na stay? Okay, but here i'm just cutting off the lace or the excess lace. With these little little scissors, which i feel works the best for me - and i don't really go in like no crazy jagged motions personally, but if that's what you want to do, you can definitely do that here. We'Re going to be working on the baby hairs to fix this problem of the lace like this okay, so i'm basically going to be going at my temples, which is where my normal actual baby hairs are my natural hair. So i'm just going to lay these down or i'm going to hot comb, the hair back, so that the hair is separated from this hair and then i'm going to go ahead and do the same thing on the other side. But as you can see, i'm just making sure that these two you know are separate so that the edges and the wig lay really really nicely. And i'm going to hot comb. That and then i'm going to go ahead and go on the other side and do the same thing so sometimes over bleach knots can work for you, but sometimes they can work against you and in this case it's kind of doing a little bit of both. It kind of is giving bald cap, even though i don't have a bald cap, but it's also giving over bleach so yeah. You can definitely go in and fix that with makeup for sure, which i ended up doing but yeah sometimes it works, and sometimes it doesn't. But i feel like these are probably a little bit too over bleached and it's a little brassy as well, which i did try to go ahead and tone it, but it wasn't working so yeah here, i'm just going to cut these baby hairs. You want to start long in case. You need to cut more off, of course, but i'm going to cut sideburns and then two pieces in the front and i'm going to curl them with my small curling wand per usual and we're going to see what we're working with and i'm pretty sure. I ended up cutting them a little bit more, but we'll see i don't remember honestly and truly, but yeah we're going to see in a second, so i'm just cutting them along, so that i can have something to work with in case. I need to cut them. So here i'm going in with that little flat iron, which is literally a game changer, and what you want to do is curl it away from your face and then kind of shape it. If that makes any sense, so i have been trying to master how to do this. Okay and one of the things that i've seen is to always curl away with these. I usually curl towards my face, but this time i decided to try to curl away, and i mean it just does what it does here: i'm taking some of my erica j styling loose and just putting it on top of my head. So i don't have to keep pressing it or picking it up and i'm going to just mold these to my liking. Literally, you just want to mold them. If you even do baby hairs, you know you can mold them. However, you want you, don't even have to add them, but for me personally, for this install one thousand percent needed some edges to cover up this lace. Okay, since i could not go out with this lace on its own, absolutely not so yeah here i am just molding the baby hairs to my liking and they definitely need a little bit of cutting, but i'm just got i'm just going to mold them first and Then i'm going to go in and cut them to my liking, but yeah you just want to keep doing that until you get it the way you want and also i will be, laying them again. So you know this isn't the final product, but it just kind of gives you a starting point and then, in the end, when you go ahead and lay it down with the elastic band again, then you can comb them out and just kind of mold them to Your liking, so i'm doing that on the other side as well in the same exact motions just on the opposite side and as you can see, it's already kind of camouflaging the imperfections you know what i mean, and that is the. What do you want to call it? That is the magic of baby hairs? Some people don't like them. Some people do, but i personally think that for me at least it's just a look that i like to go for and even when i wear my natural hair, i do very over the top extravagant baby hairs. So i'm gon na do the same thing with my wigs, so here i'm taking that edge melting band again and i'm going to put this on to basically set everything in place. While i work on taming the top of this hair because it is looking a little wild and crazy - and you can leave it like this - but i wanted a defined look because this hair, this hair, okay, super defined, is absolutely gorgeous. So i had to define the curls at the top to match the ones at the bottom, and just so you guys know the hair at the bottom is air dried literally. This is the natural texture of the hair after it air dries. I put conditioner in it and i rinsed out the conditioner and i just let the hair air dry overnight and the bottom is the texture of the hair after air drying and the top is just for manipulation. But the bottom is absolutely gorgeous. So i wanted the top to look just like the bottom, so here i'm just, i literally just pulled the hair over and it just made a perfect side part but yeah i'm going to be spraying this with some water just a little bit not too much just To give it a little bit of definition, and you guys are going to see how she looks in the end. I also go on with some type of mousse, but water works perfectly fine for this hair, and it just looks so gorgeous like asteria hair has some of the best curly hair. If you guys remember my wand, curl wig, that you guys went absolutely crazy over that wig was a curly wig that i just blow dried and wand curled. So i don't know if you guys remember when i did those wand curls and you guys were just going absolutely crazy - that was asteria hair. It was just a curly wig that i blow dried and i won curled and i absolutely loved it. So this time around, i wanted to keep it in its natural texture and, as you can see, it is absolutely absolutely gorgeous and when the top dries, it's going to look just as beautiful as the bottom. As you can see, the texture is gorgeous gorgeous gorgeous. It is so thick and juicy and soft, and i absolutely love this hair - you guys, i'm super excited to show you guys the final result, because it was looking a little rough okay in the beginning, it was looking a little rough. I didn't know. I was going to end up where i did at the end of this video to be honest, but i think it came out looking absolutely gorgeous. I love it. You guys look at this texture. Oh my gosh. Look at this texture, it's absolutely stunning! I love this hair, you guys, okay, so, like i said this, wig is from assyria hair. It is 36 inches of just lusciousness. Okay, i will have the links down below everything you need to know for this wig i love it. This is definitely one of my favorite installs that i've done in a while and it actually started off pretty rocky. So i didn't know he was going to end up here since okay, but, like i said everything will be in the description box. Thank you guys. So much for watching, let me know how i did i'm trying to get better at this y'all 2022. We out here, okay, eric and say who i'm just kidding, but i love you guys so so much and i'll see you in my next one. You
Comments
DestxnyBee: I love your install vids. This one came out so good
Jasmine Darden: You literally KILLED this one!! wooooow, sis! YES MA'AM!!
OMG It’s Katt !: I love the outcome , and this hair is so gorgeous ✨✨
Chan Gibbons: Love the outcome!
Sally Jane: Do you think their 13x4 has enough parting space ? Or you recommend getting a 13x6
Dee Luther: Great Video as always Stunning thumbnail tho U Did a Good Job Your Beyond Gorgeous u are Makeup always on Point Happy Sunday Too Have a MarvelouS Week ahead STAY BLESS N BE SAFE ALWAYS
Junior Chaves o Picasso de Yahushua: Pretty as always Bronniee
Donilla Fiffee: Omggg this hair
ASTERIA HAIR: Give what it’s supposed to give
Keanna Harden: I love this hair
Doreen Gardiner: Omg love this
Sammy Da Goat: The Hair Is Super Cuteee
Re’Mona Lavon: You couldn’t even tell it was over bleached once you did the baby hairs. You be selling your wigs after you do your reviews?
Shermaine: Present plz .. I jus love these kinds vid
Paige: You said you don’t like their lace?