One Year Unsponsored Unice Wig Review /Transformation + Amazon Bundles + Diy Black To Honey Brown
- Posted on 08 November, 2021
- Color Lace Wig
- By Anonymous
WHAT IT DO YA'LL!
Welcome to another video!
Today I'm showing you guys how I transformed my wig
Original WIg:
UNice hair Wig 5x5 22inch 200% Density Wig https://tinyurl.com/34hvsrtf
UNice Hair Pre Plucked Virgin Hair Body Wave HD Lace Closure Wigs
Bundles: https://amzn.to/3cooPBt (choose a length)
Alligator clips: https://amzn.to/3kOAI8t
T Pins https://amzn.to/3DqdcWt
Needle and Thread https://amzn.to/3Fnxv7s (curved needle)
Wig Stand https://amzn.to/3ct9WxL
Mixing Bowls https://amzn.to/3Cp7p2d
Bw2 Powder https://amzn.to/30BVIIG
Clairol 30 Volume Developer https://amzn.to/32fMr9y
Clairol 20 Volume Developer https://amzn.to/2Z3B4jQ
Clairol 10 Volume Developer
Aluminum Foil (from grocery store)
Gloves
Coloring Brush https://amzn.to/3nsOoaE
Rat Tail Comb https://amzn.to/3crjLfA
Revlon Ash Blond #60 https://amzn.to/3HLfhiv (I couldn't find a single pack)
Heat Protection BTZ Turn up the Heat https://amzn.to/30yGhQX
Razor Comb with extra Blades https://amzn.to/3CGJxHz
Flat Iron BaBylissPRO Nano Titanium https://amzn.to/3Cz8ioF
KeraCare Styling Wax Stick https://amzn.to/30IUDib
Got2b Spray https://amzn.to/3oImLtO (I prefer this bottle to the yellow one)
Edge Control Design essentials https://amzn.to/3nriH1B(the only edge control I use) Silicon Mix Deep Conditioner https://amzn.to/3kO977l (the ONLY conditioner that gets the factory smell out of bundles)
Foam head https://amzn.to/3Hx0W8Z (you can get them cheaper at the hair store)
Canvas Head (my size is 22) https://amzn.to/3x1rwCl
Suave Clarifying Shampoo (can be found at the dollar store)
Aussie Miracle Moist Conditioner Purple Shiny Silver Shampoo (purchased at Sally’s, any purple shampoo will do)
Continuous Spray Bottle https://amzn.to/3Dxopo3
Revlon Tweezer
Heat Protection
Black Hot Comb https://amzn.to/3DA5QzK
Mac Powder Color Dark (use anything that’s your skin tone)
Garnier Fructis Sleek Shine https://amzn.to/30EVEaQ
Flat Iron BaBylissPRO Nano Titanium https://amzn.to/3Cz8ioF
Alcohol Got2be Ultra glued https://amzn.to/3oImLtO (I prefer the black one to the yellow one)
Blow dryer
Stocking Cap
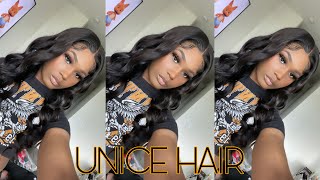
All right, y'all jumping straight into this. If you watched my last video on my unique hair wig, you would know that i thought that the hair was just a little too thin for my liking. So this time around, i purchased two bundles of hair from eunice hair. On amazon, so that i could add to the wig to just add a little bit more thickness, i'm gon na give you a little bit of tea so that y'all can save some money. This hair on the unis website. For some reason, it's like thirty dollars more expensive on the actual website versus amazon that has a one day - shipping. I ordered this hair on saturday and it came sunday at like 2 p.m, so order it from amazon. I purchased this wig at the beginning of 2021 and i wore it on and off throughout the year, even through all this time, the closure is still intact, even though i comb this hair every day or every time i use it. I'M always running my fingers through my hair. It is not balding. The hair still looks good. This wig is not a full lace wig. So what i did was i felt for gaps in between the tracks and i would clip the hair up and i would use a needle and thread to just sew that 22 inch bundle into those sections. I double all of my wips because it's way easier to get that thickness and that fullness without having to do all that work of single wefting. When you double weft, your wig will be so much thicker, but don't worry it's still going to be flat when i do get to the top, though that's when i start single wefting just so, i can make sure that my wig is as flat as possible. I do find that the more tracks that you put in the tighter the wig gets based on how you're sewing. So please be mindful about that. If you're a beginner take the wig off and try it on and off, or else you can get to a point where your wig ends up way too small. Look at how full this already looks. This is just the 22 inch bundles sewn onto the wig. I didn't use all of the 22 inch bundle, because this was thick enough. I was just trying to get some thickness in there, but i didn't want the wig looking too wiggy in both now, for this 18 inch bundle, i'm just using it to fill in the sides of the wig to make it look just a little bit fuller. So i wanted the wig to be as even as possible, so i opened up the full bundle of hair and i cut it in half, one half is gon na be for the left side and the other half is gon na be for the right side. I did one side at a time, and this is the left side how it looked when it was completed and we are done sewing in those tracks. Look at how much body and movement this unit has. I did take the wig off and tried it on. The wig was not heavy at all and it fit my head perfectly. The best part is you can't tell the difference between the hair that i sewed in versus the hair that was already in everything blended in seamlessly. Since i had extra hair left and honestly, i wasn't even sure if the hair was going to bleach or not. I decided to test out this hair and see how well it bleaches, i'm definitely not a pro at bleaching hair, but when i first started initially, i had the question of what volume should i use to test things out. I had cut three different tracks and i used three different bowls and three different volume developers. The three volume developers were 10, 20 and 30.. So in one bowl i put in one scoop of powder and then one scoop of 10 volume developer, and then i did the same thing with 20 and 30 volume developer last, i saturated each track in the different mixtures. This was a great test just because i was able to see how fast each different level of developer light into the hair. I covered each track with aluminum foil and then i checked on it in 15, minute increments for an hour, so i checked it at the 15 minute mark the 30 minute mark 45 minute and an hour. These are my results after an hour, and please use my results as a guide so that you don't have to buy so many different levels of developer. Everything will be linked and listed down below. These are the products that i used for my mixture. I did one part developer to one part powder. I started off with three scoops of each. I separated the hair into four different sections. The back had two big sections and then the front had two smaller sections. I used the 20 volume developer on the bottom sections and the 30 volume at the top simply because i know for me it takes an hour for me to achieve the look that i want and i didn't want the bottom of my hair over processing. While i did the top, so that's why i did a 20, which is a little less strong, and i did that at the bottom and the 30 at the front, so that i could have the same level throughout the unit. I hope that makes sense and just go ahead and just start dipping into that mixture and just act a full with it. Just put it on there be quick. I took away too much time like this back section alone took me like 20 minutes, and then i realized i need to i needed to hurry up, because this isn't even the highlighting part, but just be quick, be generous and then add little i'm gon na call Them stripes like add little stripes to it like when you get towards the top, so that it's not just one line um but yeah. That'S the best advice that i can give you just be generous with it comb it through make sure you're saturating the insides, the middle, the front, the back, take your time, but don't take your time now that the back is all done. We'Re going to focus on highlighting the front, basically, all i did was. I took my rat tail comb and i was just weaving through the hair, taking some sections dropping some sections and just just weaving through it real good and then i would separate the top from the bottom and then just saturate, the top. With that developer, i had to be quick for the right side. I started doing my highlights at the top rather than at the bottom, simply because i was pressed for time and i wanted to make sure i could get as many highlights as i could. But my hair was processing and i didn't want the back to over process, make sure you're sneaking a peek at the back pieces and other pieces that you've already done. And if you see that they're getting a little too light, then feel free to just take that foil off and taking that foil off helps reduce the processing speed. Look at me. I got bleach all on my leg and stuff, but at this point pretty much the whole head was done processing and i only had that last section left and i was getting that process for like another five or ten minutes before i watched the mister off. I don't know about you, but i am in love. I wasn't trying to go too too light because it is the fall time and i want something a little more honey brown like toned down, but this came out beautiful, look at all the different tones and colors. You can definitely stop at this step and then just dip. This hair and purple shampoo to get rid of the brassiness, but i'm gon na go ahead and go a little step further and add that ash brown color. This is the color i use, which was the revlon color silk. I used two bottles. Each bottle came with two things on the inside, one is a developer and one is the actual color. So the smaller bottle is the color and i just went ahead and poured it into that bigger white bottle, and then i put the cap on and i just mixed it up real well, this step was very easy. I didn't feel as much pressure basically just use. Those two applicators and just saturate the hair, just completely saturated and make sure you get every section and make sure you're combing it in real good. I will tell you one thing: those two bottles were not enough. I thought it would be enough, because you know most of the hair that i use like most of the hair is dark. I only have highlights so. I figured two bottles would be more than enough, but i played myself and halfway through this. I had to run to walgreens and get a third bottle, so just letting you know, if you add more hair to your wig than you possibly might need more than two bottles. The direction said to leave it on for 25 minutes. But since i had to run to the store, i ended up, leaving it on for over an hour. So i'm just saying you know um it didn't mess up the hair any but yeah. I left it on just a little longer than it requests. I washed the hair with regular old pantene shampoo. I did not use the little conditioner packet that came with the the color i just felt like it was not necessary after i washed the hair. I let it deep condition and silicone mix. I let it sit for about two or three hours. This part is optional, but if you feel like your wig is still a little too brassy even after coloring, it feel free to let it sit in some purple shampoo overnight. I let the hair air dry, and this is the color that it was after air drying and i am still in love, i'm just letting you know um by this time it was a little cloudy outside. I think the sun was going down, so the color does appear a little darker on camera, but in person it's just a little bit more vibrant. Now for some housekeeping. Since we did add those tracks, the hair is very uneven, so i had to go ahead and cut some layers into it and just shape the hair. Let'S get this closure together. This is a 5x5 closure. That'S attached to this wig, i'm just using a hot comb and my favorite wax stick, which is the curacao wax stick and i'm just parting sections into the closure and just flatten it down real good with that hot comb. This is how one side looks, and i just used that got to be spray to just add a little volume at the top. I know y'all see how flat i laid this down, and i wanted to show you that those tracks are still there. The 18 inch wefts that i sewed in are there and they're laying down flat seamless, and you can't even see them. I plucked the part just a little bit be careful because i ended up ripping a hole into my lace, but that was the last step into getting this closure late. This is how the unit looks on the inside and you can see those sewn in tracks. I sewed on an elastic band simply because i don't use the bald cap method when i do my hair. I just like to take my wigs on and off, i put makeup on the lace, but i don't put any makeup on the cap because i just use a cap, that's as close as possible to my skin color. Since i have such a low hairline. I take out my little edges and i just use them as baby hairs. My install process is very quick, but listen. If you don't have this little red bottle right here. You need to get it. I didn't use all three types of got to be. I don't use the sprays and i use the gels this little bottle right here will have you feeling, like you, a whole hair stylist, we're almost at the finish line guys last. I just put some face framing layers in there and then i just did some slight curls. Initially, when i do my curls, i do them tight, so they look real weddingy real, i'm going to prom type-ish, but i told you this hair does not hold a curl. So i do it tight so that during the day it falls into a nice beautiful wave. I was out of frame for most of this. What i did was, i used maybelline fit me in the color 228 and i used that as a foundation color for the line of my part after i used foundation on the part, i used black spray to help crispen up that line a bit. If you use black spray, make sure you use got to be to seal it in real good or else every time you hug somebody you're going to be leaving parts of your hair on their shirt, and here we go. Y'All y'all cannot tell me. This is not a new wig that wig that you're about to throw away. Don'T do it to yourself. Don'T waste that money! You still got another three months in it, get you some bundles sew it in color it up real nice cut it up into a cute little style. Do something with it, but it's still got life in it. This hair is long. It'S beautiful, luscious, flowy bouncy. After everything i put this through here, it's still with me and i'm pretty sure i'm gon na have this here up until the year anniversary in january. So i'm so happy with the results it took. The color so well, eunice hair did its thing i'll, give it its props. As always. Thank you guys for watching. If you made it all the way to the end, don't forget to subscribe, give me some wig recommendations. Let me know what y'all want to see comment down below guys. Thank you again for watching it's tammy, the creator y'all, you

Comments
Tami The Creator: What hair company/texture do you want me to review next?
Sandra: great informative video, thanks!
Likedbymany: Looks good!
Melissa Chacon: Here’s a tip, research fast hair growth fortified shampoo to double hair growth.
Tina Green: Cute but that front the front of the hair line was not good