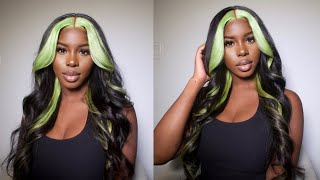
How To: Blonde Skunk Stripe | Ft. Beautyforeverhair
- Posted on 30 June, 2021
- Color Lace Wig
- By Anonymous
Hello Glam Fam,
I am back again Yall miss me? Todays video is on this bomb wig that I decided to add a skunk stripe to The skunk stripe trend has been going around lately & i figured now would be the time to do it. All the products I used will be listed below as well as the hair details on this wig. Be sure to check my previous blonde streak video below! SUBSCRIBE to my channel for more hair projects & looks
#wig #wigs #lacefront #frontalwig #blonde #streak #blondestreak #blondestripe #skunk #slunkstripe #glambytai #beauty #forever #beautyforever #hair #beautyforeverhair
PRODUCT DEETS:
Clariols BW2 Lightner
40 Volume Developer
CHECK OUT MY BLONDE STREAK VIDEOS BELOW
HAIR DEETS:
●▬▬▬▬▬ ❤ #BeautyForeverHair ❤ ▬▬▬▬▬●
►Buy Now, Pay Later with PayPal & QUADPAY &Stripe !
►Independence Day Sale -UP TO 32% OFF + $25 Again !
►Use Special Code “beautyytb” Get Extra $10 Off !
Get the Video Same Highlight Wig : https://bit.ly/3w9g3yu
I’m Using 150% 13*4 Brown Lace Body Wave 24’’ : https://bit.ly/3ybLeLd
https://www.beautyforever.com/ ➤Top -Sale Lace Wig : https://bit.ly/2SDNv2A
❤Most Invisible HD Lace Series : https://bit.ly/3x7T6gC
❤NEW Highlight Color Wig For 2021 Summer : https://bit.ly/3hjtp5V
☛Easy Wear &Go Headband Wig : https://bit.ly/2TnM0po
☛Bundles & Closure Available : https://bit.ly/2SFfbnM
Latest Highlight Blonde Curly Wig Tutorial Must See :
Aliexpress Beauty Forever Website : http://bit.ly/3ceVkl2
Hot Sale Hair on Aliexpress Store : http://bit.ly/3qC6yFe
Amazon Beauty Forever Hair : https://amzn.to/2KSGkyB
Instagram@beautyforeverhair : http://bit.ly/IGBeautyForever
Beauty Forever YouTube Channel : https://bit.ly/34a1Y8Y
Customer Service Whatsapp:+8613783534924
WANNA COLLAB? BUSINESS INQUIRES?!
-----------------------------------------------------------------------
KEEP UP W TAI:
IG: @ItsGlamByTai
Twitter: @GlamByTai
SnapChat: @SnapGlamByTai
TikTok: @GlamByTai
-----------------------------------------------------------------------
Oh hello, youtube welcome back to my channel, it's ty aka glam by tai, i'm back with another video. If you're new here hit that subscribe button come join the glam fam child, i do all wig related makeup and some lifestyle videos um, i'm a new mommy. So, yes, i'm in the process of postpartum and newborn stage child so yeah join the fam child. Today'S video is on this us skunk stripe that i decided to do on this wig um. If you're on tech talk - and you follow me on my tick tock, my tic toc is at glen bye. Time has been really like big on this trend. It'S like skunk stripe trend and i've done like blonde streaks in my hair before like in the front, but i've never done just in all blonde patch. So i was like. Oh you know what that'll be perfect to incorporate in today's video um. It gives it like a highlighted effect. It'S very much like peekaboo kind of um, which i like it doesn't bother me. I didn't know what style to do with this wig. So i just was like okay middle part. You can never go wrong with a middle part or a side part, and i was going to do a side part, but i felt like if i did a side part this way it was going to give blonde streak vibe yeah. If you guys didn't watch my blonde streak, video, it will be linked below and in the cards um. It just reminds me of that, and i know i wanted you know something different and then, if i put it all this way, it's like um, it's too peekaboo, like you, can't even see it so [ __ ] it a middle part. It was chad. I really stay here and contemplated it simple. I used my clairol bw tools, the hair lightener. I did like in this three times so yeah. This hair is from beauty forever, hair um, it's a 24 inch lace front. Now the hair is super soft, like super bouncy voluminous. Yes, all of that, but okay, it can be bleached, but i will insert like in the video as you'll see um. It didn't lighten very high enough for me. Even this is a little still too dark. I never wanted this. You want to be like that like what's up, but i got impatient child. I was tired of waiting for it to lighten, so i did this three times and for this hair to have been bleached three times soft, like the hair, is not shedding off um. The knots still are intact. Everything like i'm, really impressed with this wig yeah. You guys, i'm done rambling, make sure you hit that subscribe button, so you don't miss. None of my videos keep watching to see how i got this guys yeah all right y'all for the wig. For today it is from beauty forever hair um. I have worked with them in the past and they got some good ass hair, so they gave me this little purple bag with a wig cap, a comb, some lashes, but this is really the wig for me, okay, this is a 24 inch body. Weave now does come a little pre-plucked but y'all know straight out the packaging, like i don't [ __ ] with wigs that are just fresh out of the packaging. So i did have to go in and pluck the wig myself bleach the knots, but i decided to do the skunk stripe first, so the wig has some cute body waves like look at that the waves are really really nice on this wig. Of course it comes with um the three combs on the inside, even though i don't use the combs, but you know some people do i mean whatever it comes with the three combs um and the little adjustable straps at the bottom, but you can go ahead and Add your own adjustable straps if needed. So i tried my best to show you guys exactly what i was doing on camera um excuse my double-edged. Chin yeah, i'm still fit, but i'm pinning her to cry. I'M pitting her to uh my mannequin that bridget yeah. I know y'all seen her. She look crazy. I need a new mannequin, but here i am just measuring out exactly where i want my skunk stripe. Now: um the wig, the lace, the front lace on the wig. It does kind of get shorter on the sides. Like you get more parting space in the middle so because i was doing the skunk stripe to the side, i did the skunk stripe a little bit on a thinner side um, just because i didn't want to do it too thick and it looked odd because there's Not enough lace there if that makes sense, but when i figure out exactly right with my skunk stripe, i'm braiding the side of the wig that i'm not going to be using now. This was actually a project child because fresh out of the box, this wig was just nothing was done to it. It wasn't plugged so the hairline was super thick, so i had to like really make sure that i'm not getting any bleach on the opposite sides of where the skunk stripe is. I just wanted the bleach to be specifically on our skunk stripe, so to actually start the bleaching process. Y'All know i use my um clairol's bw2 um hair lightener 40 volume developer. I put it in a little cup with um jesus, lord a little plastic knife mix. It the [ __ ] up, you could use a hairbrush, but i really don't have my hat time. So i'm just mixing this up and girl just the smell. If you know you know, bleach smells now. The consistency that i had it in was not as thick as when i'm bleaching the knots, but not as runny as when i had it when i did my bleach bath. If you guys seen my last video of my bleach bath, so i would say, like um kind of like shampoo or conditioner consistency, but yeah. Of course i tried to part away the places that i'm not using the bleach on just for the skunk stripe, but child. Even that was hard, so i started on the roots first and i started clearly on the whole sides of the skunk stripe. Then i'm gon na you guys are gon na see me go in with a comb and i'm individually sectioning out parts just to make sure the roots get completely covered. So my thing was that i really really really really wanted to focus on the roots because doing this skunk stripe. I don't have to bleach that part of the knots like where the skunk stripe is. I didn't have to bleach those knots, so i'm making sure that i'm going and completely evenly getting that bleach on the roots, as you can guys, can see so child. Eventually, the aluminum foils on the side got taken the [ __ ] off okay um. I just went on ahead and took the bleach with my hands and ran it completely through once the roots were done. I focused on the roots. First, then i worked myself all the way down now in the beginning of the video. Remember you guys, i told y'all. I did this three times, so this was after the first time, y'all see it's more like a caramel type of color. I really would have did it a couple more times, but one i didn't want to damage the hair, because i didn't know how the hair was going to take with being bleached so many times um, but it really did take good after three times. So i probably could have waited and did another more whatever, but because i really wanted this to be like more of a platinum but ciao. The hair just was not lifting fast enough for me. Okay and i got really impatient, but i'm doing the same steps, i'm taking individual sections, focusing um the bleach all on the roots. First, then i'm gon na go. You know just right back in mixing it up with my hands to apply it to the rest of the wig. Now after three times three times literally um, i went on ahead and got this color, which i mean it's not bad. It kind of is a skunk straight, like y'all could tell but um i did go ahead and bleach the knots after i did that and i plucked it myself after i did that so yeah. This was literally a project really quick for the install y'all know. This is my go-to way to do it install it's my arrogant tag, inspired installs um, if you guys didn't see that video i'll put it up here in the cards for y'all, so make sure you check that out, but i'm starting with my hot comb. I already cut my lace, i'm using my hot comb to lay my hair completely flat because y'all know when it's time for us to install. We don't want those hairs to be like flying away inside of the glue, because it's just going to create a mess. So yeah this is just me measuring out my head with some eyeshadow and a brush. Eyeshadow is a bronze, but it's a little bit lighter than my skin complexion um, it's from when i was in the winter child i'm in the summer now so, but you guys cannot really tell it's like it's not like white on my forehead, okay but yeah. I'M measuring that out and i'm gon na flip my lace over and use my glue all right so for lace. Glue. I'M using my bow hold, of course, just dab it on a few um dots drops whatever, and i'm going to smear that out with the back of my rat tail comb now. This is why it's really good to measure out exactly where your wig lays, because you know how far to put up the glue make sure that it is in even layers. I believe i did three layers for this install um. I know eric can say he does like at least five layers, but his clients are keeping their wigs on a little bit longer or they want their wigs to last longer. For me personally, i just do three layers, because y'all know how fast i change up. My wigs all right, i'm not about to sit here and be struggling to get a wig off at the end of the day, but even with three layers, like my wigs, never lift like even in the hot ass sun in the summer. Like i know it's hot as [ __ ] right now, my wig is not going anywhere like it's just it stays. I don't. I don't know exactly how child, but i do wrap my hair at night and everything and it stays literally, probably because i'm not using a blow dryer and once it turns completely white, i'm laying my wig down and i'm doing it in sections like i take my Time, i'm very neat if anything lifts i go back in with just a little bit of glue and i go on ahead and put it back down, but so far so good. So once i get everything down, i am using my scarf to tie down and i'll probably tie that for like 10-15 minutes before it's time to actually take it off and work on baby hairs. All right taking my scarf off, i did go ahead and straighten the hair. I didn't like press it out like amazing, but you know i did a little bit of something um. This is what it looks like with no baby hairs which you can rock but ciao. You know me: i'm gon na take my um edge tamer brush and i'm gon na pull out some hairs that are gon na be used for our baby hairs. Then i'm going to use my hot comb and flatten that now in my arrogante inspired wig video um. I did go ahead and curl the baby hairs, but lately i haven't, i just been using my hot comb to flatten them out and then i'll cut them and lay them down like. I have that it's because i really do need to get um either like a curling wand. That'S really really small or a little small flat iron, but i really have not been doing it lately. This is just how i've been doing my edges and yeah. It works for me to cut my baby hairs. I'Ve been using my razor comb, my eyebrow razor comb, whatever the [ __ ], you want to call it it's not even a comb beach get it together, my eyebrow razor there you go um and yeah, i'm just cutting in a little diagonal. You know way just so: we don't have a straight blunt cut but yeah so so to lay my edges down, i'm using my gorilla snot, not gorilla, glue, gorilla snot, which is the gel uh yeah. I'M laying this completely down y'all seen me sweep my baby hairs. Plenty of times y'all y'all get the point all right. So once my baby hairs are done y'all. This is where i was struggling a little bit like. I know if i wanted to do it to this side. The other side, i didn't know how to exactly accentuate this skunk stripe. So i just said: [ __ ] it i'm gon na do a middle part because you can never go wrong with the middle part, took my hot comb and i'm flatten everything out. But i did kind of like lift it a little bit as you guys can see when i'm going back just so, you can see that skunk stripe yeah. I wanted to insinuate that i wanted that to be like the inspiration of the whole. Look like you can't. It'S a peekaboo in a way, yes, but i still wanted it to be nice and visible to do my part. I'Ve been doing my little cheat sheet, yeah, taking a little bit of concealer that matches me and my skin complexion and i'm taking a flat brush and just putting it directly into our part blending it out with my fingers. So it doesn't look too harsh or doesn't look like i put something in my part if that makes sense, but yeah you guys. This is the finished result. Honestly, it took me three tries, but we got it. We here make sure y'all go ahead and check out beauty forever. Hair go follow me on my instagram. It'S glam by ty, so y'all can see more pics of this drum, i'm done rambling. Thank you. So much for watching i'll see you guys in my next video bye
Comments
KellyJelly9976: this came out so nice!!
Joyner's Empire : this was really helpful thanks!!!
4fs Fiaaa: Loooks great girl ❤️
Nell Iman: You’re so beautiful wtf ❤️
Jermia Christ: What can I do to make the stripe platinum blonde/white?
Pretty Tima: How long did you let the bleach sit on the hair for?
Heiabal Tadese: What exact color did you use?? Btw ur vv pretty
DeVonna Smith: Love your content but this wig is straight TRASH. I ordered the exact same one and I’m sending it right back. So thin, smells synthetic when using heat, it’s not the same length all around. It’s horrible. I’ll definitely be using your technique for the skunk stripe on another wig !
Simply Keisha B: Yau New Mommy, Congratulations!
Desiree Amari: ❤️
Patty Pattyboom: How are u and the baby beautiful?u will forever have my support purr
M A R I . X O: Yasss
Lettecha Mcdowall: That mannequin when through a lot
Nani Rojas: Where is the hair from?
JANAI KIRSTEN: thumbnail >