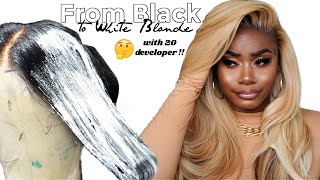
Bleaching My Wig From Natural Brown To Honey Blonde| Very Simple| Shimmering Lights Shampoo Set|
- Posted on 10 February, 2019
- Color Lace Wig
- By Anonymous
✨NEW Tutorial Alert
Style /How To:Bleach A Wig Honey blonde Tones
Hair Info:22 inch Puerto Rican Curly
Youtube: IAmBeautifulHustler Channel✨
——————————————————
Instagram :_Beautifulhustler
YouTube :IAmBeautifulHustler Channel
✨For Sponsorships ,Reviews,& Questions
Email:[email protected]
Contact : 786-571-1313
——————————————————
To Book or Purchase Hair Www.ibhslays.com
Allow 3-14 Business Days For All Orders
——————————————————
*Follow My Pages *
@thebeautifulhustlerBrand
@glitzandglambeautylounge
—————————————————————
#Youtuber #YoutubeVlogger #YoutubeReviews #Hairtutorials #Miamihairstylist #Miamihair #Duluthhairstylist #TravelingHairstylist #YoutubeTutorials #GeorgiaHair #GeorgiaHairstylist
#Atlantahair #Atlantahairstylist #Celebrityhair #CelebrityHairstylist #Browardhair #Browardhairstylist
#miaminails #browardnails
#newyorkhair #newyorkhairstylist #texashair #chicagohair #neworleanshair
Hi YouTube and welcome back to my channel. I am here today with a coloring tutorial to show you how I bleach my hair. The way you see in this section of this video, but first off, if you are new to my channel, go ahead and click that subscribe button eternal your alarm bells this week. Right here is a used wig that I had in before, and you can purchase this week from my hair company, which you'll be down in description box. This is my texture, Puerto Rican curly, and this is this hair pretty much. I just have all my wigs balled up and move in, and I'm just basically took this wig out and I brushed it out with some water, and so basically this is the hair kind of air dried at the same time, and I'm just gon na show, you Guys how I bleach my hair to get it the way that, in the beginning of this video, which was very simple, no, I did not use any dye for this look. This was just all bleaching powder and developer. So, for starters, what I did was part, my hair into four different sections: gon na part, the front section I'll often just twist those pieces together, because I'm going to show you basically what I do just working on one section of the bed. So now that I have flipped this way into four sections, I'm just going to take a piece of one of my sections and begin to spread that bleaching powder throughout the hair. Now i am using 40 developer and i'm using the four cream developer and I'm using the bw2 powder. I just mixed it up a bit. Well, this small black bowl, but you know, of course I had to make more and I'm just going to basically do this throughout the whole. Video just pull sections down. Add that bleach on there detangle it a little bit yeah just you know, keep doing the same thing, just repetition! Yes, so just basically keep spreading that bleaching powder throughout the thing comb it in just make sure that the bleaching powder does hit all of the hair. Now, in total I'll probably say this process took like literally no more than maybe 25 minutes and that's for putting everything on there and once I did apply this bleaching powder to my last section. I waited about 10 minutes and then I started washing out each section. By the way I applied the bleaching powder, so I'm gon na wash out the first section I put the powder and then the second and then third and then of course the last one. So that's just basically what I did and right you can see. I did both sections. You will see that the right side is lighter than the left side, because obviously I did the right side first, so it's probably like a few minutes behind. So that's why I said when I did wash this out. I did wash it according to how I put it in my a section in order. That'S when you are bleaching hair be sure to have one gloves, because this stuff really burns. If it sits too long on your hands, I've been burned many many times so sometimes I don't even follow the rules that I'm giving you guys, but just being honest, you do want to wear gloves like this something round. I was not playing. I made sure I had my gloves one deck, because I did not want my fingers and hands to be burning all night long, so safety first safety. First, please have your gloves guys so, once again now that we have reached the top, we all know it's done. I didn't let this sit for 10 minutes before I started to wash it out and you want to make sure that you wash it out in the same order that you applied the bleaching powder. I did not want everything to be an even tone, so I did do the back a little bit lighter than the front, and just because I wanted to like, I just wanted it different like tongue. So, at the end of this video, you will see how it looks and, like I get put in like a mini portion of the tutorial on the action Jonas install. But I hope you guys didn't learn something from this video. If you do just go ahead and give me a thumbs up what I also wanted to mention that, when washing this out, I didn't use the shimmering lights, shampoo and conditioner. It is very important that you use that because it is a toning shampoo and get rid of all the yellow tone. So I did use that just washed off right away, but thank you guys till next time.


Comments
P Chantel: You did that that color is bomb