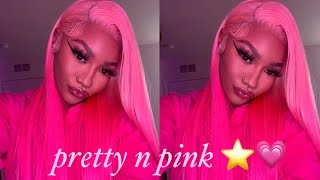
Hot Pink Blush Bob Wig | Water Color Method| Half Up Half Down
- Posted on 07 June, 2019
- Color Lace Wig
- By Anonymous
This was my first attempt @ doing water color! I’m in love!! 613 bundles from my vendor. This frontal wig was constructed using 2-14in bundles & 1-14in 12x4 Frontal. Thanks for watching! Hope you guys enjoy like & subscribe!
Watch me install this wig!! - https://youtu.be/hQXbHcQpkBM
Half up half down curly bob- https://youtu.be/YOcOdy-YMGA
Adore Dye Used:
Pink Petal & Pink Blushhttps://www.amazon.com/Adore-Semi-Perm...
Flat Iron: Remington (purple) from Walmart
Personal IG: https://www.instagram.com/dharmaray/
Beauty IG: https://www.instagram.com/_alistbeauty...
Facebook: https://m.facebook.com/alistbeautybarH...
Hey, ladies, if you're interested in how I got this cute pink Bob stay tuned, I'm just starting off with some fresh six thirteen bundles, I purchased the bundles for my vendor. My vendor does not have a website or a name from what I know I just communicate with them on whatsapp, so I wouldn't be able to give you guys any information on the hair. So in this clip you see that I used boiling hot water in the pill and then I added a small amount of cold water on top of it and I'm using a pink petal and what I realized later on in this video that I should have used. Two bottles of this - I only use one by the first mistake because I should have just dumped the whole bottle in there, but I was trying to use half and and then I just go in with the pink blush. Just a few dots and already here, you can feel that I didn't put enough color using a wooden spatula and a color brush to stir the mixture in the plastic container. That'S how it came out as you can see it's just not. It didn't take all the way and I only did the bundles. I didn't even start on the frontal, so I go ahead and put the other half of the bottle into the mixture and I add a few more squirts of the and I add a few more squirts of the pink blush era was a rose gold kind of Color - and it was still a lot of blind pieces, so I just dumped it in there for like a few more minutes, and this is how it came out. It would have been a cute pink, like light pink color, but I didn't feel like waiting to go to the beauty supply store the next day. So I just used the hot pink and I was like. Okay, I'm just. I just went ahead and decided to use the pink blush for my wig and make it a hot, pink wig. Why not? I go ahead and I dump the whole bottle of pink blush into the mixture and immediately I'm like wow. This is a like very dark. It'S like tinting my hand, I put all the hair in there. I didn't put anything on my frontal. I just dumped it all in there with the hair, and I was very cautious trying not to get it on my frontal, so I tried to brush it through a little bit. I was like now. Let me just dump it in there, so I dumped it in a few times and my frontal did get tinted a little bit. But in order to stop that, I went ahead and I clipped the frontal on the sides so that I wouldn't have to worry about it getting tented. So here I'm just pouring out the water and rinsing it with cold water. I don't really want to put any product in their hair, because I was just like yeah. Let me just rinse it off, so I hung the hair up to dry overnight, and this is a video of what the hair looks like after I rinse it out is very hot, pink, it's very luscious pink, and this is the look that I wanted to go For from the beginning, but I was like no, I'm gon na do something more toned down and I ended up doing it anyway. This is the hair after I let it dry overnight. As you can see, it's a cute, hot, pink color. I went ahead and I braided the frontal down so that I could lay it down see. This is the frontal stitch down very small and neat tight stitches so that the frontal doesn't go anywhere so in this next clip you're, just gon na see me sewing the bundles down, I'm getting closer and closer to the end. I am using the pins to hold my place. I didn't film a tutorial because there are so many on youtube if you guys want to know how I make these wigs in more detail, I can do a video about that. So this is what the leg looks. Like when I'm finished now I'm about to go ahead and get into the styling portion and I'm just gon na part, the hair so that I can get it into a nice ponytail. As you can see, I got my ponytail ready and I'm using foam lotion so that I can go ahead and set the style and flatten it out. I'M gon na use the hot comb to smooth it in the hot comb, with the foam really helps to smooth that hair out. So now I'm just going back with my tweezers and plucking the hairline on average. It takes me about an hour an hour and a half to pluck a really good hair line. You just go through impart different sections and pluck - and in this clip you see me using a scrunchie method in order to get the bob. This method allows for the bob to be longer in the front and have that shorter look in the back. I did go back in with the scissors just to make sure everything was even. I used the scissor and comb method, but I'm not gon na put that in this video. So now I'm just Flatiron in the hair making sure everything is nice and smooth and ready to go. So I'm just adding mousse to the part where my ponytail is gon na, be because I'm gon na flatten that part out and make sure that my ponytail is flat and looking like it's coming from my scalp with no bumps and I'm just gon na use. The hot comb method again and what this does is like kind of like fry, the foam into the hair, and it really helps it to sit. So I use my comb to comb it back into a ponytail and I'm using a black thick scrunchie. This bundle that I'm using is going to be the Edit part of the ponytail because, as you can see, just the frontal by itself doesn't create the thick ponytail look. So I'm just going back with the hot comb and straighten the extra hair out and I'm gon na pin this hair around the ponytail. Now you should pin it around as you go just to make sure that it stays in place in this video. I was rushing, but I ended up having to go back anyway and just pin everything back in place because it came loose and now you're gon na see me use this little piece of hair that I cut from the longer bundle and I'm going to be pinning That down to the ponytail and wrapping it around the ponytail so that you won't see any of those tracks. So I'm pretty much done with the week at this point, I'm just going in with my flat iron and making sure I get all of those pieces. The ponytail is still kind of frizzy, so I'm gon na just go ahead and make sure I flatten out that ponytail with the flat iron - and this is the look that I got it is really cute - don't mind the back. I didn't really flat on it as good as I should have, but it is a really really really cute week and I will be installing it soon.

Comments
Dynasti Crawford: That's a pretty pink color I like that
Nickay: This is sooo bomb
Itss Rimaa: How many bottles did you use?
Bella Jaee: Birthday hair for sureeee
Colin O'Connor: you should had put one bundle a time
Jada Moore:
Anirah Lattimore: Please tell us your vendor
Kayla Spann: fashoo