Easy!! How To Color Melt The Perfect Pink Hair! Water Color Method (Alonzo Arnold Inspired)
- Posted on 29 April, 2020
- Color Lace Wig
- By Anonymous
Hey Guys!
Welcome back to my channel! In this video I will show how to properly replace a lace frontal on a custom wig. I will always demonstrate how to color melt hair using the water color method. This look was inspired by one of my FAVORITE HAIRSTYLIST, ALONZO ARNOLD!! He is AH- MAZING!! Hope you enjoy! Leave me a comment on your thoughts and what you would like to see next!! Below are the products I used and My Amazon link if you would like to purchase!
KEEP IN TOUCH:
IG: @ThePaulaHellens
Salon IG: @Bombshellstudiosct
website: https://bombshellstudiosct.com
email: [email protected]
Hair Details:
Custom wig made by me using: 1 x 18in Frontal and 3 x 22in bundles from https://bombshellstudiosct.com (BEST BLONDE HAIR EVER!)
HAIR COLOR:
ADORE NEON PINK & RASPBERRY TWIST : https://www.amazon.com/dp/B0184L02OU/r...
PINK PETAL: https://www.amazon.com/dp/B01C5XQ7WO/r...
COLOR LOCK: BRAZILIAN BOND BUILDER
https://www.amazon.com/dp/B07KHC8TYF/r...
GOT 2 B SPRAY:
https://www.amazon.com/dp/B0009VQ8X8/r...
KERACARE SETTING LOTION:
https://www.amazon.com/dp/B005NORC1S/r...
ANDIS HOT COMB:
https://www.amazon.com/dp/B077DXLN5C/r...
MUA: Breanna C. Long
IG: @Breanna.c.long
Youtube Channel
https://www.youtube.com/user/ting1994f...
Nail Tech: Pam
IG: @la.nailsalvador
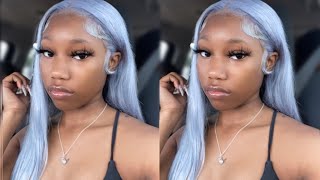
Hey guys wan na see me create this look. Keep watching alright, so we're gon na get right into it, so I'm gon na be marking where the frontal is so that I don't have to remeasure the new frontal, because I will be replacing this one. So when we're placing a frontal, you simply just need to separate all the hair from the frontal and the hair that will be attached to the wig. So this is kind of gon na, be a demo on how you replace a frontal and how to do a watercolor method, because I did previously color this frontal. It would be too difficult for the look I'm going for so I'll. Just I prefer just to do a new one on this one. I had coloured it previously like three times so yes about time, so once you have it separated gon na go in and you're just gon na cut the thread off now. It'S obviously this one's a little easier, because it's blonde here in black thread, so I can easily identify where the thread is. But you want to make sure that you're cutting the thread and not the cap and then it just easily pulls off just like that. Now we'll be adding the new frontal, and this is from bombshell studios it's our 613 blonde bombshell collection. It is a traditional 13 by 4. I believe the length is 18 inches. So now what I'm going to do is line up the front toe with the wig cap, secure it with the T pins, as you can see on the sides where the t pin is, you should have left it marked. That is your proper measurement, so it will be the same technique if you're replacing a closure as well. Now you just want to tie the hair from the frontal or the closure, whichever you're replacing to get it out of the way. Then you are going to simply start refilling it, and you want to sew right. You want to pull it as close to the bundles as you can. It should already pretty much be lined up, though so you'll use the t pins to kind of measure or mark where it's supposed to go and then once you get where the T pin is you're gon na pull the teeth in now and then just to yourself. So it's really easy. It'S really simple! It'S the easiest thing to do is to replace a frontal or coder, and while I she is a good as new honey, you got you a whole brand-new wig child, and now I'm gon na go in and customize the hair line. I have wet it. I just used water bottle and my tweezers and I'm gon na go in I'm not gon na do too much because I am doing a color and I don't like to do baby hairs with my color wigs. So I just want to create a nice natural hair line also, if you guys are still tuned and thank you so much don't forget - to hit the like button and subscribe to my channel. If you would like a video on how I customized frontals leave me a comment in the comment section and I can record one for you, I guess man, this hair line is looking good. I love a natural hair line, alright so now to the coloring. So with the water color, I'm gon na be doing a color Mouse, so you want to separate the front or the frontal from the back of the way you want to protect your lace. I use the got to be spray. You want to make sure that the lace is completely saturated, so you're gon na completely cover the lace with the got to be. This protects it from the color. Okay, we're gon na start with your lightest color, so you're gon na put the color into a bucket of hot water, you're gon na dance mix it until all of the little things flying around is completely dissolved. Alright, you see how nice and clear that is now you're gon na grab your wig hunting. That'S coming next grab your wig. This is so easy, so you wan na add. The reason why I have them in ponytails is because that's what the darker color is. So this is gon na, create the separation and let me know what not the color and then you just dip it. I promise you guys it's so quick, it's so easy. This coloring method has changed my effing life. Like our kid you not. I love it now. You just dip just continue to dip until it gets the color that you're looking for. If you want it to be a little bit darker a little bit more pigmentation, you just keep dipping, then you want to take this out so now we're gon na. Do the bottom! So that's why you always want to start with the lightest color, because light can fade into the dark right. But if you do dark and the dark fades into the light you just jacked up - okay, so now you're gon na mix, I like mixing colors it's my thing. So I'm gon na mix these two together again same process. We'Re gon na make a make we're gon na keep stirring this. I'M sorry until it's completely dissolved, then you're just gon na dip, the wig. Now you want to keep the top so hold the whole top part up and you're just gon na dip. The bottom of the wig into the color take it down. As close like you should be able to see that line of demarcation from what you had your ponytail holders right, so you're, just gon na keep dipping all the way until it's that color that you're. Looking for until it has that that pigmentation that you want and now the great thing is when you're doing a lighter to a darker, you can even go up a little higher. If you see any spaces that maybe were missed, you can just lightly lightly just lightly tap it in there. I swear to god you guys this takes like 15 minutes. It will change your coloring life like it's changed my life and while I look how pretty she is - oh, my god, like 15 minutes done done now, whenever I use a fashion color. This is where a color locked I'll leave that in the description box below. But this just keeps the color locked in and helps prevent fading, and also you guys. This wig has three bundles of 22 inches from bombshell, studios Wow. Look at that she is Bob okay, but the yesterday hair line, we all see the hair line says yes, this is pretty all right, so I've already blown her out and look how amazing this color melt came out. So now I'm gon na prep it for my install. I just used a little bit of setting lotion. Oh my gosh, I'm sorry y'all, I'm obsessed with this hair line like oh okay. So back to this, then, I'm gon na take my hot comb, and this is me: I'm just gon na start setting the wig to make sure that she is going to be laying nice and flat yes and shout-out to my nail tech Pam, because she did such An amazing job on my nails they are like was so pretty. It was like the whole perfect look. It went right like my nails, inspired my wig okay, it literally inspired my way so now, I'm just gon na set it in the middle part. Before my install, I like doing it this way, because this ensures that my wood is not crooked, like like seriously, that's the reason why I put it on with a middle part. First, its lining it up and make sure that my wig it's not going on cricket and if I ever decide to do a middle part. I know it's gon na be like in the middle so and this really helps get all the hair like really super. But lets you y'all know these we've got to be flat: honey, okay, we do filete only installs over here and look how pretty she is yeah. I am obsessed with this color like this way came out so pretty so yeah. I completely deleted the footage of me. Actually, installing the wig, so I'm sorry, but here is my makeup artist. She works at bombshell studios. I will link her channel because she's amazing and we collab and she did such an awesome job on my makeup, like Brianna's, the truth y'all so y'all make sure y'all go to her channel subscribe, she's the bomb, alright and bam. She is the ready honey. I was so so happy with this finish. Looked everything came out bomb the wig was bombed, the makeup was bomb. My nails were prom like everything. Thank you guys. So much for watching see you soon.


Comments
K2Queen: The wig is so bomb the color just blends so well! the way you show us the easy to dye the wig have save a lot of time and patience.
Pariss Ashley: Yassssss Paula this is my favorite look on you it was so satisfying watching it I can’t wait to get my HD LACE FRONTAL
All Things KMS: Yessss to the customized frontal video can’t wait to see more
Amilliyon Abrams: So talented and pretty ❤️I definitely look up to her specially from us being from the same place ️
MiSSKiKiBOO1: Absolutely yes to the customization video
MsBrittany Janai: Super cute! Love it
Duffi Malik- Styles 🦋: That pink is everything. The ombre . Uggggh
Hax A: You look so good honey!!
sheismazing2_ _: Omg Absolutely gorgeous
n. xo: Thank you
Brentny Wrentz: Can u use the same method with bundles??and a closure
Jae Sutton: The commentary Paula! Hahaha! Love this pooh!
Carmen J: You killed it <3
Willa Edwards: Girl you are just so pretty
Gold Gold: God bless you all ❤️
Nitch peach: You look like pa- IT IS PAULA
Dope Willa: Hi tt Paula it’s me caleb I just wanted to say hi
QueenUNLIMITED: You called, I came.