I Dyed My Hair Baby Blue In 5 Mins | Water Color Method Ft. Beaudiva Hair
- Posted on 05 May, 2019
- Color Lace Wig
- By Anonymous
DIY BABY BLUE WIG IN 5 MINS | WATER COLOR METHOD | Beaudiva Hair #beaudivahair
●▬▬▬▬▬▬▬▬▬♛Beaudiva Hair♛▬▬▬▬▬▬▬▬●
Hair details: 130% Density Lace Frontal Wigs Blonde Color Hair Wig 613 Straight 22”Get This Hair Now ➤ https://bit.ly/2V14APd
★ Beaudiva official hair store ➤ https://beaudiva.com/
Top selling straight hair 3 bundles➤ https://bit.ly/2VRa4k4
Top selling body wave hair 4 bundles with frontal➤ https://bit.ly/2H4e4VZ
Get to know our latest promotion ? https://bit.ly/2DNBj4E
Follow @"beaudivawig" on Instagram: https://www.instagram.com/beaudivawig/...
Follow @"beaudiva" on FaceBook: https://www.facebook.com/Beaudiva-2214...
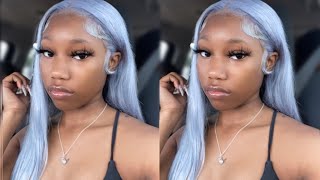
Welcome back to my channel's loves, i'm roshana, and today i'm back with another video. Today, i'm going to be showing you guys how i dyed this wig skye blue. Like look at this color guys, it's absolutely beautiful. This wig is from view diva hair. Everything about them will be in the description box down below shout out to them for sponsoring this video, and if you guys want to see how i achieved this look then just keep on watching. So this is what it's going to look like when you first receive the hair. It'S just going to come in this ziploc pink bag with some information on it and then you guys can see the wig inside clearly so we're just going to go ahead and open that up. This is a 613 lace front wig. It is 22 inches and guys look at that length. Okay: okay, i'm feeling it so now i'm going to go ahead and show you guys what the wig looks like first taking out all the extra stuff, and now you guys are just seeing me play with the wig. So then we're going to go ahead and turn this wig inside out, so we can get a better feel of what the wig looks like inside. So there are three combs in the back of the wig. Just in case you guys were wondering, and then there is the front of the wig. The whole front is the lace. It is a lace frontal and yes guys they also have some straps at the back, but you guys can adjust the wig on just in case your head is a little bigger or a little smaller. So one thing i really liked about this lace. Front wig was how transparent the lace was. Once i installed the wig, the lace completely disappeared, so i definitely really admire that about the wig and guys it's also pre-plucked. It could be pretty a little more so if you guys know how to plug a wig, and you guys want to pluck it more, you definitely could because it was pre-plugged. But i, like my wigs, just a little more pre-pluck than what it was so now. What i'm doing to prevent the dye from going onto the lace for when i start dyeing the wig is i'm just going to put the wig inside out on the mannequin and then i'm going to just pin it to the mannequin so that it stays in place. So now going in, with my got to be glue free spray, i'm just going to be applying this all over the lace front on the knots, because trust me guys this is just going to prevent the dye from seeping through onto the part, because you guys don't Want to part your hair like have a middle part or a side part, and then it's like blue. It'S not supposed to be that color. It'S supposed to be the color of your complexion so to prevent it from having the dye, because we're going to dye the whole wig in the water method and i'm going to put the whole wig into the die. So this is just a really crucial step. I definitely recommend you guys do this, so that you guys can prevent having the dye go on the lace, because you do not want that. It'S not a good look. So once you apply the free spray, just make sure that it's dry and then, after that, you can proceed to the next step and now we're going to go ahead and dye. The hair so you're going to need a bowl, of course, and this is where you're going to put the water in and put the dye in and put the wig in. So the dye that i'm using is the adore baby, blue color, and you guys this color is just so flawless. I was so excited to try it because it's just so bright and pretty and it's perfect for springtime. So this is what i use. I use two bottles, but i would recommend three just to be safe and now i'm going to go ahead and take my kettle, which has super super hot water, so be careful on this step and we're going to pour it into the bowl and it's pretty self-explanatory. After this, i'm just going to go ahead and put the dye into the water, and then i'm going to want to mix that all up and then dip the wig into it. But you guys are going to go ahead and watch me. Do this and yeah pretty self-explanatory? So after you finish, mixing the dye into the water you're just going to go ahead and take the lace front wig from the bottom and then just kind of work it into the water and you're just going to duck it in there and i'm using the brush Sort of to just make sure i get all of the hair inside because you don't want to miss any spots, and it's just going to soak up the color. It'S so freaky how this happens, like you, guys, can kind of see it already. It just kind of soaks up the color, so you're just going to want to keep on repeating this step and just look at that already already just took most of the color like it's beautiful. So it's really hot right now, so just be careful on this part, but guys now i'm just going to add some more dye because it is soaking up the water. I mean it is soaking up the dye from the bowl, so you just want to add some more dye so that you can soak up more dye because you want it to get the most vibrant color it can get. So i would recommend doing this as many times as you feel possible, or just do it until there's no more dye left, so it really depends on how large your bowl is. I chose this bowl because, honestly, i don't really think i have any bigger bowls in the house, but this worked perfectly fine. A bigger bowl would be easier because you can kind of just duck the whole entire wig in there and then you don't have to really just do it in portions like i am, but it still gets the job done so now. I'M just gon na go ahead and add some more dye, and this is just going to just make sure that i get the hair as blue as possible. It'S pretty self-explanatory! So now i'm just going to go ahead and try to squeeze out some of the water and it's this was really difficult because the water was super hot. So i recommend doing this with like a towel or with some gloves on or something i was doing it with my hands and you guys can just tell how hot it was. I was just scorching my hand, but ignore that the point is i'm just going to soak the water, i'm just going to try to get all the water out the hair and then i'm just going to go ahead and take it to the sink and wash it. I did that off camera. You guys can choose to do that at the end. I just like to make sure that i know exactly what it looks like because i feel like when i wash out all the dye then i get to see. If i need to add more, do i need to do another round, etc. So after washing the hair, i saw that i needed to do it one more time. So this is a fresh bowl of water and now i'm just taking some more dye and we're just going to repeat the same steps and this time i just want to focus more on the front part of the wig like more on the frontal, because the bottom Is definitely dyed. I just have some missing spots on the middle and then on the frontal as well. So this is like the most important part, technically the front tool, because this is where everyone's going to see mostly they're, going to look at your head and they don't want to see any blonde spots. Okay, they want to see all blue one thing. I really like about doing the water method instead of dyeing it. The regular manual way is that this is way faster. This took about maybe 30 minutes, and i was taking my time when i dye here, like literally here by hair, like literally i'm parting, the hair and then dyeing it that takes forever. So this is a quicker, faster way and you get the same results honestly. So this is what the wig looks like when i finish washing it and then i blow dry it so guys, i'm in love with the color. I was super satisfied, so now i'm going to go ahead and take the flat iron and just straighten the hair, because i don't want any puffy hair. I want it to be straight when i install it into my head and, as you guys can see, i'm just kind of taking random pieces and going with the flow. This is how i flat iron here. This is what works for me. You guys can do it. However, you guys do it like if you take your time and you do like small pieces at a time, you can go ahead and do that but, like i said i get the same results. If i do it this way. So i another thing i really liked about this: wig is like once i dyed it. The hair became better quality like it wasn't bad quality when i took it out the packet when it was just 613 blonde hair, but for some reason i feel like it just got even better like when i dyed it, which is very weird but very true. Like the quality of the hair is actually bomb so usually 613. Here is not good, but this was actually some good hair, like you guys can tell in the photos you guys can tell in the video. You can just tell it's good here. So this is what the wig looks like when i finish flat ironing the whole thing guys. I absolutely love how this hair came out. It gives me mermaid vibes, like the blue color is so pretty it's just so vibrant and bright and honestly. This is one of my favorite colored, wigs so far like it's just so bomb like the color is exactly how i thought it would come out, it's just gorgeous so gorgeous so guys that is pretty much it after this i installed the hair off camera and i'm Going to show you guys in the next clip how it came out once again, everything you guys need to know about beauty here will be in the description box down below. Definitely go check them out. So this is the final look. You guys, i hope you guys enjoyed this video. I absolutely love this wig, the color came out so beautiful and vibrant, and it just gives me mermaid vibes, i'm obsessed with it. Everything you guys need to know about beautiful hair will be in the description box down below definitely go check out the website. They have a huge variety of wigs. I'Ve never seen before so definitely go check them out. That is it for this video. I love. If you watch till the end and i'll see you guys in my next video, you


Comments
Kyle Clark: Wow so gorgeous!!! I love that blue
SuperChiko4000: This is a beautiful video
Beaudiva: The hair is so beautiful.
Jeahav Valentin: I love this video a lot wholeheartedly
Talana Jordan: omg you are sooo gorgeous!! and this looks soooo good!! :)
Ruby Fire: Ameii
Becky Walker: Super!
Eileen Queens: Is it human hair ?
Mahendra Mix: React to little mix these for walls at the surprise surprise
abood sabah: زز ظظنن