How To: Dramatic Baby Hairs On A Frontal Wig(Beginner Friendly) Ft Celie Hair
- Posted on 25 March, 2022
- Color Lace Wig
- By Anonymous
●▬▬▬▬▬▬▬▬▬ ♛CelieHair♛ ▬▬▬▬▬▬▬▬▬●
Hair info: 13x4 Water Wave HD Lace Frontal Wig 24 Inches
Direct Link ➤https://bit.ly/3IoyFka
Coupon code: "wig10" save extra 15% OFF
Celie Official Store:https://www.celiehair.com/
HOT SALE wigs ➤https://bit.ly/3qfgxTT
HD Lace Wig ➤https://bit.ly/3tkbqna
Colored Wig ➤https://bit.ly/34TUdYq
New Trend Wigs ➤https://bit.ly/3614vGQ
●▬▬▬▬▬▬▬▬▬ ★Contact Us ★▬▬▬▬▬▬▬▬▬●
Whatsapp/imessage:+86 17537405382
Order Service Email: [email protected]
Follow US Get Newest Hairstyle Trend
Instagram:https://www.instagram.com/celiehair/
Facebook:https://www.facebook.com/celiehair
Youtube:https://www.youtube.com/@celiehair
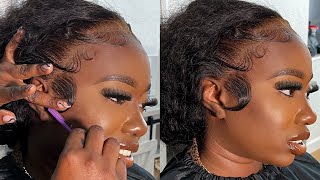
Hey y'all welcome back to my channel, so today we are doing this beautiful half a pack down with some crazy freestyle. Babies like yes, they are giving like well. This one gave me a hard time, but y'all gon na see throughout the video hobby man. She do something very much something period, but if you want to see how i got this look, girl then keep watching all right, so the setup is a little bit off and different. It'S still the same. I still got. I just got a lot going on. I'M working on a lot of things, so i'm trying to make it look as presentable as possible. Okay, so first thing we're going to do. I'M not going down my cap, i'm not going to move that honestly, but now i think about it. Now, i'm not going to glue down my account. So first thing we're going to do is we're going to stick back these edges because we don't need nothing getting on the edges, making them rough or hard to work with or or or create some type of breakage or something we don't need that so we're just Going to take some real good edge control and if you're the type of girl that when you use edge control it just don't like it waves right back up, then you just got to get you uh edge control, that's best for you. I use the even when i tell you that all the time this is the one i use and it is really good, as you can see from my edges. So this is what i'm using to slick this up, and when i do my sideburns, i try to slick it up in like a straight up or diagonal motion instead of going straight back because i feel like the hairs just get caught or whatever. So just look back. The edges will protect your edges, whether we use a spray adhesive like real glue, whatever you just want to protect your edges. So let's get those up all right. So now that we got the edges delayed we're going to put our stocking cap, on which i already colored in whenever someone just want to be using it again. I just feel like the lighting is so off like i could give y'all so much better lighting, but this is the lighting i'm working with right now, natural sunlight and then it's coming from this way too. So it's just like. I don't want to put too much light. This way y'all, like i can't see what's going on, but i'm gon na try my best, though i'm gon na try my best y'all but yeah get your caps on and they'll be going slotted right back. I know what to do. Y'All know what to do so. Hopefully this is better. I tried to do like a low something so now that we got our cap on i'm personally, i'm going to slide it all the way back, because when we don't know what baby is you don't want to see this line? That'S not cute! So being that the cat is fitting fitted to my liking, my baby is: is gon na be here somewhere, so you don't have to push it too far back to where you feel like it's gon na slip, but you don't want it to show like that's the Thing we don't want it to show now we just got ta get our way going because today, as you can see by the title, we're focusing on babies, we want to do some nice, crazy, baby hairs, we're going to do a nice, beautiful style, but we're going To switch it up a little bit, we always do all these different types of styles. That'S cute, but the baby hair just really was in right now was trending. The baby is like look, you got to get creative got, ta, do something different and i feel like i've done so many hairstyles and of course i have so much more to do, but styles are getting so basic to me so now. I feel like it's time to really focus on the baby hairs, so we can start to figure out what we want to use for our baby is, what's best to use for what type of styles et cetera, et cetera, we're going to get into all of that. But first we got to get the wig on so let's get the wig on and then we're going to jump straight into it. So this is the wig that we are going to be installing today. This is a 26 inch water wave wig and i know water waves. My favorites out, if you know you know, if you don't water wave, is my favorite texture, because it's the perfect combination of curly and big or wavy and big without it being too much like it still gives the same. Look personally, i feel so. I already went in, i plugged it and everything like that, so hd wigs, i don't have to do too much. I still am going going to tint the knots because i just feel like i'm always going to want to tip my lots. I don't care how seamless things blend hd transparent, whatever i'm always going to my lace, so i'm going to get in tinted, we're going to use some concealer you can use whatever you want. I prefer to use cream concealer. I use the rk black kiss from the hair store, so in yeah girl we got to get it to match this. What is looking like up against my skin right now - and this right here is the natural texture here like this - is how it came. Y'All can still see the uniform waves, and this is just how it look after this stuff, but we're going to bring everything back to life. This is also a 13x4 unit with full parting space on the inside, which, when do we not love like when we barely see it nowadays. So you know, i love me a good 13 by 4, a full 13 by four hello. Let'S get this big one! So before we continue and start to place, everything down, you want to just part the wig in certain places. Just so you can kind of get an idea of where everything is going to pull. You see where the cap is right here. The cap is all the way back, so that's good. Our baby hairs are only going to really be around here, so it's not going to look. You know too crazy, like up into the cat. This is what it would look like as far as getting scalp, because remember this is my head and my hair. My actual hair is like right here somewhere, so it doesn't look bad at all. So now, when you've got it exactly where you want it and you placed it played with it, you know stuff like that, then you could post it on. However, you're going to lay it down with you're, going to keep it clueless spray it using adhesive like glue, glue and stuff like that. So someone asked me recently: how can they prevent getting the wrinkles from in between from their legs after installing? Because you know sometimes, if you pull it and then lay it down on the glue, all it's going to do is retract and it's going to create wrinkles. So if you lay down your wig and it doesn't naturally just fit - and you see like lumps or hums or something like that, more than likely you're going to be stuck with some wrinkles and ripples, and we don't want that. So what i do sometimes that actually helps i just take the back of the wig and i kind of lift it up a little bit to fit exactly how i want it. So you see how this is laying down way better than it was before that helped. My wig stay exactly where i wanted. You already shouldn't be pulling. I do kind of see myself pulling a little bit and i'm not sure if i should like i'm not really sure if i should like adjust the straps, but i feel like it's so secure and flat in the front. I don't even want to touch it. So now that i got it up in the back, i'm gon na just take the hair, put it away and then i'm gon na do my sections and piece it on, and once you cut that and everything like that, of course, you could always pull it back Down and everything should be fine. Everything works different for everybody, but i'm gon na show y'all how it works for me and how i usually avoid that problem do foreign. Can we just like take a second to appreciate this melt because wow this looks so good like it looks, really really good all right so now that we got that said and done, i'm gon na be doing a half a half down, but i didn't know, even Though i could, though, i hate doing these heavy stuff on myself, because it's just so hard, i can't see anything really which is mad annoying, but i don't know if i want to take it from here, because i technically can i mean look how nice it looks By the air, oh and we're going to pull the wig back down by the way we're going to pull the wig back, though, because i know probably look crazy. So when you put it back down your hairline should look something like this, and even if you want a little bit more security, you can always take your makeup brush. Do a few dabs, nothing too crazy! You don't want it to look funny at all, but you could just do a little something and you should be literally fine. Look at that right. So, instead of taking it all the way to the end and pulling it up in a full half a pack down, i'm gon na just make it wider. I'M just gon na take it and i'm gon na see part it just like this and see. Parting is literally self-explanatory. It'S exactly what i'm saying, but i reference that, because i start my baby hairs right here, which is a little bit in front of the hairline. It'S not like a straight part back, so i like, to put it part it in a curve. So i have some room for my baby is okay, so now that we got that c part you see if you could see the cat, i'm and i know y'all could see the cap and everything like that, but we're gon na fix that we're gon na fix That i got ta keep watching for the gems for the gyms, because i know at this point a lot of us know how to do our hair we're getting a little better, etc, etc. But sometimes we make certain mistakes and it's just like. Oh my god. How do i fix that? That'S what i'm here for and we're gon na the deeper you take the part the more you're gon na have in a ponytail, and you know how i hate skin ponytails. I hate skin ponytails, so bad, like that's one of my pet peeves, depending on the look. Sometimes it looks decent, but a lot of the time. It looks crazy and we don't want that so once our best to avoid that and pull as much hair forward as we can for this pony now, the back of your hair is very important as well. This whole section, because you need your tracks to be hidden, but you don't need to be clocked at all. We don't do the clocking, we don't do the clocking. Okay, so take your spray. Take your wax stick whatever you may need and flatten that out, and i'm gon na carefully hot comb that please y'all be very careful with these hot combs, because you will burn yourself. I just burn myself. You say i mean i burn myself all the time, but you will really burn yourself, bad, especially your face. You could it's one thing to burn your finger, but if you burn your face, it's a whole different story. So please be very careful and take your time also gon na do something that i didn't do in a very a good amount of time. I'M not gon na lie, i haven't done front baby hairs and so on. Probably because that's not really my thing. To be honest, like i never been a person who feels like, i need to do these type of baby hairs. I kind of just keep it simple for the most part, but for this sake of this video and y'all, of course, we're going to be doing things that we don't usually do because we're trying to get some crazy babies we're not trying to do supernatural today. That'S not what this hairstyle is giving okay period, so we're going to pull these right on now. I also usually don't. I also usually don't pull out my sideburns um so early i mean i usually don't pull out too many sideburns, because i don't really use a full hairline. Full of baby is, but we got ta do it. We got ta do what we got ta do so this looks about good. This looks about right, it doesn't look crazy and you really got ta. Take your time and mold everything like literally step by step. You have to take your time and perfect everything before you start to do the baby ears and do a lot of action. It'S because if it don't look right, it'll be obvious and if you care about the little details, it's going to bug you and i care about the little details. So perfect, your hairline pull out your baby hairs hot this hot that remember! It'S not really about that! Right now, but i just want y'all to know that if you're a perfectionist, then perfect, you perfect your hairline do what you got to do, because at the end of the day you got ta wear it period. This is when things can get a little bit tricky. So you really have to pay attention and honestly, it also depends on what sure what you want to do, what type of look you're going for what type of baby hairs you like et cetera, et cetera, because just because crazy baby is or a lot of babies, Doesn'T mean it has to look like everybody else is like it's. Your definition is your hair. You can do what you want to do, however. This is where it can get tricky, because this is going to determine how your baby has come out, how they look, etc. Right so first things: first, you don't want your baby hairs to be too short, so i think i'm going to cut my baby hairs right by my brow, plus my hairline is already kind of low a little bit, so we don't need some more baby ears. You don't really need long babies in the first place, but me personally, my forehead is kind of short. So i don't need a lot. So i'm gon na cut right about here and jagged edges, of course, and it should look something like this now you could go back in, you could do it, how you want to do it fix it, etc. I always suggest cutting longer first and if you, especially if you're new to doing baby, is cut it longer first and then cut it shorter as you go, so you can kind of see, because if you just do pull one of these and just cut it off And you don't know what you're doing once you cut it, that's it! You can't glue the hair back on so be very careful and i cut these baby ears in a diagonal type of motion, because they're going to, of course, get longer at a certain point, and we want to connect it kind of to this baby here right here. So i cut this diagonal and i kind of cut this one straight across so you're. Just going to repeat the same fold and baby is cut right, ready to go right, so everybody needs to advance we're not going to be using mousse we're not going to be using hicks um we're not the edges edge control, we're not gon na, be using um Eco styler gel none of that. I really i'm using okay. So put it like this right, i'm using my even adhesive spray. Not only is this super strong, but i feel like it helps mold. The only thing with this is: you have to move extremely fast. You have to know what you're doing, because not only is this going to secure your baby hairs, but once you already start spraying it's going to dry very fast and once it starts drying and clumping together, that's it now, of course you could use most. You could use all of this. I only use this to lay down my hairline, so the last thing i need is something to aggravate it. I'M not. I don't got time so with that being said, you're going to do it section by section, so you have to literally spray this one work on it. Do what you do spray this one, do what you do spray it out and do what you do now. Don'T get me wrong sometimes, when you use mousse, it helps create more natural flowing baby hairs and stuff like that. But it really all depends on your application and, if you know damn well, you sprayed it down got to be or something that's not extreme like it. Won'T super super hold it or, if you put water on it, because when i use this for my hairline, all i have to do is take a pad with water and pat my hairline a few times, and it's going to come right up. Why? Because it's adhesive spray, it's not meant to stay super long. It'S for a temporary hold so just make sure you're paying attention. So i got this little pencil um. I call this. The pencil little uh fly high and whatever the case may be, is used for pixie cuts and stuff like that, and it does great with the baby hairs. As i know, everybody used this for their baby is, and it's really it's it's it's good. It'S really good and it helps me it helps create the most beautiful sculpted baby hairs and that's what we're going for and that's gon na help with our look today so make sure you grab all the little hairs and be okay. I'M not mother talking how i do this. Take your time. Do not rush trying, don't burn yourself, trying to rush and thinking you just so perfect and take it in time. Okay, we want it to come out nice, but we don't want to burn ourselves. We don't want to nothing, take your damn time. So, oh so this part, this is another part, that's a little bit tricky, because this is the time for you to freestyle. This is the time for you to just be as creative as you can and just make something, and sometimes of course you could take inspo of instagram pinterest, all these different places. You know, and it may help you out if you want to just start from scratch completely and just do your own thing you feel like you got. The motion go crazy, i'm someone where, if i don't feel it, but not necessarily if i don't feel it, but if i kind of know it's like, i don't know. If i want to do this, i don't know if this is going to come right. I don't want to waste my time, etc. I look for inspiration, y'all, look. Let me tell you something, because you can always look for inspiration and then make it your own and try different things and go around it. So that's kind of what it's looking like. So just make sure you keep that in mind, don't be too hard on yourselves about it. Okay, so honestly, i don't even think i'm going to be able to really talk y'all through the baby is because i still don't know what i'm going to do yet exactly but i'ma. Just let y'all watch y'all going to see the motion and we're gon na see. If, hopefully, that helps y'all, because i don't feel like me talking through it - it's gon na help, but i'm pretty sure y'all want more of a visual anyway, instead of me just talking about it. So let me show y'all, let's, let's, let's do this! Okay, jesus! I'M scared, i'm scared, my all right, y'all, like 20 minutes later this baby here was just pissing me off. I don't know what she had going on, but this side is pretty cute, pretty decent. Of course, i like the swirls on this side, like this a little bit more than i do this side, but at this point i'm really not complaining at all, like i'm really not complaining, i just want. Oh, i keep forgetting i'm, not a mannequin. I just want to make sure it's laying down as it should so once we get to this point apart, everything makes sense, you know, and i had to as i could see, i had to back out the moves for certain parts, because i'm just like it's getting A little stiff, it's getting a little, you know, so i had to bring the mousse up, but nothing too crazy, as you could see just a little quick one two and be good. So now i'm gon na just lightly spray it with um a holding spray. The white can the sebastian hairspray, because it's not heavy at all, like it does what it needs to do. It creates direction. It holds to a certain extent, they have actual. Actually, they have a stronger one, but i don't feel the need to use it because i feel like it's either this or this. This is super. This is regular. So that's all i need so i'm just going to spray my hairline, i'm going to tie it down. We'Re going to do the ponytail, real, quick and we're going to finish up this look. So so, oh all right, so i know a lot of people. Probably don't see me do this already, but for the people who didn't so, let me just show you a quick trick. So when you don't use when you don't do the bald cap method, as in gluing it down et cetera, et cetera - and you just put the cap on you - do hear styles like this, and then you run into a problem that looks something like this. Your knots look super over bleached and the truth is your knots are not over bleach. You can just see the cap right here, as i said what happened so what i like to do. Yes, you can just take a brush and just take some concealer and go down, but i feel like that. Never really works for me because it doesn't really get in there. The way i want it to so, what i do is i just take a popsicle stick or tongue press or whatever you want to call it, and i just take some. I scrape a little bit on a little bit of concealer on the top pressure like i don't literally scrape it out, because you don't want to um. You don't want to do too much on your part and widen it up and then you're gon na have to close it back or like black hair dye or sharpie, or something like that. So i try to keep it controlled, although sometimes with this type of thing, i never really get it in there. It can open your part up a little bit, but the thing is you want to try to not have to do that. So basically, what i'm going to do is first of all find out where most your product is so most of my product is on this side, so i'm going to start from the top and i'm literally gon na scrape back and forth on this line. My goal is to make that line of demarcation disappear. You see how it did a little bit of something so far. That'S the thing, that's what we want and you see how it's opening up the part of course. Sometimes that does happen, but if you have a super super steady hand or you're taking your time not brushing too much, then you should be okay, but me i don't care to clean up it's just. I want to just make sure that the line is seamless and it's blended and everything makes sense. You see how you can't even see it no more perfect, so just going to do the same to the other side. This is what one side looks like. This is what the next side looks like, but that's that i'm going to take a sharpie because i usually use my maybelline touch up, but it's very very messy at the moment - and i don't feel like you like that, so i'm gon na just take a sharpie. I'M just gon na clean up my part a little bit, so you want to be very precise when using your sharpie, very precise and now you're done so. I have one above right now, i'm about to get dressed. So let me get dressed real quick, so we can finish up this. Look all right y'all. So this is the final look. I hope y'all enjoyed this look in this tutorial. I hope that the visuals helped y'all, create your baby ears and y'all learn new techniques. As far as disguising your lace, um lace lines, demarcation stuff, like that et cetera, et cetera, i think this hairstyle looks so cute like this is so cute. I'M feeling like myself again, okay, i'm cute, i'm cute, i feel like i want to go out with something, but i have to work, unfortunately, well, not, unfortunately, but i have to work. I'M not going to have no like play time play time until like i'll be like saturday, so i'm gon na try to hold off this look until like saturday sunday, i'm gon na tie it down as much as i can fix it up as much as i Can do what i can so i can hold this look down because i got some things to do, but i got ta work first, work stories, first other than that y'all. Let me know what y'all think of this video, if you, if you made it this far on the video you better, be subscribed because there's no way you just watching and stuff like that, i don't only do it videos, i do story times i do vlogs. I do all different types of content, so if you feeling me feeling a vibe, you want to watch something else, make sure y'all go look at the related videos somewhere down there and make sure y'all subscribe like if you like this video and comment down below. Let me know your thoughts. Let me know if y'all want to see more videos from wow, and i will see you in my next video bye, y'all [ __ ] around me now.

Comments
Kiara Danielle: i love how they turned out looks so soft and flattering !
Cleo Cenci: Awesome tutorial! You always do a great job! What moose did you use on your hair? Thanks!❤️
tiffanyjackson521: You always come through I love watching your tutorials and story times I’ve learned so much from watching you I wanted to know if you have a Paris Danielle collection like eye lashes lip gloss Hair and skin products. If not I see that for you especially the lashes and different glosses You Stay poppin sis
Kea Williamson: I love dramatic baby hairs!!!
Danny: It’s prettyyy but the frontal is to low for this type of baby hairs no shade I’m just being honest