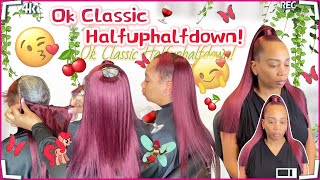
How To Dye 1B Hair Burgundy Without Bleach + Wig Install
- Posted on 19 December, 2020
- Color Lace Wig
- By Anonymous
What's up y'all welcome back to my channel welcome to day 18 of vlogmas! Today I will be showing y'all how I dye my 1B wig burgundy. I hope you enjoy this video!! Make sure to like, comment, and subscribe to see future uploads. ✨
Links to My Other Videos
WALMART OUTFITS CHALLENGE!! STYLING AFFORDABLE CLOTHING FROM WALMART
https://www.youtube.com/watch?v=sqbcf...
VLOG: COME WITH ME TO LAS VEGAS DURING GLOBAL PANDEMIC ✈️
https://www.youtube.com/watch?v=PZ_Ch...
BEST CURLY HAIR EVER?! LACE FRONTAL WIG INSTALL + REVIEW FT. AIDAIYA HAIR ON AMAZON
https://www.youtube.com/watch?v=6NmRw...
FASHION NOVA FALL TRY ON HAUL 2020 *CUTE AND TRENDY*
https://www.youtube.com/watch?v=SkJHi...
MASSIVE (20+ ITEMS) SHEIN FALL TRY ON HAUL 2020!!
https://www.youtube.com/watch?v=iXxZK...
BEGINNER FRIENDLY 4X4 LACE CLOSURE WIG INSTALL + WIG REVIEW FT. ALI LUMINA ON AMAZON
https://www.youtube.com/watch?v=CzMZx...
FALL/WINTER LOOKBOOK 2020!! (CUTE & COZY) + ANNOUNCING WINNER OF GIVEAWAY
https://www.youtube.com/watch?v=_Ro46...
IS IT WORTH IT?! LOVELY WHOLESALE TRY ON HAUL + MINI LOOKBOOOK
https://www.youtube.com/watch?v=OA6Jf...
Business Inquiries
Email: [email protected]
Follow Me for Updates‼️
Instagram: @_jasmine_simone
Snapchat: @jstcheer
What'S up y'all welcome back to my channel. My name is jasmine. Simone welcome today's 18 vlogmas. So today, i'm basically just showing you guys how i dyed one of my wig to get this little burgundy and light reddish look to it and i really love the way it came out because it's like really nice and i've never really tried like a full color On my on myself before so it's something new for me for sure. That'S, basically what this video is going to be about, if you're new here be sure to click that subscribe button. If you want to see more vlogmas content and also if you want to see more hair and fat related content as well, be sure to hit that subscribe button, also, i will be doing another lookbook soon, maybe within the next couple days, i'm not going to promise You guys what day i'll be doing with, but i am going to do one and then i do have like a couple hauls coming, but i have to wait for like the clothes to come, i'm just going to do like a little lookbook in the meantime until The clothes get here, then i'll be doing a couple more haul for you guys so without further ado, let's get right into the video okay y'all. So to start this process off, i'm basically going to make the dye and developer together. So the diet i'm using is l'oreal high color highlight so i got the color, magenta and red and i got three of each and which is a total of six and i actually did end up using all six of them. So basically, what you see me doing here is basically just pouring out the dye in this little plastic. Bowl y'all just use any plastic. Little ball, like you know the ones you get from like the restaurants. So at this moment i was putting like two of each color in the bowl at first, because i didn't know for sure how much i would need - and i didn't want to use all of it and just waste all the product. So i'm just pouring both of them in the bowl to prepare to mix it with the developer and the developer. I'M using is the 40 developer which pro to be like process the hair factor for like the dye. So that's the one i'll be using today. Do so once i got all the dye in a bowl, i'm going to take the body developer and pour it in the bowl and basically just start mixing it up now. You'Ll see me mist it and occasionally, like stir some more 40 developer in there, because you want the texture of the dye to be like liquidy, but not super liquidy, so it should be like paint almost at the end. So this is almost what it should look like close to that so now what i'm doing, basically just sending off the part of the clojure in the frame prepare to put the dye on there now. The reason i did the front first is because i wanted the front to have the most color like i want it to be more vibrant, so i knew that i needed to do that part first. So that way, it would have as much time as possible to really take in the dye and really have that bright appearance at the end, and when i put the dye on there, i tried to get as close to the roots as possible. Like i wanted the root to be red and bringing also, but i didn't want to stay in the lace because i didn't know they were going to wash off - and i didn't just didn't - want to take the chance and risk it. So that is basically what i'm doing right here and then i'm just putting the dye at the top and then just working my way down, and then you'll also see me putting the dye on the back of whatever piece i'm putting the hair dye on. Also do so it's wait a minute, let me and then after i finish, putting all the dye under. I basically just took a little foil paper and you know just put the foil on the hair because that's supposed to make it process faster, so i only put it on the front because i wanted the color to be more brighter in the front than the back. This do wait a minute, let me so so you so so so do wait a minute. So so, once i finish putting all the dye on the hair, i basically just let the dye sit on the hair for about what a good one hour or so, but you can leave it on there longer if you want like a brighter color or like a More bribing appearance on the hair, if you want like a more burgundy, is color, i definitely would recommend just leave it on there for a good one hour. So after i let the hair sit for about an hour, so i just started to rinse it off and really just get like a lot of that dye over there. You'Re not gon na get all of it off, but you can get like a majority of it. All so it was the thing was so red. It was looks like some red kool-aid, like that's, really what it looked like, but yes, so then i proceeded to put some shampoo on here. I use the argan oil shampoo because that's what i use on my natural hair and it's always worked good for my wig also, so i really just proceeded to give it a nice, shampoo and a nice wash to get all that dye off do so after i Use the shampoo i use this olive oil replenishing conditioner to put on the hair, and this conditioner is really good. Also, i use it on my natural hair also and on my other wigs, and it's really done just ways, so i just put it on there. So that way it can retain some moisture in the wig and i leave it on for about maybe 30 minutes or so and then after the 30 minutes is up. I washed it all off and, as you can see like, some of the dye was still coming off. So it's going to take a minute for, like the dye to really just come all the way off and after i rinsed off all the conditioner. I proceeded to blow dry the hair and then i flat ironed it also. So that way it would be prepared for the next day when i actually installed the hair. Now, i'm just going to show you guys the process of me installing the wig, and i forgot to mention that this wig is the same clojure wig that i used in one of my other previous videos, so i'll put like a little picture of the thumbnail. So you all will see what i'm talking about. So i just really just start off by putting some gaussian spray and then wait 20 minutes for it to dry and then just cut it all the way off. As far back as i could so so once i cut off all the excess part of the ball cap, i'm proceeding to put some powder foundation on the cap so that way it can look as natural as possible. When i put the wig on oh y'all, look at that color right here it just looks marvelous. I was really excited once i put it on so basically, i'm just adjusting the wig onto my head before i proceed to actually glue it down. So now i'm taking my ghost ball and glue and basically just making little dots before i spread it with my popsicle stick and this time i chose to do two layers of glue. So that way, this install could last about maybe a good two weeks or so and once it starts to turn clear and get a little tacky, i'm basically just gon na take the front part of the wig and just place it right where the glue was, and I'M taking my right tail comb to really make sure that is really nice and melted. Then i took a little bit more powder foundation to put in the middle part, to make sure that it really blends in with my skin and for the final part of this install i'm basically just taking the hot comb and just going through and combing. Through my hair, so that way it has like the flattest look as possible and that's pretty much the end of how i installed this closure with the clojure. Wigs are always way faster to install than the lace frontal, because i think, because it's so small and it's really just a small portion of the lace, all right y'all. So that is the whole process about how i dyed my hair burgundy and how i installed it. As well, i don't know if i'll ever die in there with another wig again because, like when i started dying, the wig. It was 11 00 pm, so yeah y'all probably like why you doing so late, because i just waited heck of late to do it, and then i didn't finish like i blow-dried it and flat ironed it last night also - and i finished that around 5 00 a.m. So i'm very much tired, but other than that, i'm really satisfied with how it came out. Like i love, i love love the color, like i love that it's not super bright, but it's like bright enough. This is my new look for probably a good month or two, because that's usually how long i wear my wigs and stuff yeah. So let me know what y'all think if y'all really like this color or y'all, not really messing with it. Let me know in the comments below that is pretty much the end of this video. I really hope y'all enjoyed this video if you want to see more vlogmas content, be sure to hit that subscribe button or if you want to see more hair and fash related content as well, be sure to hit subscribe button. Also without further ado, i will see you guys tomorrow in day 19., you


Comments
Simply Tee: You did amazing with this color! Such pretty install on you
Barbie Vlogs !: Your hair came out beautiful girl !!
Iyanla Ethel: The colour is beautiful!!!
Kaya Marley: You did a good job ... And the color is nice on u.
Diorrr TV: This is cute
Callmebisi: