How To Dye Your Hair Burgundy Without Bleach!! | Sophiology Inspired | Allthingsdejanicole
- Posted on 12 October, 2021
- Color Lace Wig
- By Anonymous
To all my ladies looking for the perfect Fall hair color... THIS IS FOR YOU!!
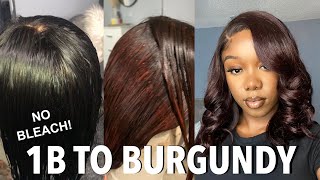
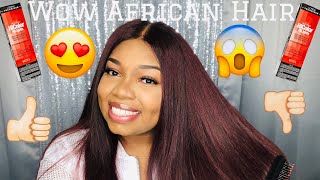
Today’s video I'm going to be showing you how I achieved the most beautiful Burgundy hair color with NO BLEACH! You heard that right! This is the easiest beginner friendly way to dye hair thanks to Loreal HiColor Hilights! I picked up 6 boxes of the Loreal HiColor dye, 2 in the shade Red and 4 in the shade Magenta to get this most desired color burgundy. I did construct the wig myself, I do have a detailed video on how I make my own wigs I will leave the link below. This color is also inspired by the good sis Sophiology!! If you guys don't know who Sophiology is then you are surely missing out! Sophiology inspired me to go Burgundy about 3 years ago, Red/Burgundy was her color back then and when I came accross her tutorial i just knew I needed to be a red head. Fast forward to today and we are rocking the Burgundy all over again!
Now this video I did get in detail on the color only and how to achieve it but, after wearing the hair for some time I wasn't impressed by the quality of the actual bundles. I purchased 3 bundles of brazilian body wave and 5x5 lace closure from Beauty Forever Hair. i have worked with Beauty Forever Hair in the past and their my go to for affordable hair but for some reason the quality of the bundles weren't giving what it needed to give. Keep in mind that when coloring or bleaching your hair the process will change either texture or overall quality of the hair and I think that's what happened here. The hair wouldn't hold a curl or stay nice in sleek, it was too puffy for my liking, it started to look like old hair. Next time I dye my hair I may just have to use higher quality bundles.
Overall the color of the hair came out beautiful! I hope you guys try this color out and rock it for the rest of Fall. Let me know what you think about it down below in the comments. Don't forget to like, comment and subscribe! See you next upload ❤️✨
#HowToDyeHairBurgundyWithoutBleach #BeginnerFriendly #SophiologyInspired
TIMESTAMPS
00:00 Intro
00:20 Products Needed
02:10 How to mix the hair dye
03:13 Applying dye to bundles
05:33 Applying dye to Closure
06:37 Processed color update
08:23 Finished results/Outro
Don't forget to subscribe and follow me on my social media handles
Instagram: @allthingsdejanicole
SnapChat: @itsdejanicole
For serious Inquires only
Hello co-host and welcome back to my channel we're gon na get right into it. We'Re not gon na waste any time, because i know what you guys are here for so first things. First, when you're dyeing your hair, you're gon na need some latex gloves to protect your hands because you are working with dye, so you don't want it to stain you're going to need a rat tail comb, a some type of like hair dyeing brush. You could use this or you could use your hands or a spoon just to help apply the product onto the hair you're going to need scissors only for you know to cut like the product - and you know your bundles and everything after that. You'Ll be fine, and then you are going to need some developer, i'm using the clear all professionals and valen 40.. I believe the box for the high color highlights actually says 30, but this is just what i wanted to use to try and get it to lift brighter you're going to need some type of mixing bowl. I was being ratchet and just used one of my bows. I did throw this out after i just used that one, so i can get more product and then this is going to be the start of the show, we're going to be using the high color highlights and magenta as well as red. So this product specifically, is for black hair to help lighten up black hair. So if you're, if your hair is black or if your bundles are black, this would be good for you. If your hair is like blonde or any other type of color, you may have to find another way to um process your hair, because this is specifically for black hair for dark hair. Only it clearly says on the box. This hair today is going to be from beauty forever. I am using three bundles of brazilian body wave, i believe in 20, 22, 24 and then a 20 inch, 5x5 lace closure and once you have all of those products, you are good to go. I did buy in total six boxes of hair dye, four magentas and two reds, and it's going to be one box of red per every two boxes of magenta. So the easiest way for me, instead of trying to just squeeze the product at the tube, is to just go ahead and take your scissors and just cut the bottom off, because it'll be easier to get the product off out this way versus trying to squeeze it Out you'll be saving more product, so i'm going to go ahead and put two of the magentas in there. So that's what we look like before and then i'm going to mix in the red just to get it nice and even and it won't be like blotchy when we go and actually apply it to the head. So i'm going to mix all three of the colors together and then we're going to go in with the developer and we're going to be using a cup of developer. I use the cup, but then afterwards i went back in and put some more in and, as i was dyeing it, i was putting more developer in it to try and like stretch it out, because i was really afraid that i didn't have enough dye um. But you really want to you really want to mix it up and take your time because it's going to be really loose, but you wanted to get nice and thick well, it's not really that thick, but you want this type of consistency but, like i said so, We used probably like a cup and a half, because i kept pouring more in it, because i was so afraid that this was not going to be enough and then once you are all set with the mixture, you want to go ahead and get your bundles laid Out i dye my hair like this. I take the bundles, leave it like wrapped up how it is in like two, you know what i mean. I was just like the it's two of the bundles together, the one track, but it's four and a half that so it looked like two tracks. I'Ve dyed my hair like this. Just so i can be more precise and really get you know the product all over. The hair, but it's honestly just a little bit annoying um and then like, as you see, i'm also taking the brush and like going in and put it putting it on the bundles and i'm going to use my comb to like comb it out. You know um. I feel like this weight method will be perfect for beginners. You want to take your time. You want to make sure that you get everything all the color all over the hair, but if you're in a rush, this way is going to be very it's way more. Tedious, it is way more tedious because you have to do this entire side. You got to flip it over and do the other side. So that's this is the only bundle that i actually did it this way. The other bundles, i literally just flipped in half and then poured the product all over the hair and was just rubbing it in and massaging it with my hand, because it's so much faster. But i would definitely prefer this way if it's this, if you're a beginner - and this is your first time ever dying here - you definitely want to be precise and make sure that you get all of the product on the hair, because you don't want any black spots. You don't want any parts to be more, you know color than the other, so if you're a beginner i would say definitely take your time, but i have time for that. Like i've dyed my hair multiple times, i've done my hair multiple times so i'll, just like over it. After i did this bundle and the purpose of like combing the hair is to make sure that you get the dye on like all of the strands. So you want to comb it through to make sure that you get it on every strand, because you don't want strands of black and then strands of blonde. You want everything to be colored and then afterwards, just massage it and get everywhere, get it on the um. Get it on the tracks and get it all throughout the hair. You know. If you want to pour more product on it, you can but definitely work it into the hair, and then that is how it looks. When i'm done, you can kind of see that it's starting to process already, you can see some of the red, but that is what it looks like so for the closure. You want to be a lot more careful with this. Then you are with the bundles just because this has lace on it and you don't want to get the dye on the lace, especially in the front, because that's what's going to be showing the front area or wherever you're going to have your part. So what i did was, i parted the hair down the middle split it up in two sections, and then i did section by section with dyeing the hair, so i wanted to have black root. Still, i really didn't want the color to be straight from the roots to tip. I wanted to look a little bit more natural, i guess and make it look like it's growing out of my head. So what i did was took some aluminum foil and put it over the roots and then went ahead and dyed the hair in every section that i did. I put aluminum foil on top of the roots, just to protect it from not only the color that i'm putting on that section, but then the other section that i'm going to put over it. I don't want that dye to get on it all right y'all. So this is what we looking like. This is how much dye i have left over, which is really good, because i really thought i was gon na run out of hair. This is the closure so far it is processing and these are the bundles. I'M i'm pretty positive that these are like really finished processing because they got super super puffy um, but i had more dye and i didn't want to waste it, so i put some more on it with my hands just like rubbed it in. So i think i'm going to let it sit. It is 8 29. Now i think i'm let all of this sit until 8, 30 and then just start washing i'ma wash those first just because i started at like almost seven o'clock um. So it's been about two hours um, but i started these first and i did the closure last. So i think i'll wash these out. First, i'm gon na. Let my closure sit for a little bit just so it could either be brighter or be just the color. Will match that i'm a little nervous because, as you guys can see in here, i don't know if you can but like like right there. Some of the pieces are lighter that kept happening as i was doing it. So i had to keep like stirring up the mix every time i know i put into different colors, so it's probably because of that, but i'm just hoping that everything comes out. You know as just one nice looking color, that i really pray that there's no streaks. I like blushes or anything, and i'm hoping that i don't have to go out and buy more dye and redo it just in case but yeah, i'm gon na. Let this sit until nine and i'll start washing these and then i'm gon na. Let it air dry go to bed and then tomorrow, we'll see what everything looks like as far as the color, because you really can't tell the color as is um damn you really got. Ta wait till it's dry, so all right, okay, people. So this is the finished result as far as the color get into it get into it get into it. Let me get closer to the light. Oh don't mind all the bottles but yeah. So this is the finished. Look i'm happy with how the um color turned out, but as far as the hair, but as far as the hair, like the actual hair, we're gon na, have to have a conversation about that maybe later on. I do think that this is probably like the perfect color, for you guys to try for fall. Burgundy and olive. Just screams fall um, but yeah. So i love the color. I think it turned out really really cute um, it's not as bright as i wanted it to be. I mean it's pretty it's a it's a good color. It is a really good color. I don't remember it's brighter than how i made it the first time i got this hair from beauty forever, hair, like i mentioned in the video, and it just did not. I don't know when i collected here the first time i did it from you, nice and yes, when you process hair, it's going to turn out different. You know, as far as like texture and stuff like that which is kind of expected, but i wasn't expecting this and i'm sorry that i probably didn't do like a sit-down video but honestly, it's late and i'm actually not feeling that good um, i'm hot these licenses, Make me hot i'm a little nauseous. I haven't only eaten like one thing today, so i'm just wanting to hurry up and hop on here and just like close a little video out, but it was really focusing on the color and i think the color it turned out really really pretty. I think it's really pretty but yeah, so this would probably just be like my youtube wig, maybe not for work. I honestly wore it like for two weeks and then i was just like i was over it because, like i said, the texture of the hair changed and i'm not too fond of it, and actually, i think, i'm going to cut it, because i realized that i, Like how shorter hair looks on me, rather than long hair like by length hair, i love that. I think that that's more me, that's more deja versus trying to be like super super long and half inches, i'm over it honestly, but yeah. So thanks so much guys for watching this video on how i dyed this hair. I hope you guys know got some tips and i hope you guys try out this color. If you guys haven't already. Please subscribe to my channel go ahead and give this video a thumbs up as well and turn on your post notifications. So you can be notified when i upload next. Okay, peace take a chance, you'll never know, but you don't know it's beautiful. Anything is possible, but you don't know it's beautiful.
Comments
AllThingsDejaNicole: If you've never went burgundy or red before this is your sign to do it neeoowww!! This is the PERFECT fall hair color to make the perfect statement this season!! I do want to apologize for the outro , sis wasn't feel good and that was the quickest way for me to get it done instead of doing a full sit down video. But let me know what you guys think about the color down below in the comments! ❤
Tiarah Griffin: Yessss come through red head I’m living for this color on you, it looks so good I ordered some bundles from beauty forever and once it was colored it died lol the hair was in shambles so I had to let it go. I wanna try a color for the fall and this was definitely my sign to go ahead and do it! Wish me luck
Pamela Griffin: Beautiful ❤️
Arlene Tatum: Extremely Beautiful Baby Girl