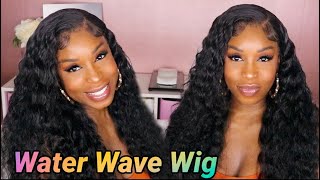
Bleach , Plucking, And Install Full Glueless Water Wave Wig Install Ft Isee Hair
- Posted on 26 April, 2021
- Color Lace Wig
- By Anonymous
Hello my beautiful subscribers (and non subs) ☺️
Want more help? I offer virtual 1 on 1 help just send me an email or dm for more information!
• I sell wigs after I review them! (Follow me on IG) I post the wigs in my story if for sale! But this wig has been sold !
Want a wig made? Want me to pluck and bleach the knots for you wig? Contact me!
IG:holaa_caro
Email:[email protected]
Hair info
30 inches 180% density
Brazilian water wave
Hair Link: https://bit.ly/3axOVRL
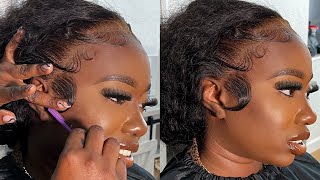
Hello, everyone welcome back to my channel in today's video we're going to be doing a start to finish. Wig install okay, i'm talking, but i'm going to show you guys how i bleach the knots on my wig, how i pluck my wig and all the things i do to get this flawless, install okay, the hair that i'm working with today is from ic hair company. It is a 30 inch water, wave, wig and all the descriptions and stuff will be down in the description box. I mean all the information will be down in the description box. Anywho, let's get right in to it. So that's how the wig is looking straight out of the box, and first thing i do to all of my wigs. Is i bleach the knots first? What right here is, i'm just spraying the front of the wig to push back all the baby hairs, because i do not want to get any bleach onto my baby hairs. A bit of disclaimer is bleaching. Your knots does promote shedding in the long term, so keep that in mind. But honestly, i feel like it's worth it for more natural look. This is the bleach that i'm using i like to use this generic bw bleach. I have a big tub it's about 12, but if you're regular, just like beginner or don't have like thousands of wigs like i do, then you just need about one side. I know beauty. Supply stores sell them for like one to two dollars, probably three dollars. If they're being extra - and i use 40 volume developer and the reason why i use 40 volume, i feel like it's high enough to let it bleach fast, but not too fast. Where you know, i can't control the process. I do not recommend using anything under 20 volume, but if you're beginner definitely go for a 30 volume, 40 volume is more of the you know advanced, i would say so. I put a good scoop like one scoop has a scooper in there. I pour in my developer, i like to pour it in slowly, especially beginner, because you don't want your developer, your consistency to be too runny and developer. A little bit goes a long way because you think you didn't pour that much, but now it's too runny and you know it's going to start seeping through your legs, which you don't want. So i like to pour it in into sections, and even in this i poured a little bit too much and it was a little bit too runny for my liking. I like to get a nice icing type of consistency, if that makes sense so like it's not like um a melted ice cream, it's kind of like spreadable like icing, if that makes sense right. So if you do end up pouring a little bit too much developer, that's okay, add more! You know powder to kind of offset the texture. I always make sure i flip over my spatula to make sure nothing's falling out if it's dripping it's too runny, and i cannot use that at all. Once i have the consistency that i like, i just go ahead with my wig facing upside down and open. Just go in and brush in the i don't know: hair bleach paste and i like to brush it in in a downward motion. I find that to be easier. I don't put too much pressure but enough to make sure that i'm getting those knots. So the whole point of bleaching are not is because we want them to go from black, as you see right here and then in about 30 minutes to this blonde color that you see right here. That'S how i know that i'm ready to go ahead and wash out the bleach. So here's me just you know washing it out. First, i wash out all the bleach and then once i've washed it out to tone the knots, because it's looking a little bit orange and brassy. I use this purple shampoo. This is a walmart brand, but people also use shimmer lights, which are popular, but it's much cheaper, so you know can't lose with that. I use a good amount like i'm trying to cover all of the hair with this, so i really squirt it in there and then i let it sit for another 10 minutes, not too long come back, wash it out and boom bam. Our knots is ready to be plucked, so i do have a recent plucking video out, so this is gon na be more like a quick overview, but more detailed one will be. Also in my channel, i put a white napkin over my canvas head, because this lets me see my knots a lot better, which really helps with over plucking and all of that. Okay, once i got my wig onto my mannequin head, i just go ahead and pin it down. This helps to you know, help you see the wig, but also helps create a little bit of tension. A little bit of tension is needed when trying to pull those knots out directly from the root. Once my wig is pinned down, i got everything brushed back, i like to part out the middle, because this helps me not over pluck in the middle, which can be very annoying when you're trying to the middle part and also just helps me work in sections. I find working in sections always helps to prevent you know mistakes. I know you guys can see how slightly over bleached this wig is. Like i said earlier, my consistency was consistency was a bit runny. So that's why it did get a little bit of a seepage, but that's okay. I can work with that whenever i'm installing the wig and i'll show you guys how to fix. You know over bleached knots, anywho back to the plucking. So first thing i did was i pulled out the very hair in the beginning of the wig right. I do not plug this first because i realize especially when i'm doing my baby hairs i'll have bald spots, so it's best to just leave that alone. For last, if it needs to be plugged once i've got all of that pulled out, i'm using this slant tip tweezer. This is from walmart. I believe it's revlon. I really like this one. It'S lasted me the longest, and i go in right with the tip the pointiest part facing. I guess the front of the wig and i just start to pluck skip a line. Pluck skip a line again. I do have a very detailed tutorial that i posted like not too long ago, so yeah just kind of see this more like an overview, a tip that i always say is try not to over plug okay, it's better to under pluck than over. Pluck because when you install the wig, you can see exactly where your head you need to pluck, so i always try to make sure i'm not plucking in the same area that once i've plucked one area, i start to go back. You know like back more further back into the hairline, not like back into that same spot once i have plucked all over right. I go ahead and push back the hair. That'S in the front and depending on how pre-plucked the wig came, some wigs come very pre-plugged. I do not have to you know, pluck too much in the front line, but some wigs are very bulky, especially in the front, and i will go ahead and pluck that front line. Okay, so we've plucked we've bleached and now we have to tint our lace. We'Re almost to the installation y'all so to tip my lace super easy. All i use is my foundation shade and i am using my fenty foundation in the shade 420 using a brush. I just go ahead and buff that on the inside and the outside of the lace make sure i'm covering mainly the front part of the lace, which is the part that i'm trying to you know have blend in with my skin tone. Now we have our wig tinted, we can finally install the wig. So okay confession: i don't know what happened to the clip of me laying down the lace - i don't know just disappeared, so forgive me, but we're gon na quickly. Just take a flashback to a recent install that i did because i use the same technique for all of my wigs okay. So what i'm using is my got to be hairspray and i'm just spraying that directly onto the front part of the hairline. You know just taking my time spraying that in and i like to go in with my rat tail comb or whatever you know surface flat surface thing i can use help me push the lace down in my blow dryer to on a warm to cool heat setting, Not hot because that's gon na make it too sticky, and i just use that to help push the lace into my skin once my lace is nice and glued down. I use just regular scissors to cut my hair into sections. Working in sections, like i said, always gives the best results using my little cuticle scissors, i'm just cutting it up and down jagged motion across the lace, and i try my best to cut as much lace as possible. Cutting off as much unnecessary lace is what helps you get that what lace effect, because if you just have lace, sit in there, then clearly there's a lace girl. What you mean, what lace all right now that i've cut off all the lace. I go ahead and just pull down the front line of hair. These are what i'm going to use for my baby hair and i pull out as much as i want, depending on how thick i want it, but i don't like them to be too thick. So i don't pull out too much and i just go ahead and re-spray the lace, some more because you know just in case i have any lifting, because you do not want any lifting, especially if you're gon na be laying down your baby hairs because trying to Sweep baby hairs when the lace is lifting trust me it's a madness so once i've done all of that, i pull the hair down like an anchor go in my blow dryer again to just you know: re-lock in that lace: okay, we're back to the present we're All caught up, thank you for being with me over there so and now that i've pulled out all my baby hairs, i'm just going in and just using my scissors and cutting them a little bit short. This is not as short as i'm going to cut them, but just for now so i can, like you know, see what i'm doing, i'm using my elastic band to just lay the lace one more time, because i'm really not trying to have any lifting. I'M telling you lifting is the devil when it comes to trying to get a flawless install. So i put my elastic band, let that sit for a little bit, probably like two to five minutes, come back and we're ready to do our baby hairs. So for my baby hairs, i am using a got to be gel. I'M sorry, i'm tripping, i'm using eco styler and i like to use eco styler, because it's just i don't know it's not as sticky as got to be. I used to use got to be, but eco styler is not as sticky which i really like. So that way, whenever i'm trying to like swoop the hair into the way that i want it, i can go back over and over again and it's not going to just like be stuck, but once you lay it down it stays in that place. That makes sense. So it has the lasting ability of god to be without all that extra stickiness, which i really like. So i do also have a detailed baby hair tutorial which i'll link down below, but just a quick little overview. I just kind of just swoop and use my finger as like a placeholder. If that makes sense, i always kind of look at like instagram pictures or a pinterest post to give me inspiration for what i'm doing, because, honestly, i never know what type of baby hair i'm going for as you can see. First, i thought i was going to do the little. You know middle part, type of thing where, where there's only swoops on the side, but i changed my mind and ended up doing the normal traditional baby hairs where you know you have this soup in the middle and all around the hair. So i kind of just do whatever i feel like looks good. It does take me honestly, the longest like the install part super quick, the baby hairs. Take me sometimes can take me an hour just to figure out so don't be discouraged if you're not getting it. It takes time it's an art but yeah. So once i'm done doing my baby hairs, i will come back to you guys um. I left work early. I thought you could go for a ride today. What no? I can't go on a bike ride right now. Why? Because of the play you just stand in no, no, it's not the place just you know. I can't go on a million bike rides whenever you want me to you, know: hey. Is it about a girl? No, no just drop, it is lindsay right. Am i really suffocating no they're different people every day, teenagers hormones all ablaze, except, of course, when they're on stage? When i need it, no, you said it wasn't about a girl. Maybe it really is falling away. I shall play tobias came up with a new plan for the play and a way to connect to george michael. I know why you're in the play, what baby hair i have been laid and now we're gon na go in with that last band one more time and let that lace simmer final step of this is to go ahead and you know define these curls all i'm Using is a little bit of a leave-in conditioner, i'll link it down below which one i'm using mixed in with some water into a spray bottle, and just you know, brushing out the curls until they start to get nice and defined. I just like to make sure that i'm brushing them all the way through and scooping towards the end, to really get that you know ringlet type of look and also it's really important that you drench the hair, especially if your first time you know out of the Box defining the hair, because you need to break away from that like manufactured curl pattern when it comes in and brush it out to get the actual really pretty curls. That'S meant to have now that i've gotten both sides - nice and defined. I like to go in and scrunch the hair scrunching also helps promote the defined curls. You know, so i go ahead and just scrunch it all up and i bring the hair forward all the way, and i just let the hair air dry like this. Sometimes it takes one to two hours, one to two hours for a complete air dry, but i make sure i don't run my fingers through it. I don't do too much just let the air dry, let the hair air dry in this wet look and it will dry basically in this wet look. So i'll, come back to you guys once the hair is all air dried out, so we're back. The hair is still drying, but it's okay. I just want to show you guys real quick, what i do to just finish off the hair, to give it that flawless, install type of look. So, first i'm going to go in with this hot comb and just push that right into that part to get a really really flat part, and now i have to do two things as well. I need to fix that over bleaching that i mentioned earlier, and also you know, get that part popping so to get the part popping. I go in with my concealer in a little brush and this is a concealer shade. That'S like what i'll use to highlight my eyebrows and i just draw a nice a straight line, all the way back, and this helps to make that part. You know really defined and pop, but to also make it pop. I have to fix all this like over bleaching, because now it looks like i just like over plucked. My part i go in with my mascara and i just you know clean up all of that extra bleach. As you can see, and now it looks very clean and just you know, professional and flawless, we are finally to the end of this install all right. I hope you guys have hung in there with me, because i know it's a little bit of a long video, but now, just you know finishing off, i'm using my hot comb to just frame the phrase frame, the hair. The way i wanted to like i'll lift some parts flatten some parts just make it look the way i want it to look and, like i said this hair was about like 80 percent dry in this clip, but the last clip i'm going to show you is What the hair looks like a fully dry, but that is all i have for you guys. I hope you enjoyed this video. Thank you so much for watching. You have any comments. Questions concerns you all know where to be the description box and make sure you like comment and subscribe and yeah peace out girl scouts see y'all in another one good, bye,

Comments
Armani P: This is becoming my favorite hair texture it looks so pretty on you
Rachael Barbara: Instead of bleaching try the lace tint spray it saves so much time and it’s easy to use !!
Tijuana Skky: Great video very detailed very friendly ❤️
Ty.Ahmara: thank you! Gonna try my first wig install
Sammie: Love this hair on you , I love when she says “peace out Girl Scouts”
nai ツ: just bought this i already know im gonna love this wig. tysm for the tutorial
Cinnamon: Wow, just no words. That wig is immaculate
Arianna Gills: Beautiful
Jahmieya Ewing: Hey love quick question, who do you recommend getting water wave hair from off of Amazon?
Mimisaidwhat: Love it! So what conditioner did you use? I didn’t see it listed. Thanks!
abs: i love this curl pattern on you!! is this video sponsored by any chance?
yanky_olabode: My wig has already been customized and installed previously, do you think its too late to bleach my knots even if half is already gone?
Tijuana Skky: Great job
Jha J: Beautiful ! Would you recommend water wave hair from ISee or Yolissa? Getting ready to purchase and torn in between the two after watching both videos.
Kiara Sergeant: How long did it take to ship?
Sierra Queen: Love it beautiful new subscriber
Mia Pia: What do I do if the wig they sent is too small ? I tired to get them to send me a new one but it’s not looking so good . I got a large but it fits like a small
HERHAIR HABITS: Where do you get your elastic bands from ?
Aniya Hebron: Do you still have this wig for sell?
Sleepy Natali: Baby the way these other companies use your pictures from this video it kills me glad I finally found you♀️
xxfloatyourboatxx: do you have an update on this hair?
Nairobi: Unfortunately the hair I purchased was very thin. I'm sending back. Do not be fooled by these videos. I'm not blaming her, it's the company.
K R: I just ordered this wig and it came today and it was total shambles. It wasn’t even 180% density and I ordered it as a 13*6 and it doesn’t even look like a 13*4. I am so upset I was just trynna be as bad as you Carol and they jipped me♀️
Tijuana Skky: So nice salon finish
CAPABLE OF GREATNESS: ....well girl i mess up my wig, i dont want to think about it... i only paid £70,00 ordered from china
S W: Is there a reason why you don’t use your rubby kisses foundation ( shade 11) anymore ?
Katura McDaniel: can we get an updated makeup tutorial
Titi Ogbola:
Just Nana:
LA Will: ❤️❤️❤️❤️❤️❤️❤️❤️❤️❤️
Sasha LabellaSoul:
nadine Martin: I don't like curly always get tangled in the back
M: their reviews are quite bad