Very Detailed Curly Wig Install Tutorial Ft Iseehair
- Posted on 10 November, 2020
- Color Lace Wig
- By Anonymous
Hello guys! Welcome to my channel . Here is my very first YouTube Wig Tutorial. I will be posting a lot of these here on this channel! I am a beginner, so please subscribe and grow with me ❤️
The company I used here : https://www.iseehair.com/?gclid=CjwKCA...
Exact wig in video : https://www.iseehair.com/isee-hair-bob...
Hair dye : https://www.amazon.com/Adore-Semi-Perm...
Bleach : https://www.amazon.com/Clairol-Profess...
Developer : https://www.amazon.com/Super-Star-Crem...
Instagram @Miss_Pecantann
Twitter : @Thatskaylah
Snapchat: Kaylahtheog
LIKE COMMENT SUBSCRIBE
THANK YOU ❤️
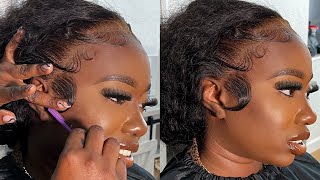
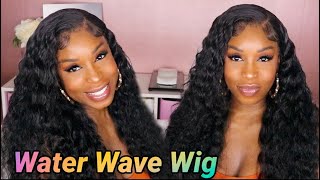
What'S up y'all today, i will be doing a tutorial on how i installed this wig right here. You just saw me blow drying it now. I am using my hot comb to straighten out the edges so that i can prepare to pluck so i'm just using my hot comb here, i'm just plucking it. I don't really have a special technique to pluck in i just put wherever i see a thicket. I like to plug right there on the hairline so that i don't do too much. You know i don't like to have a very, very thin hairline, but i also like it to be thin enough, so i'm just plucking along the hairline. I don't have any special techniques without plucking. It'S really up to you. The way that you decide to pluck your hairline here, i'm just continuing to look okay right here, i'm just going to do the basic ball cap method. Um i like to actually cut two holes on the side of my ear. That way. The cap just lays better to me. I see a lot of people do this, so i feel like this is just the best method before you apply your got to be spray, so here you just see me cutting holes and aligning it across my ear. I have a very small here, y'all. Okay. Now i am about to apply the got to be glue spray across my hairline um. I like to spray this braid a little bit way above my hairline, so that i don't place my wig directly on my hairline. I have um very thin edges, so i try my best not to put too much pressure on it, but also don't do it too far across your hairline. If you know what i mean, i just think it depends on what type of hairline you have um. It'S pretty self-explanatory. Once you get ready to spray, you will be able to see where you need to align your godspeed glue, i'm being very sloppy y'all. I was in a rush. I'M not gon na lie, so just as long as you get it across your headline. This step is not hard at all. I received this hair from icyhair.com um. The wig came with a wig cap that is very useful y'all. You could really use this. You could never have too many. Weird cups also came with a pair of 3d lashes. I think the box is very cute here, i'm taking the lashes out of the packaging so that you can see it better. Here is the wig that i ordered y'all. This is a 10 inch mongolian curly, 150 density, 13x4 um. The lace was very, very full. I really love how they had the three combs on the inside and the hair was very thick. I loved it here, i'm just applying my shade of makeup on my ball cap. You want to make sure that you have your shade of makeup for your bob kept, which is obvious. I mean you want it to look as natural as possible. You don't want anything too light or too dark. You want your exact foundation completion, so there i'm just spreading this across and you will take that same foundation and you would do the same thing for your lace. Apply it on your lace as i'm doing right here, and you just want to make sure you use that same shade and i'm just showing you how it looks. Okay. Now i begin to cut my cap off that this step is very simple. You just simply cut the cap off against your hairline. As you can see, i was rushing, so mine did not come out as if i would have took my time, but it's good enough y'all. You want to apply 99 alcohol to wipe away the extra makeup that may have gotten on your skin. You don't want any oils before you get ready to apply your glue here. I'M just measuring out where i would cut along the sides which i already have. I cut along the side so that it can fit over my ear. You always want to make sure you do that here. I'M gon na do three layers. I'M not gon na do the entire three layers on camera, but i apply my glue and dots. I use got to be glued and i apply my glue and dots and i also spread my glue across with my finger. This step is um to each his own. I like to use my fingers personally because it gets the glue spread across better for me. I don't really like to use. You know products for that here. You wait until the glue is completely clear. You don't want any white glue before you lay that lace, because it will show guys. So you just want to make sure that it's completely clear - and you lay your lace right on the glue, which is also pretty self-explanatory, make sure you layer directly on the glue you don't want to lay it too far across or too far back i like to Use the end of my edge comb to kind of mash it in, and you want to use that cone part. I tried to use my fingers as less as possible to do this part because it could just it could look messy. Also. You just want to try to use at least like a little small comb or the end of a brush to do this part. You just want to spread that glue in rub it in very good before you begin to blow dry it. Okay. Now i'm going to take my blow dryer to melt that in all the way it does not really matter what heat setting you have your blow dryer on. I prefer something that i can have it as close as possible to the lace. I just wanted to know you know get dry as fast as possible. No one really wants to sit there with a blow dryer in their face for too long. So whatever works for you. I also find it helpful to pull down a little bit as you blow dry, just to make sure that it sticks. Okay, here i'm beginning to cut my lace y'all, i used um my eyebrow archers. For this part, you can use hair scissors. You can use your eyebrow archer. I just find my eyebrow archer kind of easier to you know, get the shape that i wanted to cut my lace. I don't like to cut my lace straight across i kind of like to zigzag a little bit as you can see. Okay, i got this elastic band from the packaging my wig came in, so this really helps melt as you begin to style your weed, the way that you want to it's good to wrap an elastic being around just to help. You melt the lace here, i'm using my kandra boutique hot comb to hot comb, my hair into styles. I wasn't really sure how i wanted to style my hair at the moment. I think i was just doing this part to melt my lace in also hot cones. Really do help you melting your lace, also, okay, i decided to go with the half up half down, so i use my hot comb to guide my hair up into a ponytail and that's what you see me doing right here is that unless the bean is laying, I begin to style my wood now that i got that i took off my elastic band as you can see, it helps so much with the melting process. Also, i like to use that to pour out my baby hairs and i parted those out before i applied the less again so that it can melt down. So i can prepare to style them so here i'm just cutting the baby hairs with also my eyebrow archer. That i used to cut my lace with it just gives it a cleaner cut for me here, i'm taking my tweezers just to give my baby hairs a little pluck. I try not to have thick baby hairs. You don't want thick baby hairs y'all. So it's best that you use like a tweezer to just plug out your baby hairs and just stand them up to your liking. You know it's just easier that way and i'm going to take my eyebrow archer and just cut down my baby hairs. Some more here. I'M just continuing to customize my baby hairs. The way that i want them, i'm just going to take that little piece and wrap it around the ponytail y'all to hide the rubber band. I hate that look. Okay, i'm not gon na lie out. This is always the most challenging part for me, i'm a perfectionist, so i take a lot of time with my baby hairs, which could be a good or bad thing. The only bad thing about this is you don't want to clump too many products on your baby hairs, because it could possibly cause your lace to lift or it can just cause residual. It could just look very bad. I did this because you know it's my head, but it's to each his own, but i spend a lot of time on my baby hair, so you'll kind of see me struggling struggling a little bit y'all, but don't get discouraged. It'S really not that hard. Once you just continue to do it, you kind of just supposed to let it flow and use your fingers to guide you, it's okay to do it until you get it right, but just try to avoid using too many products like i did. Baby hair sometimes can take a lot of customization. You will see me using my hair scissors to cut them some more. It just depends on how you desire your baby hairs to look. Sometimes you can go in unsure how you want them to look. So it's okay to customize a little on the way. I mean it's fine, just as long as you get them, how you want them. Also one thing that i did not do on camera. I got this trick from arrogance. Hey i got a um. I got a flat iron and i kind of flat ironed. My baby hairs, i kind of gave them a little curve. I saw him do this and i figured that you know if arrogance, hey, the goat did this. Why not so i tried that treat and it was very helpful because it helps you guide, your baby hairs, the direction that you want to. So you could just take a haircut, not a haircut. I'M sorry y'all, you can just take a flat iron and you can give your baby hairs a little bump and it will definitely help you in the baby hair process. You can see the mistake that i made, i probably use too many products and you can see the residue, but i will make sure that i fix that this video is really raw y'all, i'm showing y'all my mistakes also, but as you can see the more that I did it, you know the more it kind of flowed for me. It just takes a lot of practice and a lot of patience awesome as you can see, i'm using my fingers to swoop and guide my baby and then i'm just going to do the same. For the other side, also, one thing i forgot to mention what i use for my baby hairs is the got to be glued. The yellow bottle the spiking glue. I used to use on gorilla snot in the red and blue bottle, and my lace will always for some reason lived with that. So i tried something new and i really like the yellow bottle. I'Ve got to be glued, so there are many different things you can use. You could use mousse with zero alcohol. You can use your little snack. It just depends on what works best for you. As you can see, this side was much easier for me. Awesome awesome! Okay, y'all, i could not find my spray bottle um in my spray bottle, i usually just add leave-in conditioner and water, but since i couldn't find it, i had to use another bottle, but i just put canson curling activator in this bottle and water. That'S it y'all and it's okay, just to use like a leave-in, conditioner or curl activator and water into a bottle to get that wet. Look. Um, not everyone prefers the weight look, but i love the way it looks. So i had to find something to work y'all, but it worked fine, it's just not the type of bottle that i would usually use, but it worked fine, also y'all throughout this video. Please just use that hole in my shirt. This is the shirt that i'm working on y'all, so please excuse me. This hair is very beautiful. I love this um texture. Mongolian curly is one of my favorite textures y'all. So this is the texture. That'S in this video. I really love the curl pattern. The hair bleached perfectly y'all it bleached and colored perfectly the lace bleached perfectly. I really just love this unit um. I just think it was very full. It was just everything that i expected it had very minimal shedding and i would definitely be shopping with these. With this vendor again, i will be dropping the um description of this hair in the um description below i'm sorry, i will be dropping the link in the description below so that you can go, get you some. It was not pricey at all. I did not even pay a hundred dollars for this wig here, i'm just adding the pencil and water just to get my hair. This wet look and, as you can see, the curl pattern is coming along the more i wet it. It'S such a pretty curl pattern. Also, the way that i got this hair color, i just got two bottles of developer and bw2 powder and i lightened the hair first and then i got honey brown dye and i did the water method, which is where you boil the water and then once you Boil the water and you pour in the dye and you stir it and then you just dip the hair. Yes, this does work on hair other than 6 13. You just need to bleach your hair first and then proceed to do the water diabetic. Okay, y'all i'm adding a oil sheen to it. I love oil sheen. I think it smells so good and it gives your hair such a pretty shine for the end result. So i just got a local beauty, supply store ocean and just applied it, and this is the finished, look y'all. I think it turned out perfect. I really love this hair. I love the style that i did. I just love everything about it. I think it was worth it y'all, like i said i will be leaving a link in the description so that you can go get you one of these wigs y'all. It was very much worth it. I will be shopping with them again. Okay, y'all! So don't forget to like subscribe and comment. Follow me on instagram, miss underscore pecan pan with two ends: twitter, that's kayla and snapchat kayla, the og! Thank you. So much for watching. Don'T forget to subscribe. Like comment and watch again see you guys later. Yes, yes, ma'am. Okay, it's giving all that it was supposed to give you hear me

Comments
Albaga Smith: Just a tip try mousse for baby hair’s, as you can see your baby hairs starting to look frizzy or whatever but mousse would definitely help! Other than that I love it!!