Isee Hair | Mongolian Water Wave Wig | Wig Review
- Posted on 24 March, 2020
- Color Lace Wig
- By Anonymous
Hi beauties! I am back with another wig review. This is a 100% honest review, and I was NOT sent this hair. I purchased this with my own money. This hair was extremely affordable and had amazing quality. If you liked this video be sure to LIKE, COMMENT, and SUBSCRIBE to my channel!!! Also, comment down below and let me know any future videos you want me to do.
HAIR IN VIDEO: #ISEEHAIR
LINK TO WEBSITE: https://www.iseehair.com/
DIRECT LINK TO HAIR: https://www.iseehair.com/isee-hair-bra...
TITLE OF HAIR:
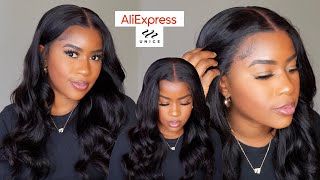
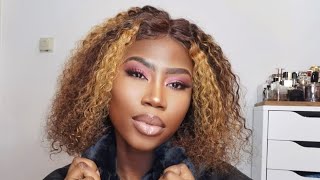
ISEE HAIR Water Wave Lace Frontal Wigs 100% Human Virgin Hair Wigs
HAIR INFO:
HAIR COLOR #1B
HAIR LENGTH 22 IN.
HAIR TYPE MONGOLIAN HAIR
PRICE $171.99
DISCOUNT CODES #ISEEHAIRCOMPANY :
Save $10,Over $199 ,With Code Beauty10
Save $15,Over $299 , With Code Beauty15
Save $20,Over $399 ,With Code Beauty20
Save $25,Over $499 ,With Code Beauty25
BUSINESS INQUIRES:
SOCIAL MEDIA:
IG: sierraa.s_
Twitter: sierraasaron
Tik Tok: sierraa.ss_
GOAL: HELP REACH MY GOAL OF 100 SUBSCRIBERS BY SUBSCRIBING TO MY CHANNEL!!!
Hello welcome back to my channel. I am sierra saron and this video is going to be on how i styled and customized this wig from icy hair. So once again i purchased the hair by myself. Nothing was sent to me, so this hair is actually 22 inch. Water wave hair, which comes down relatively far it comes down to like my belly button area. I didn't get super long hair because, like once, you wet it it's going to get even longer, so i just made sure i just got something nice and simple: 22 inches. So if you want to see how i styled and customized this wig just keep on watching back to my channel, this video is going to be a wig review from icy hair. So the hair was 22 inches, mongolian water wave hair. So i'm just doing on packaging to show you, the company that shipped it to me was dhl express, and it wasn't much that was in the package like how supernova or love me hair had. It was pretty much just a pair of lashes and then the actual wig itself, but it did come in a nice customized package and the hair was nicely packaged too. So so here, i'm just smelling to see. If it has that chemical smell like y'all, know when y'all get wigs and some of it smells like it has like some type of chemical in it, this one smelled like it was you just got your hair done out of it like a hair salon like it Had like a nice natural smell to it as if you were getting your real hair done, which i actually liked about that because i don't know about y'all, but i don't like that. I don't like when wigs come with that chemical smell. I mean i wash the hair regardless, but i just don't like that smell, but the hair did come pre-plucked but as y'all know, i'm gon na go back in and pluck it anyway, and the hair was super. Soft at the top, but for some reason at the bottom, it started to feel a little dry. I can't i can't explain it. It was just a really soft texture at the top and then, as you worked your way to the bottom, it kind of felt a little a little rough, but maybe after i wash it it'll change the texture. I don't know this: isn't the actual cap i'm wearing for the wig, i'm just getting ready to put the wig on so i can cut the lace off so the combs actually did fit this time, which i liked and the part in space. It wasn't a big part of space, but it wasn't that small either. It was enough part in space for you to have a middle part in a side part, and it was laced all in the front. So you could so you didn't have to worry about track showing or anything it was laced all over the front. So, as you can see, the lace kind of had a gray tint to it, which i didn't like and the knots were super super black and at the end of the video you can see how hard it is for me to use the foundation and the bronzer To kind of cover it up so later on, i'm gon na explain how you're, probably a bit con is that you're going to probably have to bleach it. If you don't want the knot showing because i tried to apply foundation on the cap, i apply foundation on the wig and still i could see the knot so that that was a really big con for me here. You just keep seeing me, pull the lace because my edges come out pretty far. My hairline comes out pretty far, so i'm just trying to pull it so it can cover it up. But as you can see how the hairline isn't a straight hairline is crooked. So it's a more natural look which i really like. So when it comes to me cutting the lace off. I do it piece by piece and i kind of trim it off. Do not - and i repeat, i repeat - do not try to cut your lace off all in one sitting, because if you mess up, then you just sort of mess up. You need to go piece by piece just to see what you're doing and see how far you want to cut it. If you cut it all in one sitting and comes to find out, you either cut it too far or you cut it too close. Then it's going to be really hard to try and fix that, especially if you're like me - and you have your hairline coming out pretty far so just take your take seriously. Take your time with this step. Okay! So here i'm just showing you what the lace looks like before i go in and pluck it and, as you can see, they did do a good job plucking it, but you should always want to pluck just a little bit more. So the front of your hair is just not as thick, so i did all my plucking off camera. If you want to see how i pluck hairlines and how i pluck my wigs just comment down below - and let me know so then i'll know to do a video on it. So i can in detail, show y'all how i pluck my wigs. But here i decided to take a bronzer, not foundation, yet i end up putting foundation on my cap, but i just took bronzer and kind of dabbed it all over the lace just to give it a brownish tint to it because, like i said earlier, it kind Of had like a grayish tone to it, which i didn't like yeah, so i fell asleep. So this is like the next morning because i don't know, i don't know about y'all, but i can't keep recording and i'm tired because then i start slacking and i start getting really lazy and then i start looking all crazy. So i ended up falling asleep and then i woke back up to finish the wig so right now this is when i actually took my foundation, and i took a lighter cap and you just see me kind of dab and foundation all over the front and make Sure you definitely get that edge. That'S covering up, like your edges, make sure you definitely get foundation right there, because that's the main part that people are going to see. I don't know what happened to my camera while i was doing my edges, but if you want to know how i lay my edges, it's the same method as i always use with the got to be glue. I didn't use, freeze spray or anything. I simply only use the got to be glue and i just slick my edges as if i was using mousse or how i would lay my real edges. So that's all i did for that part, and then you can just see me taking in foundation and filling in the spaces in between just to give it a more natural look. So here i'm just taking mousse nothing special, it's just like any store brand mousse and i'm just working it through my hair and no this isn't like my wet look. I just kind of wanted to lay it down a little bit. I'M probably going to do another video on how i would style it as a wet look, but this right here, what i'm doing with the wetter and the mousse is not a wet look? Okay, so this is the finishing look. I had a hard time trying to hide the knot so later on, i'm probably going to have to go and bleach the knots, because the knots were just flat out black like no foundation could cover it up. Nothing so later on, i'm probably going to have to go back and end up just bleaching them, because that seems to be like the only way i'll be able to hide them. So this isn't a wet look. All i did was put water and mousse in it. Just to kind of flatten it - and i did have a middle part at first and i didn't like how the middle part looks - and i know i like i don't do side parts, but i ended up doing a side part and i actually really like it. So this is the finishing look and i'll show you how long it is so this is 22 inches. It goes down to like if you stretch it. It goes down to like right here, but this is 22 inches, so i actually do love the hair. I just have to go back in and bleach the knots, but other than that i really do like it. It'S super soft and when i washed it, i had no problems when i was plucking it. I had no problems. This might have been the easiest way to pluck so this is the finishing look and if you like this video, please sure to like comment and subscribe, and i really hope you enjoyed


Comments
Patrice B.: What density is this hair?
Xeena R: Can we get a video on plucking & laying edges down friendddddd❤️
uluvjessi: Pretty !
SumthiN Ncredible: Update on the hair