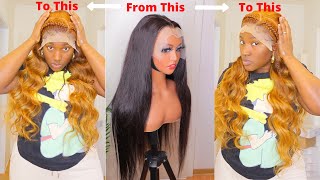
5X5 Hd Closure Wig | Spring Is Coming Early! The Perfect Auburn Wig By Bleach Bath | Nadula Hair
- Posted on 26 February, 2022
- Color Lace Wig
- By Anonymous
Hey fran !
In this video, I am showing you a video on how I bleached bath and installed this 5x5 hd lace wig on myself by Nadula hair.
Enjoy and remember to like, comment, and subscribe!
Social Media
❤️Facebook : London Tayy
❤️Instagram Hair page :@thelondontayy
❤️Instagram Personal page: @londontayysway
❤️ Amazon Storefront : https://www.amazon.com/shop/londontayy...
❤️ Business email : [email protected]
Location: US -Columbia, SC
-------------------------------------------------
Products used:
light hold spritz
got2b glue spray
20 volume developer
quick blue bleach powder
biosilk serum
aphogee mousse:
●▬▬▬▬▬▬▬▬▬ ◆ #NadulaHair ◆▬▬▬▬▬▬▬▬●
❤All the hair can be paid in 4 installments
★ $20 OFF for $199 Code: Nadula20
★ $10 OFF for $99 Code: YTBGIFT
———————————————————————————
Direct link in the video: https://bit.ly/3LKGRhL
Hair Info: 16 inch 5x5 HD lace body wave wig 180% density
https://www.nadula.com/ ➤ Top-sale wigs: https://bit.ly/3v7BIuj
Can’t miss affordable V part curly wig: https://bit.ly/3D3E6mB
Invisible 13*4/13*6/5*5 HD Lace Wigs: https://bit.ly/3p19oWz
New arrival Fashionable Wigs: https://bit.ly/3v3xmnX
Top-selling bundles with closure& frontal: https://bit.ly/3JGK93G
Nadula Customer Service Email: [email protected]
Aliexpress Nadula Hair Website: https://bit.ly/3gSYWfm
Aliexpress Nadula Hot Sale Wig: http://bit.ly/3068Mlt
Amazon Nadula Hair: https://amzn.to/38ttXlC
Follow #nadulahair for giveaway:
☛Youtube: https://www.youtube.com/c/NadulaHair
☛Instagram: https://www.instagram.com/nadulahair/
#nadula #nadulahair #nadulawig
-----------------------
bleach bath,black to blonde,bleach baths for wig,how to bleach hair,bleach baths for hair weave,5x5 closure wig,5x5 closure wig install,5x5 hd lace closure wig,5x5 closure wig side part,5x5 closure sew in,nadula hair review,nadula hair,closure wig install,closure wig,closure wig amazon
Hey guys, what's up welcome back to my channel, this is lunatech coming to you today with another video girl, i am doing a closure wig install on myself. Okay, the hair is from nadula hair. This is the sack that the hair came in okay. It also came with some goodies guys. You know they always always always include some goodies for you. Okay, you got some lashes. Okay, okay, okay, got a powder brush. The girls always need a powder brush. All right. We have a wig out brown brown is. Where is that? Okay, unless you are a fair-skinned woman and a cute little scarf? Okay, that is all that is it that is all baby in this wig okay, this is the result from the bleach bath. Okay, it has this pretty little auburn color. Okay, super super cute, okay, nothing too crazy, but enough color to bring life to you right. If you are a new subscriber, we do give hugs around this mug all right, i'm just gon na go ahead and give you guys a hug when i do personal videos, that's what i like to do all right. All right! Let'S go so without further ado. Let'S go ahead and jump into the video all right y'all, so here i am about to bleach bath. This wig i'm going to use the l'oreal, quick blue ester strength and i'm going to use the clairol 20 volume developer, which i do not recommend this low of a developer. I recommend 30 or 40 because it's a lot quicker, but this is the only thing that i had to be honest. So i'm going to fill out half of my sink with hot water. Don'T do too much too much hot water or too much water in general. You don't want to dilute it that much, but that level right there is just fine, okay, half of that sink okay. I am going to empty the entire container of that powder that i have left and i'm just going to kind of mix it with the water. Now one thing i feel like i do recommend is mixing the developer, as well as the bleach together first and then adding the water. So that way you don't get so many clumps, but as far as clairol um liquid, i just kept adding adding adding liquid until it wasn't as watery. You know what i'm saying so i just kept adding. So i just could say honestly, probably just use one container of the one big container of the powder and one bottle big bottle of that developer. Okay, but, like i said, if i feel like, if i would have mixed the the powder and the developer together. First, then, that would have been fine and then adding water. Second, you wouldn't got all those clumps okay, but, as you guys can see, the color was even the color was fine, so i wouldn't trip too much. I did have this sitting in the solution for 45 minutes halfway throughout the solutions. I did grab it out of the solution and comb it all the way through. So that way everything was even and distributed properly, because, if not, you may get blotches and we don't want that. Okay, so guys after i did that i shampooed it conditioning. You know the good old, whatever, whatever whatever let it air dry for the most part, and then i got started on my hair, so my hair, i'm using a hair growth oil because i am on this hair growth journey. My hair has not been this best form. The last year or two i'm not really sure, what's been going on, but i've been doing what i need to do to get to grow it back or whatever the case may be so yeah. So once i put that oil on my scalp and i massage it in i'm, going to use the got to be glue spray on my edges, spray that on my edges and then mold it back with my hand in a blow dryer. Now i'm going to get a new cap now the new cap doesn't really matter because i'm not going to do a ball cap method today, guys i'm just going to use that cap to conceal my two braids in the back all right um. However, i was thinking like do. I want the cap to kind of still start at the front at first, i decided to do it at the front, but then i was like you know what i'm just going to slide this cap all the way to the bike. Okay, the bike and - and i'm just going to it out, like i usually do and just kind of click, make sure the part is clear in the middle and i'm going to use my own scalp and my own skin to mimic a cap all right. So here is the color guys, look how even it is like it is very, very even it turned out very, very well all right so um so yeah yo. You know what i lied. I think that i kept that in the i kept that bleaching powder in there i kept that wig in that solution, y'all for probably like two hours. I think it was way longer than 45 minutes, because when i checked at 45 minutes it wasn't the color. I wanted i was like this is still pretty dark. Oh no, but you guys see when it's like wet look, how dark it is in the back, but as you guys can see like when it's done you're going to see that it is all one color right. So um, you guys can see how the cap is all the way pretty much slid further back, it's not at the hairline, so yeah i'm actually going to glue this down, because i just kind of like a glue melt a little better. I don't want it to be coming up all types of time because i actually do want to wear it for the weekend. So i want to make sure that it's still pretty molded and melted. So i'm going to clean my forehead with witch hazel and then i'm going to use the ghost bond glue girl, but i don't recommend a ghost bomb glue, but that's the only thing that i did have. So that's what i'm using i'm gon na do two layers and smooth it in and then i'm going to um apply the wig and kind of press it and melt it into my forehead alright. Also, once i did two layers and rubbed it in now, i'm going to pull the wig over and i'm going to press that lace into the skin. It will tell the glue and then i'm going to use a blow dryer and kind of heat it up and further melt it into that glue. Okay, after that, i'm going to use some guys to be glue spray spray, the hairline and tie it down with an elastic band. Okay, once i tied it down with that elastic band, i am going to use the blow dryer and bladder and dry the rest of the hair that is still wet. Okay, i'm going to focus on styling this hair, while the lace and the hair and all that stuff is being melted into that glue all right. So once everything is fully melted and everything is fully dry, i'm going to take that band off cut that lace off. I'M going to cut it with a regular scissors, guys i'm not going to use any type of um razor because i don't have any right now so yeah. So i'm just going to do that. Just kind of cut straight across i cut a little jagged, but for the most part guys, i really didn't focus on cutting the jacket. To be perfectly honest, i'm going to do a middle part and i'm going to focus on kind of making sure that middle part is defined and then flat. I did put a little bit of bio silk on the hair, just to kind of soak it out. Just to give it some type of moisture after i did diet and everything i'm going to use the wax stick on both sides of that part, and i'm going to use my hot comb on the highest setting. I think it's like 4 30 was the highest setting and i'm going to use that hot comb in order to lay everything down guys. If you got to go over a few times, make sure you do that, but make sure that is all melted and laid down. And able to do that? Okay, so i'm just going to keep on going, keep on going, keep on melting, keep on pushing it in to the wig and then now i'm going to pull out the baby hairs guys. This is the section where i'm going to figure out where the baby hair is going to be now. All of this is not going to be baby hairs, but i do like to pull that hair. That'S near the front of that cut off lace, and i like to use that in order to fully fully melt the rest of that lace. In once, i have comb everything forward and back i'm going to use, got to be glue spray and i'm going to use that to spray and plug i'm going to plug and spray. I'M just going to kind of you know, customize things pretty good and then i'm going to spray that got to be glue spray on the lace part where the the baby hairs are and then i'm going to tie it down once again. But if you see spots where you need to plug make sure you do take the opportunity to kind of plug plug plug plug now that everything is blown out and um, everything is just kind of blown out straight and look pretty presentable. I'M going to use the concealer that i use and i'm going to further define that middle part. All right, i am not going to plug anything out guys. You definitely definitely risk the chance of ripping the lace by doing that. So i really do not like to pluck where the part is. I just use that concealer and just define it and clean it up, really really really good. Okay, now i'm going to use a baby bliss flat iron to curl it now. I did trim a little bit of the hair at the end because it was pretty dry and straggly, so i'm probably seeing that in the other clip, but i'm just gon na make it like more so barrel. Curls, you know barrel. Curls is my thing. I'M gon na do that and for the entire head after i do that, i'm going to use a little bit of that spritz light super light holding spray just to kind of give me some some hope, but guys i do not recommend it. It kind of made the hair a little bit uh. It was super light holding spritz, i'm not sure why i made it crunchy, but you have a little hold, but if you continuously like combing throughout and doing things like that, you will feel that stickiness that hardness. You know you know what i'm saying like you'll feel that so i don't recommend putting any type of holding spray on the hair because it may get like crunchy and things like that. Alright, now that i took the band off and styled the hair, i'm going to use some aphogee mousse and i'm just going to use that to the mold things where i needed to go like i'm, going to put some of that baby hair going towards the back And i'm going to kind of push out where i do what my baby hair is and i'm going to use that to be glue cream with the mousse. Together, that's going to provide the flexibility, but also provide the hole that i want and that i need okay and i'm going to use that just for the baby hairs, not anything else. Everything else is going to get like some spray and some mousse and hot comb, but i'm not going to use any got to be glue cream or anything other than that baby, hair. Okay. So once i do that and just play with the baby hairs, i do decide to kind of comb the baby hairs out after they completely dry just to give it more of a fluffy look. I did bring that concealer a little bit straight towards my face. Instead of stopping or starting at a little bit behind the hairline, just to give it a more natural look, and i comb the curls out guys and that's how i got the end result that you guys see. Thank you guys so much for watching my video, and i will talk to you all in my next video love. Y'All, make sure you guys go to nuedula.com and by this week is actually a 5x5 hd closure wig. You guys can see it melted, great and the color was great. All right, love, y'all, so much bye,

Comments
Junior Chaves o Picasso de Yahushua: You're looking stunningly gorgeous as always ♥️
Afro Sophisticated Beauty: Love the color what did you use ?