How To: Side Part Quick Weave | Very Detailed Beginner Friendly| Gorgeous Ombre Hair| Beautyforever
- Posted on 25 March, 2022
- Color Lace Wig
- By Anonymous
This video details how I install a quick weave via the wig cap method using hair protector. The hair I'm installing is Beauty Forever's ombre hair.
These are the hair links for the description box.
●▬▬▬▬▬ #BeautyForeverHair ▬▬▬▬▬●
☛Get $20 Off Use Special Code: beautyytb
Video Hair Info: Ombre Straight Hair 26" 26" 26"
Direct link ➤https://bit.ly/3wOdO83
Easiest Install V Part wig: https://bit.ly/3tyLWCy
https://www.beautyforever.com/ ➤Best Realistic HD lace wig: https://bit.ly/3D48leg
Affordable Wear & Go HeadbandWigs ➤https://bit.ly/36mg3nW
Full Bundles Deal➤https://bit.ly/3iyqw25
☛Buy Now, Pay Later, 4 or 6 Interest-Free payments
Affordable Fashion Lace part Wigs➤https://bit.ly/3tvX4jD
$10 Cash Back ➤https://bit.ly/3DesM8j
Super Brand Day Huge Sale ➤https://bit.ly/36paEN4
#Beautyforeverwig #Beautyforevervpartwig
Aliexpress Beauty Forever Website: https://bit.ly/3epWyuk
Amazon Beauty Forever Hair: https://amzn.to/3p4FYHL
Instagram@beautyforeverhair: http://bit.ly/IGBeautyForever
Beauty Forever YouTube Channel: https://bit.ly/38akLUg
Customer Service WhatsApp:+8613783534924
Supplies Needed:
Hair
Hair glue
weave cap/ stocking cap
hair protectant or Got 2b glued hair spray
blowdryer
scissors
White eyeliner/lipliner pencil
Steps to install quick weave:
PREP:
1. Braid down your hair (optional, can pull into ponytail/slick down), and make sure to leave out enough hair at the top to cover your tracks.
2. Put on the wig cap (any color)
3. Use a white eyeliner/lip liner pencil to mark the area around your leave out
3. Apply hair protectant to cap avoiding areas of leave out , can use gorilla glue hair spray or morning glory hair protectant
4. Blow dry hair protectant making sure it is COMPLETELY dry
INSTALL
1. Measure the track hair against your head from ear to ear
2. Cut the weft that you measured
3. Apply hair glue to track and allow to dry for no longer than 30 seconds
4. Lay the track onto your cap beginning at the bottom working your way up
5. Repeat the above steps until you reach your leave out
6. cut off the remaining cap that's exposed (be careful!!)
7. Style your leave out as desired
Watch my other videos!!
How to Takedown your quick weave:
Quick Wweave install with Wiggings hair:
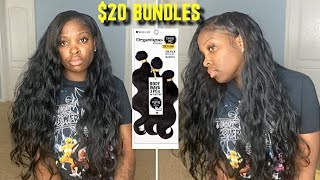
What'S up y'all welcome back to my channel this video, of course we are doing a side. Part quick, weave, so jump right into things, you're, going to start by parting, your hair to the side. You can do it to the left. You can do it to the right. The choice is yours um, i'm personally going to do more of an off centered side, part quick weave, but if you want like a deeper side part, you would just make your part a little bit further to the side. Also, you want to make sure that you leave out enough hair to cover your tracks. I personally wouldn't recommend leaving out any less than this. I know it may look like a lot and it may look like you can leave out a little bit less. But when you start gluing the tracks down you'll see that you're going to need enough hair. I barely had enough, so yeah definitely make sure you leave out enough hair and i'm just pulling my edges forward because i personally, like my edges, left out, but this is optional and you don't have to do that. So this step right here is one of the most important things that you're going to do during the install, because how your hair lays underneath your cap determines how flat your install is going to lay. I chose to do braids going straight back because i can typically make that flat, but i actually messed up in one of my braids towards the top was too thick and as you're gon na see later, it created like a little lump at the top of my Head and that kind of made me so mad i was i was - i was mad, but just make sure um you make the like at least the top of your hair as flat as possible when it comes to braids, so don't rush you may have to make Like a few braids and make them like really thin so that it lays flat. But it's super important, because if you make them too thick and bulky you're gon na have a bump in your hair. And it's not going to look cute and i'm just trying to spare you the pain in agony that i had to go through next, i'm just applying my wig cap. I'M only going to use one making sure that it fits properly on my head and that everything lines up on the back and the sides, and then i'm going to take a white, eyeliner pen and outline my leave out just so. I can see what i'm doing when i'm gluing the tracks to protect my hair, i'm using the morning glory hair protector and i'm also going to use some got to be free spray, and i'm going to take my applicator brush and apply this all over the cap. Except for where my leave out is at um and then i'm gon na go through and blow dry it um. So first i'm gon na start with the morning glory, hair protector and just brush it all over, and then i'm gon na blow dry that and then i'm going to go through with the freeze spray and then blow dry. That also, i want to point out that it's important to make sure to get this hair protectant and the free spray as close to the edge of the wig cap as possible, because this, once it's dried in place, it helps hold your wig cap in place. So it doesn't slide back and, as always, make sure everything is 100 dry before you start applying any tracks and the hair that i'm installing today is from beauty forever. Hair y'all. I am installing some 26 inch, ombre hair and i'm so excited because i've not had ombre hair since like 2012 y'all, and it has been a while, but i miss ombre hair and what i love about this is that it comes pre-dyed. So you don't have to do this yourself, don't nobody have to mess with no bleach um yeah and you can just go ahead and install it all. The information for this hair, of course, will be in the description box below um. When i first got this hair honestly, i was a little nervous because these bundles looked a little thin and i did not think this was going to make a full head, but it did - and i actually wound up having some left over. So three bundles is definitely enough for a full, quick weave head um. You can definitely get four if you feel like you can fit it, but i think three bundles honestly should be enough. Rest of your install should be smooth sailing from here, because it's pretty much repetitive, all you're going to do is measure the track from end to end and one end of the cap to the other end of the cap, making sure it touches the ends. You'Re gon na cut it then i go back in and re-measure it after it's cut just to make sure it fits how i want it to i put the glue on the track and then i attach it to my head now. Don'T worry, i'm going to show you this process a few times, but that's basically the just of how it's done. Okay, so let's go through this again. First, take the track and measure it from ear to ear side to side end of the cap to into the cap. Whichever you want to call it, then, after cutting the track, i use my fingers to feel where the previous track i laid is and where i want to place the new track. Before i add the glue just so, i have a good idea of where i want the track to go. Then, after applying the glue, i'm going to, let it dry for a couple of seconds just to get tacky kind of like how you would do your eyelashes and pay attention to how i'm holding the track. I hold it from the bottom, so i can flip it over and then i'm using my fingers to feel where i believe it should go and i'm placing it on the cap. Okay, so one bundle got me about halfway through my head. This is how much i have left for from the last bundle, but it's not enough to go from side to side, so i'm just gon na start over with the next bundle. Once i lay that last track that meets that bottom white line on the side that you can see here in just a second um. That means that i have gone as far as i can go as far as laying whole pieces of track like this, like. If you see right there, it hits that white line. This is the last track that i'm going to lay like this um, because now i'm going to have to fill in that gap on the side there and, as you can see in the back like, i can't go any further on the left side, because my leave Out is right there so now i'm going to start cutting smaller pieces to fill in that gap. So if you look right here, you can see what i was talking about earlier with that lump at the top of my head. I should have made this braid two individual braids, instead of one big one, which caused that little lump which made me mad. Just don't make that mistake, um yeah and you will have a nice flat install then, when i start getting closer to the front of my head, i'm gon na start curving my track so that my hair can fall on my face. Now. I'M gon na go through with my scissors and cut the cap down the middle being very careful not to cut my hair because i've done that before and that sucks um yeah and i'm also not gon na cut the excess cap off the side over there and That little gap on the left - if you can see that because i'm going to glue some more tracks right there, but i just want to go ahead and cut down the middle. So i can get a better idea of what it's going to look like this is so after i reached the end of the cap. I realized that i have some like gaps and some spaces on the sides, so i'm just going to go through with some more tracks and fill in the spaces which is going to require me gluing the tracks to my actual hair. You don't have to do that, but it's just a personal preference for me um, because i just want it a little fuller. So now, i'm just going to add some layers to my hair and kind of cut out my bangs. So my hair in front of my face can fall correctly and then i'm going to go through and curl my hair, which i cut most of that out because we know what curling hair looks like so after curling my hair, i decided i didn't like how my Bang in the front looked - and it looked a little thin to me, so i went through and added an extra track just so the hair can like fall in my face a little more um again, this is optional. But to me the bang just wasn't given what i needed it to give um. So i just want to go through and make it a little fuller and pretty much that's it. We are done y'all. This would have been a 10 out of 10 style. If it wasn't for that lump at the top of my head that i know y'all see so for that, i'm deducting two points i'll give this eight out of ten. But if you just take my advice and make sure the top of your head is just super flat, you won't have that and everything will come out cute and flat looking. But besides that it was really cute. I did actually wind up going back and uh filling in the back, adding more tracks to make it fuller like if you can see here it looked kind of thin. I added some more to the back to make it fuller later on. Maybe i'll show you that, but that's it for this video, like i said i got this hair from beauty forever. It'S super cute go check it out. All the information will be in the description box below um. If you guys have any questions about anything that i did make sure to leave a comment in the comment section i'll make sure to get back to you and yeah. If you like, this video make sure you give it a thumbs up, if you're new to my channel definitely make sure you hit that subscribe button, and that's it for this video. You guys uh thanks so much for watching adios until next time.


Comments
huhh?: I've been binge watching your videos for the past week! Thanks for keeping us Laid & Slayed, sis!
April Lambert: This is gorgeous honey!!! Thanks for sharing
Zakiyyah BG: How long will this last? Those colors look amazing on you!!❤
Ashanti Haley: I love the colors! Thank you for sharing. Would you say this hair is silky straight? also, did you use all 3 bundles?
Savage_liz22: I'm buying this like right now that hair looks dope af!!!
Dee Luther: First Comment Cute thumbnail tho Beyond Pretty you are Nice Cheeks Structure Them Beautiful Nails Happy Amazing Weekend Be Bless n Stay safe always
Soran Albert: dqpoieeb https://www.youtube.com/playlist?list=PLatBUqXIPJGg77ODNDckYbK6hiRP-ERW8
Anastacia Van Der Linge: Ggdtxh and I have to do it for a few a few weeks days now for a few days to and will we have a bft frxbs of our own and we will have the sweetest dreams and sleep tight and we will be able for