Fake Scalp Wig Install | 6In Part Lace Frontal Wig Ft. Rpghair
- Posted on 11 January, 2020
- Fake Scalp Wig
- By Anonymous
This wig is from https://www.rpghair.com/
***** RPGHair 2020 New Year Sale *****
$30 off over $259, code: NY30
$20 off over $179, code: NY20
$10 off over $99, code: NY10
here is the wig details in this video:
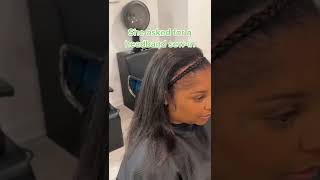
Fake Scalp Lace Front Wig 6in Deep Part Silky Straight Hair[FSW61]
Link: https://www.rpghair.com/6in-fake-scalp...
Hair Type: 100% human hair
Hair Color: natural color
Hair Length: 18inch
Wig Density: 150%
Cap Construction: 6" parting lace front + Fake Scap Wig Cap
More Affordable Lace Front Wig:
https://www.rpghair.com/lace-front-wig...
Join Rpghair.com on Social Media:
Youtube Channel: https://www.youtube.com/c/RPGHair
Instagram: https://www.instagram.com/rpghairwig/ @rpghairwig @rpghair_us
Facebook: https://www.facebook.com/rpghair/
Hey my love's welcome back for another video, so I have a close-up here of a last week, so you already know what video this is gon na be this here is a fake scalp, 18 inch, lace, wig. This was actually my Thanksgiving here and I don't know how I forgot to edit and upload this video, but we are going to definitely slay from start to finish. So this is a look at what the wig looks like. As I mentioned, this is a fake scalp lace wig. I believe it's a hundred and fifty percent density, which is perfect for holidays and family gathering, as it is not too heavy and dense. You get that fake scalp, which makes it look super natural. You get the elastic band, which also helps it to be glueless and fit your head perfectly, and you know we're gon na slate from start to finish. So, as you guys can see, the elastic band is adjustable. I kind of made it go as tight as it could, and this is what the wig looks like when you first put it on now, I'm gon na take shapers. You guys know I love to spray. I want to spray it all over the hairline, as well as a little bit in the partying. I want to take my electric hot comb. I'M gon na go ahead and press everything out now. One thing I love is to prep my wigs before the install. This makes for an easier and neater install, and I don't know it just helps everything to come together perfectly once I go ahead and melt the wig down now I don't know if you guys can tell what the parting is super perfect, even though it's a bit Lighter than my complexion, it looks so natural, especially because most of our scalps are a little bit lighter than our complexions anyways now with the hot comb. This is something that I didn't do years ago, but I feel like I cannot live without someone deemed to me. The other day next do I have to use a hot comb. The answer is, no, I've just become accustomed to use it, and I love what it does for my wigs hey. Can we get a load of how amazing this looks once you elongate the parting, so this one definitely came with departing? I believe this is about six inches of parting going backward, so you definitely can get a much more natural look when you go in with your rat tail comb and stretch the parting out as far as they can go now, you guys can see well the hot Comb does to kind of lay everything down. It helps to get rid of the flyaways. It makes it look a little bit more melted as the root looks super bone straight now, as amazing as a parting looks, the hairline definitely could use a little bit of tweezing. I went in a little bit, I didn't get extreme, but I just kind of wanted to break up the mundane and help it to look a little less boxy. You can also add powder to the party, and this will help as well. Also, it's good for me to note that I did not call wash my wig beforehand because it came with the fake Scout. I kind of felt like everything would work out a lot easier if I did not go in and co-wash, but you definitely have that option to do that as well as you guys can see. I'M gon na just take a bunch of clips and just pin the hair back as much as possible. Again this video was filmed almost a month ago. Actually it was over a month ago, so I've definitely changed up a lot and my technique. I'Ve definitely been teaching myself how to do different techniques when it comes to install this way, I would recommend to be like I know No just because you guys can see I'm getting that guys to be glued spray into the hairline way too much, which makes for A little bit messy of an install but you're gon na see I'm gon na be able to finish and bring it all together. In the end, also, I love using the blow dryer on a cool setting. It helps to pretty much adhere the wig and make it for a tighter hold if it makes any sense also make sure that you go ahead and cut and customize your lace around your ear. This will help the wig tool a super flat, and it just makes everything look so much better. If you don't do this, the wig literally will sit around your like. It is right now which is not attractive, and it definitely will help the weight to be a lot more flexible. Now. This is where air came into play. I applied all of this glue or got to be glued in my case around the hairline, and then I use my eyebrow brush to go in and cut it out or the excess lace out piece by piece again. You'Re gon na see, in the end that it all works out perfectly fine, but here I just kind of was like I don't know what I'm doing. Everything looks messy and crazy, but the silver lining that this is you're gon na see how amazing it looks in the end and all the shows is pretty much if you make mistakes just continue on, because at the end of the day, a lot of the times It will definitely just come together. It'S super nice, so you're gon na see me cut out the opposite side and pretty much go in and fix it with a little bit of extra spray on top and make sure I blow dry and everything together be sure to also use a scarf. And this is going to help to milk the lace in a super super nice. So next up is baby hair. Sometimes I like to do no baby here. Sometimes I like to do a lot of baby here and then sometimes I like to do what I like to call like my grown and sexy baby here. This is where you kind of just do two pieces of baby. Here are two swoops a baby here, one above like the arch of your eyebrow and each side, and it makes for a little bit more of a subtle classy, not even classy, just more of a subtle super baby here, so that it's just not too crazy. And I kind of finesse around the ear tap or the sideburn area, just so that you don't see where my sideburn is it kind of helps it's a blade, a little bit more but again to eat just only. You can definitely do whatever you know. So to you, but you can kind of see that the wig is starting to come together. As far as my install goals, everything looks super flat and as long as I go in and add a scarf, everything is gon na melt. As I said before, and look amazing also I've upgraded the way I do my sideburns so be sure to check out the last video I did and also the videos coming after this one and you'll see that the sideburns that I've been doing lately have been looking Really really really really good and I've just been focusing on my craft 20/20. It'S pretty much here and I really really really want to work on getting my wigs as flawless as I can. There are so many styles out there that aren't slaying to the gods, but I just want to match their fly when it comes to my own installs, I'm not a stylist by profession. I just am a hair enthusiast, who loves to do my own hair and to have fun with it, and you guys, love to see me, do it and to watch. I follow along, and you know I'm just hopefully that you guys are grasping my concepts and it's helping you in some way to help to slay your own hair at home. So when I had and added a little bit of heat protectant so that I can go ahead and press the hair out, also I let the scarf sit on for about five to ten minutes. You don't really need that much time and you can see how amazing it looks all ready now, if you can see little shiny spots, that's pretty much excess, blue or free spray sitting on 4head. You could take a little bit of rubbing alcohol to kind of get that out and it'll work perfectly also product like if you're gon na do baby here right there. It'S super around that area. It kind of will cancel that out. I know that's kind of a cheat, but that is sometimes what I do. I'M just doing tons of baby here and it'll kind of like work itself out automatically. If that makes any sense now here's the final step, where I pretty much just I'm gon na, go in and flat iron, the hair again, I did add a he protected and I absolutely love the way this install came out. It was super beautiful again. This was Thanksgiving, so it was super subtle. So that wasn't like you know, ba-ba-boom. You know around the dinner table, trying to click and prepare everything it just like nice. Classy is sleek and slow and I didn't even have to add any powder. You know because of the fake scalp, it was pretty much it good to go, don't interlace, you don't add any foundation powder or concealer or anything like that, and you guys can see how awesome the shine or Sheen is in the hair without it being weighed down Or you know too oily pretty much the finished result, as you guys can see. I went ahead and bonded her down. I am gon na go ahead and put on some makeup and there from there. I will touch her up, but of course the kitties are right here, making a mess, but you guys see I just did a simple install. I kind of feel like when I overthink it because today is Thanksgiving and I'm trying to make it extra special. I do make more mistakes, then, when I am just like in my element and then just go for it so yeah make sure you guys check out our PG hair. I'Ve worked with this company many times, so you guys can definitely check out all of the content. I have created for that company and all of the reviews. I have thank you guys so much for watching. I hope you guys are enjoying the holidays. Don'T forget to Like comment. Subscribe share this video with your friends and, as always I'll see you in the next one Dominick's. This couch is and Dakota and diamond also say smooches. So thanks


Comments
jhhf jff: Thank you for sharing this amazing video,you are so helpful,I love your videos, I received the same product from newigstyle..com last week
Your Favourite Sceptic💋x: Why do they design the fake scalp away from the hair line. That makes no sense. You can see where the fake scalp ends , compared to your real scalp. Gorgeous install , I just don’t think the companies did the fake scalp