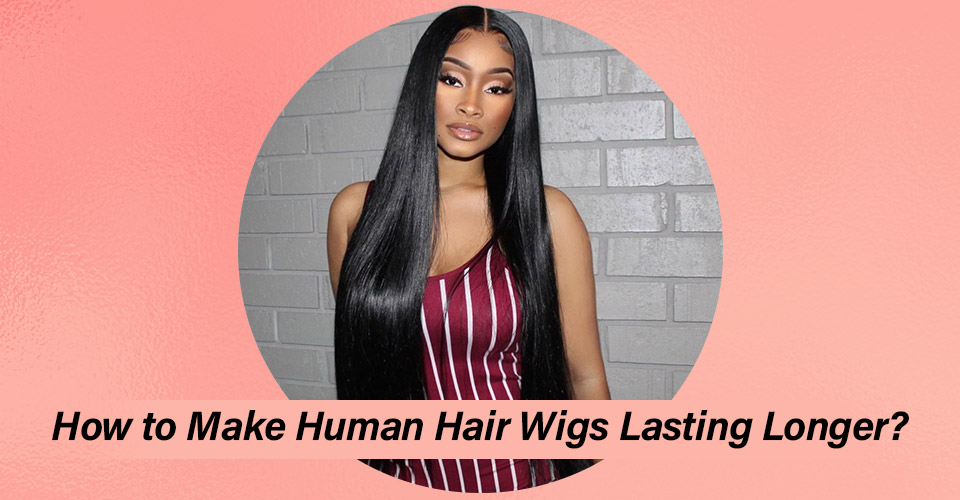
Scalpppp Teas Fake Scalp Curly Wig|Evawigs❤️
- Posted on 08 November, 2019
- Fake Scalp Wig
- By Anonymous
Fake scalp wig:
Same Prices as Black Friday till Nov. 13th
Selected Hot Styles Human Hair Lace Wigs Lowest Prices Guaranteed, the Same Prices as Black Friday!!!
Shop Now
The Official Wig Link:https://www.evawigs.com/lace-front-wig...
The Only Official Website: https://www.evawigs.com
SKU: 6LF11424
Hair Length: 20 inches
Hair Density: 150%
Hair Color: Natural Black
Hair Type: 100% Indian Remy Human Hair
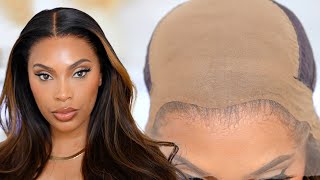
Cap Construction: Glueless Lace Front Cap 6"*6" Lace Parting Area(upgraded fake scalp)
Cap Size: Average
Lace Color: Medium Brown
My Code: HUSTLER. SAVE 15% OFF
Follow Evawigs on Social Media:
Facebook: https://www.facebook.com/evawigs
Instagram: https://www.instagram.com/evawigs
Youtube: https://www.youtube.com/user/evawigs
Pinterest: https://www.pinterest.com/evawigs
My Most FREQUENTLY USED PRODUCTS
BED HEAD MASTERPIECE
BIOSILK ROCK HARD STYLING SPRAY
BIOSILK FINISHING SPRAY
PUMP IT UP SPRITZ
SHEISBOMB WAX STICK
KERACARE WAX STICK
SHEISBOMB SLICK AND SLAY GEL
GOT2B BLACK STYLING GEL
GHOSTBOND LACE GLUE
BOLDHOLD LACE GLUE
(EXTREME CREME,ACTIVE)
99%ALCOHOL
RUBY KISSES CREAM FOUNDATION
(LEVEL 9-16)
TruMATCHLACECONCEAL (LACE TINT)
NAIROBI MOUSSE
HOT TOOLS:
MARCEL IRON HOT COMB
CONAIR FLAT IRON
A WAVE WE GO CRIMPING IRON
CONAIR CURLING IRON
BLOWDRYER
Welcome to IAmBeautifulHustler Channel
Be sure to SUBSCRIBE & TURN ON YOUR ALERTS
Follow My Socials:
Instagram:_Beautifulhustler & @thebeautifulhustlerbrand
Twitter:_Beautifulhustl
YouTube: IAmBeautifulHustler Channel
To Book or Purchase With me and my Brand
MINK LASHES,CLASSES, WEBINARS,WIGS .
#BeautyInfluencer #IambeautifulhustlerTV #_Beautifulhustler #Youtuber #MiamiHairstylists #BrowardHairstylists
#AtlantaHairstylists
#MiamiMakeupArtist #BrowardMakeupArtists #AtlantaMakeupArtist
#MiamiHair #AtlHair #Celebrityhair #Celebrityhairstylist #Loveandhiphop #Lhh #LhhMiami #Miamilashes #Minklashes #MinkLashVendor #Rawhairvendor #Minklashes #explorepage
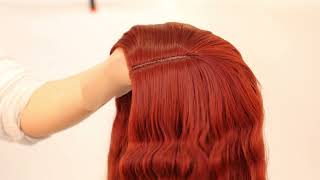
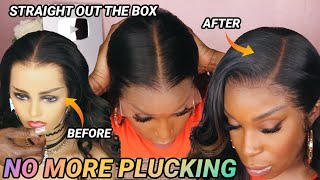
Guys, I know it's been a minute, but I am back and I have videos lined up for you guys so today I will be jumping right into this video today, and this is actually going to be like a two-part video. Even here, a company did send me over two weeks: one was an HD lays straight wig and the other one was a curly wig. So this first video will be the installation with the curly wig and then the second installation will be the video with the straight wig. So, as I mentioned before, both of these wigs will be provided from Eva's hair company, but we're gon na go ahead and jump straight into this tutorial. Now today I will be installing this fake scalp wig. Now, what a first step, which is pretty much a wig that has the clock, nothing underneath it, and that way you would don't have to add. You know like any foundation or you don't have to really wear a stocking cap underneath the lace and they did leave about an inch of just you know, lace by itself. That way, I was able to put her foundation color underneath and I'm just gon na go ahead and begin to install this week now for today's styling. I just wanted to keep it really natural to us simple. So I did do two braids, but I did do the part when the side versus the part being in the middle with the braids and I just pretty much connected the braids and I didn't do any baby hair. So anything like that. Just very much scalp tease - and I did not pluck this week at all like pretty much - how you see this week is how we came all I did was. I did bleached it nice that you know just that little inch of lace that was out. I still didn't go ahead and believe those knots and I went ahead and shampoo the wig and I'm going to begin to install. I will be using both ho active now I'll actually be using this glue way more often because they do have it here and the hair stores in Miami now. So I'm really really excited about that that elegant beauty supply, so you guys will see me use pretty much this boat hole now instead of that, goes far less glue. But, yes, you can use either glue. It'S pretty much the same way. You just want to spread the glue out to the turns clear and you can add up, as you know, many layers as you please, but for today I will be going ahead and doing four layers of their boat hole, active and then I will begin to apply The weak down blow dry up milk delays and so forth. So now that I have applied all of the glue, I'm just gon na go ahead and begin to pull that lays down intraday glue, and I just like to work side by side. I like to get one side into that glue. Where needs to be, and then I just continue to pull their lace down on the other side. Now you can actually pull the lace in the middle first and then go side by side, but for today I did go down the middle first and then I pulled each side and I'm just going to blow-dry that lace down until they glue using that you know Blow drying it on a heat setting, I always use warm heat, it's just my preference, but I feel like it helps that lace melt down just a little bit better, so I always use the heat setting when I am doing this step - and I also take my Tail comb and just comb that listen so they glue, because that also pushes that lace into that glue without having that mashed messy like turning white turning black type of look. So you just want to apply pressure, but don't necessarily mesh that in and then I just like to go in with my hands and just pull the hair back into that glue, but once I am done blowing drying all of that end, I will go ahead and Begin to cut off the extra lace using my scissors when you are cutting the lace off the desk, the scissors you do want to. You know make sure that you do go in like a you know, zigzag things that motion, because they just you know, give it a more of a natural look. So I do cut that lace off in zigzag and also I really love this, because I really love how natural like it came one as far as the plucking I like I said, I don't know how to fluff anything at all, and it's just like the legs Blend is so perfectly in and once I put that foundation underneath and everything like that, but here I am just cutting off that extra lace from around the ears, which is a very important step. You guys do not want to miss some people. Have the lace glued on top of people ears you'd! Be surprised how many people do that, so just make sure you do take the time out to make that whip it perfect to their head. You know cut that extra lace off and everything like that and pretty much what I do to one side, I'm just gon na repeat the same exact steps to the other side, and as I mentioned, this will be a no baby hair installation. It would just be like a cute braided top, you know look and it was very, very, very scalp Dianna when I was spinning, so I loved this wig and a results that it gave off now. Just being completely honest guys, quality of the wig does matter and of course the installation of the wig is just as important, but when you do have quality hair it you know you can achieve the most bestest results ever and that's why I really like these two Weeks that Eva hair, you know, did sent over to me. As I mentioned, this is a fake Scott wig and they did leave their like inch of you know space that uh at the end of natural, a space. That way I was able to like I mentioned, you know, apply that foundation and everything like that and breach that so they look extra extra natural, but even with their HD lace, wig as well with you guys, can see in my straight hair tutorial. That was that wig is also from the same company, and it was just as flawless and it would have. It was HD lace, so, like I mentioned, if it's very important, to have quality hair and that also helps you achieve the best looks because, in all honesty, I did this installation the same way. I would do any other. You know lace wig install, but we just cannot install so so bomb and that's because the quality of this lace was everything so guys go ahead and check out the description details. I highly recommend this company and I just like love of the wigs they provided me with. So that's why we've, even with this installation, I didn't even want to add any baby here - is just so much scalloped edge. You know I have to leave it as is, but nevertheless know that I have all that extra legs cut off and everything feet down. I'M gon na go ahead and take it to my bed head and its pray that they had a posture, hairline and then Tom who's. My milk belly to turn that and guys. Forgive me if you order to melt belch and it's been a little time. You know I was sold out, but I'm back in stock and I'm shipping out ASAP. So I will be updating our tracking numbers on tomorrow before I leave to New Orleans on Fridays so but Thursday. So yes, stay tuned for that, but you'll see this is Scout. So learning very much scout and that's why I love quality mates like limits so freakin bomb and I'm just gon na take my bad head. As I mentioned, this is my second step melting process that I do and I absolutely love it, and what I'm doing is just comment all the hair back from their spray, because I didn't want to keep that natural, looking hair line. Usually I like parted off to where you know I'll parts them to hair down for the baby is, but I did not do it whatsoever today, because I just wanted everything to flow and be bad so yeah. We want to go again that down that most secure of melanin to their hair mine in being took a spat with how it looks so now it's time to go ahead and remove that elastic and then I'm home honey straight your selfies on a lassi there. It looks so good, it looks so good like so good, so good so good. I was really really pleased with this install and, as I mentioned, I will be doing the two braids for the styling portion, like even if she were to put this hair in a ponytail. It is just been so raw because it's so freakin natural and I love the curl pattern this week came in. It was just so bomb.com like. I literally have no complaints, and this hair was extremely extremely soft, like even brushed out like how it is. It was like so soft, but nevertheless I am going to do the you know the braiding for this hair, like I said nor the side part with the two braids and I'm gon na wet the hair. Once I have the brains completed, so I'm just gon na go ahead and do a part on the side, but first before I begin to part it off. I am just gon na go ahead and hot comb, those roots out and just part off the section of the hair that I'm going to braid. I did just part off like a little area. I didn't break all of the top hair, but you know just like some of it. I didn't want the braids to be extremely thick and then the hair that I have parted off in the back. I'M just gon na take my wax stick and my hot comb and just press that down really really flat and also going with that bed hairspray the bad hair. This really was gon na get that hair molded down in the back. That way, when I connect the two braids, it's very very smooth in me, but I did take some of that bad head spray on top of the hair that I'm going to braid just so you can capture just so. I can capture all of the hair and it's nothing like frizzy or anything like that and I'm just doing to regular over braids. I didn't do any other braids for this install because I liked it the over braids look. So I'm just gon na go ahead and break that and then once I break this side, I'm just going to go ahead and braid up the other side. You you so now that I have that side operated up. I'M just gon na go ahead and begin to break this other side here and then I'm going to continue till I pretty much get the back all situated with that bedhead spraying and molding it down that way. I am able to connect the braids and I woken up the brushes using some bobby pins, pretty much just like two or three bobby pins and just like over crossing the braids and pinning that down, and I will bring the rest of this down. So it looks, you know a little bit neater but, like I mentioned that is all after I mold the back down. First, I have the front all braid it and I'm just gon na break that down. It just looks so good guys. I can't stop looking at the hairline like lace wear period, but ya know ya, know what time it is you and, as I mentioned, I am gon na go ahead and smooth that out with that bad head and then I'm just gon na take on the braids And connect them, but I'm also gon na wet the hair up to like just using conditioner water in a spray bottle. I am going to let the hair rub that way. I can get those curls good and pop in and you glide the curls just make the style so much more complete like that's why I am going through with the hair rub. If you don't want to weather hair, you know what the hair you can just wear. It in a natural curly pattern that it comes in, but if you really want it to be like being on bam, bam, then just go ahead and whip the hair up and with that water, conditioner and just you know, get the curls poppin. But all I did was just take the two braids and I just pulled it. I'D meet me like backwards like how you see her, how you see me pulling it and how she's holding it. I liked it. The braids like that some people tuck the braids under the weeds, but for this look today I didn't want to do like the braids one top of the hair, and it just gave me like very much like Rapunzel. I was definitely feeling it, but now I'm just gon na go ahead and finish braiding down the ends of that hair, because I did not want to leave it loose and then just wet. It actually wanted to braid it like as far down as possible because it looked it. I know it would look neater that way so pretty much. What I'm doing here, I'm just going to do the same thing to the other side as well. So now I'm just gon na go ahead and wet that hair up, I'm just using water in conditioner and spray bottle and just wet it up, wet it up, wet it up, comb it out, wet it up, but then I'm actually gon na pull like the hair To have behind the ears I'm just gon na pull it it's kind of downward a little bit just so it can fall towards the front and, as I mentioned, I did not do any baby hairs for this. Look. You guys can kind of see me like pulling it towards the front and just combing those curls out and pretty much. This is like this completes the installation I'm gon na. You know swing her around, so you guys can see the back and how it looks and everything like that, but I hope you guys did enjoy this install. Let me know what you think about it. This helped, as I mentioned before, it's provided by either swing hair, so make sure you check out the description down below, but before I go of course I have to conceal that part out, so I'm just gon na take that black spray and you know, take my Concealer and conceal the part, and then then I will be complete so ho. Thank you guys for tuning into I'm beautiful TV. I am backyard and working hard, so stay tuned for all these uploads. That'S coming back to back to back to back. I hope you guys enjoy this look and thank you for watching.
Comments
Princess Toyia: Gorgeous!!! Amazing work as usual. I love how you explain everything in detail in every video!!
Smiley Dayday: When I found out that you’re in NM I got so hyped
BlaqueBeauti2u Johnson: Yesssss hunty you did that come thru with the flawless install..
Malijah Serenity: I’m going to try this on my channel I love it
Chris-Anne Amoy: Wow lace freaking where?! I definitely wanna try this style with my curly wig
Malijah Serenity: Can you do a video with you cutting the lace first before melting it?
Hillary E: Your so talented
Tameka Mathis: Growing straight out that baby scalp!U did that
Deelkas Jones: When you say the company send you wigs, do you sell them to your client's??
Dinah DMM: Awesome job!
Catina: That looks good
deseraymiles87:
Jo'Lauren: $300 and higher......let's prioritize before making that purchase
Asia Williams: Soooo pretty
what you looking at huh: Very nice. I wanna see you reinstall a old wig with the lace already cut. & instill a closure on self.
Dea Mone: Slayage ✨
Catina: I would like to be a model please lol Come to Houston
Joy Francis: I Love @queen
UniqueBeauty333: U coming to New Orleans ? Can we link please !
Blonde Rose: Have I been saying it wrong the whole time? It’s not scalp tease it’s scalp teas? I been super wrong ♀️
Ari: Ah your code didn’t work :/
Shandell kute: Yea mami
L P: Damn her teeth
L P: Most bestest? Did you finish elementary?