First Time Trying A Fake Scalp Wig! Is It Worth It?? Feat. Evawigs
- Posted on 27 May, 2020
- Fake Scalp Wig
- By Anonymous
♡ Follow me on my socials ♡
Snapchat, Instagram & Twitter: shornell_stacey
For enquires email me on [email protected]
The Official Wig Link: https://www.evawigs.com/lace-front-wig...
The Only Official Website: https://www.evawigs.com
Hair Info In This Video:
SKU: 6LF11424
Hair Length: 20 inches
Hair Density: 150%
Hair Color: Natural Black
Hair Type: 100% Indian Remy Human Hair
Cap Construction: Glueless Lace Front Cap 6"*6" Lace Parting Area(New Fake Scalp)
Cap Size: Average
Lace Color: Medium Brown
Follow Evawigs on Social Media:
Facebook: https://www.facebook.com/evawigs
Instagram: https://www.instagram.com/evawigs
Youtube: https://www.youtube.com/user/evawigs
Pinterest: https://www.pinterest.com/evawigs
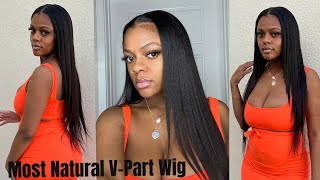
Hey guys welcome back to my channel, I feel like I'm always water headed in my beginning of my videos, but hello. Welcome back to my channel. As you can see today, we are going to be doing a hair installation, video and I'm super excited for today's video, because this is going to be my first time trying out the fake scalp method, which is basically where, like a either like stocking cap material or, Like a different type of material is stitched onto the inside of the lace, so basically it means that you don't have to wear a wig cap underneath your wigs basically and it's supposed to be like your complexion and just make life easier. So I'm going to be trying out a fake scalp week today this week was sent to me from evil wigs - and this is what she looks like this - is who were working with today, so she's a curly unit. This is a hundred and fifty percent density and she is 20 inches long and, like I mentioned this, is the fake scalp. So I'll show you what the inside looks like. So this is the new and improved fix cap, because there's the one where it's like the like, I said the stocking cap, so you can actually like pull it offers less. You just stitched around and you can pull it. This is the new and improved thanks cap, where it's like fully stitched in all the way around and on the outside. This is how it looks. You can't really tell the difference. So hopefully this will just make this wig look like it is growing out of myself like I said this is 20 inches and it's 150 percent density and it is their curly wig in the box. They also do give you a wide toothed comb, which is excellent for curly hair, and we also do get some with caps and then just a couple of bobby pins as well, and you get the detachable elastic band. So this is the one that you can take on and take off, and it's that bra strap type of elastic, so you can hook it on to three different levels depending on how how do you want your elastic band to be at the back, so I am Going to, I think, I'm going to clip it on the middle one just to be safe, don't want it too tight and I do have a wig cap on, not because I don't trust the fact that you don't wind up with cap with this, but just because It helps to hold my cornrows down like the ends of my corners. I flip them back up and I use my wig cap to basically hold them in place. First thing: I'm gon na begin doing is cutting the lace off the back because we never need that. So I'm gon na just cut that off straight away and then I'm just going to put this wig on and see how she fits okay. So the first impressions is, I feel, like it's kind of baggy. I don't know if that makes sense, but I feel like it's not it's snug in terms of the back like the back bit full snug, but in terms of the actual lace I feel like it's kind of like floppy here I don't know if it's just if It'S just me, but I will say that what I do like is that the hairline does come far enough forward on the lace that it pretty much covers. Most of my hair. I do have a little bit of my edges showing, but for the most part you can probably see here my edges are showing here, but then on this side it doesn't show so maybe like it's not symmetrical. I think maybe the way that the lace is yeah. It'S definitely not symmetrical because this side on over here it dips in, but then on this side. If anything it comes out - and I prefer it like this - I need it to come out because that's how my hairline goes up. My hairline comes out or at my temples, so this side works well for me because it comes out at the temples, but then on this side it it dips in at the temples, so I'm gon na have to try and work with that. I do feel that the color of the lace does need tint in for me and - and I feel like looking at it like this - you can see where the fake Scout, because my wig cap is all the way back here. So when I do this, I feel like ye, you can see where the fake scalp starts from, so what I'm actually gon na do. Is I'm going to take this off? I'M just going to go in with my Sally Hansen spray and I'm going to tin. Just a bit at the front like so just literally where from where the fake scalp starts and the front of the hairline is I'm gon na just spray that bit down very very lightly? Okay, that's much better! Now that I've sprayed that okay. So, let's take a look at the hairline to see how they've done, because the hairline is pre plucked, and I think this is not bad at all like this looks really good, especially up here. This looks good I feel like. I would pluck a little bit more here at the sides from my own preference, but especially up here. This bit does look really good. They'Ve also done like a kind of widow's peak hairline, where it kind of comes a bit more forward here at the front, which i think is quite nice. It makes it look more natural than like a dead squared off middle bit here, but then again, like I said on this side, I feel like there there's less hair here at the temples compared to here, where it literally is quite quite close to my eyebrow on This side, it's actually like away alright. Next, what I'm going to do is just cut off the excess lace and then we're gon na. Stick it down. Okay! So now that I've cut the lace off, I don't know if you can see what I mean when I say it's a bit baggy like if I were to stick down the ear tab, which is what I normally do. I usually just stick down there in terms of wigs. This is like you can literally lift this up. So I feel like what I'm gon na have to do is make sure that the middle bit is stuck down first and then do the ear tabs, because otherwise that we don't it will just be lifted up. Okay, so update on China. Stick this down I'm having some issues. My issue is that I feel like this is starting to wrinkle up and like bubble up here, because I'm having to pull it down so that it can lay flat on my head or I'm having to pull it when it dries. It like wrinkles back up. But then, if I don't pull it, when I stick, let's say this bit down then there's it's like lifted because there's no there's too much space. Do you I mean someone's like if I put it so that it lays flat once I let go and the next once it's all stuck down it like wrinkles up the door. If I don't pull it - and I stick this bit down - and I stick this bit down, then this bit isn't stopped down. So it's just like like if I get this bit flat and I'll go to like pull this bit to stick this down this bit. Yes up, so I'm having a hard time, I think I'm gon na have to leave it like this. I haven't stuck this piece down because literally like it's in the wrong place, but if I were to pull it forward, cuz right now, it's like behind. If I were to pull it forward, then it gives me that wrinkle there than if you guys, can see that and don't say I'm on this side, so I'm just gon na no I've had enough of it. So what I'm gon na do is try to. Basically, just work with it like this, as you can see, my edges are left out here. My edges are also left out here, so I need to cover those bits up, but I am the queen of finesse in these kind of situations. So this is what you do so what I like to do is I like to take some hair, literally just from the top of my back to top corners of my forehead, so not that little bit just to the side of it. So like this section, so these two sections right here, I'm going to click the rest of the hair out of the way and these other sections that I'm gon na use for my baby hairs. So I'm gon na cut them. You can tell that they're already short, because I think they were meant to be like pre-done baby hairs, I'm gon na cut them a little bit shorter, like this length is perfect and then I'm gon na take some moose and I'm gon na. Take it on this comb, it slips swoop it round to cover up those bits there. That was a bit like light and ashy. So now that these bits are done, then I'm just going to take from the edge of my eyebrows. I'M gon na take some hairs from there again, I'm gon na cut those down and I'm going to swoop those going back as well. Now I know we can still see some parts where my lace is still a little bit visible. My trick, for that is to just take moose and just paste the on top, but you don't want to put too much so that it lifts up the spray that you just put it. You just want to literally cover the whole section and then take a headband and just tie that down okay, so whilst that is just setting in place in the meantime, what I'm going to do is just go ahead and define these curls and voila. I do feel like you can see where the fake scalp starts, but I think that might be because I put too much of the Sally Hansen spray on the lace itself, so the lace is way darker than this bit. So I think if you put less of the spray - or maybe if you just like, put like a little bit of powder instead, then it's not going to be as visible. I can easily cover that up with some concealer, though, so this is the final look. Let me know what you guys. Think of it. Do you like this wig? Would you try out the fake scalp method, and do you think that it was easier? I think it was easier. I just think I would have preferred a fake scalp. That was a little bit darker. That way, I wouldn't have to go in with the spray, and I feel like the lace was like the transparent lace, whereas I would have preferred the lace to have been slightly tinted. That way, I wouldn't have had to use the spray at all, but I know best better for next time, and at least that way you guys can learn from the mistake that I made when it came to tinting the lace, but otherwise I love this wig, like I said it's from evil wigs and this is their curly hair in 20 inches and it is a Mahajan 50 % density. This is alone. So this what the nose looks like for me yeah, I think she's cute I like here, I think Kylie hair suits me best. So for me, at with this, I feel comfortable, but thank you guys so much for watching today's video I'll leave all information to this week and to their websites. You can check out some other other stuff as well in the description box down below, but thank you so much for watching. Don'T forget to thumbs up if you liked today's video subscribe to my channel and hit the notification bell, so you don't miss any uploads from me. That is all take care have a wonderful day even in weekend birthday, whatever time you're watching today's video take care and stay blessed. Bye,


Comments
Sam Antwi: you finessed this really well. I like how real this review is
howcanyoudothistome1: I don’t even wear weave but I always watch your videos because I love your style. You’re not too over done, you’re classy and just right x
abrat2014: STUNNING MAKE UP Please do a video on that too!!
Sandra Follis: Love your makeup!
DreyaCole: The fake scalp Methode definitely need some improving but you did a good job finessing. One q tho: where did you got your tinting spray tho?❤️
Quoia: I am still a beginner and this would be some work for me.
Cosmic Soul: Make Up is Gorgeous!