Omg!! Lace Is Super Clear Spring Ready Pre Bleached, Pre Plucked Wig | Xrsbeautyhair
- Posted on 18 April, 2022
- Fake Scalp Wig
- By Anonymous
▬▬▬▬▬▬▬▬▬♛ Xrsbeauty Hair ♛▬▬▬▬▬▬▬▬▬●
►Now Use 50% OFF Exclusive Coupon Code: XRS360
(Note:50% OFF expires By Apr.20th. After that, fans can continue to use XRS360 to enjoy 15% OFF)
Wig Link: https://bit.ly/XrsBeautyhairyournatura...
SKU: LFW12
Length: 16’’
Density: 200%
▁▁▁▁▁▁▁▁▁▁▁▁▁▁▁▁▁▁▁▁▁▁▁▁▁▁▁▁▁
New *Clear Lace* & *Clean Hairline*
*Clear Lace* is Melting with Your Skin.
Clear & Transparent for Real!
*Clean Hairline* is Same as Our Own Hairline
Natural Hairline Transition
▁▁▁▁▁▁▁▁▁▁▁▁▁▁▁▁▁▁▁▁▁▁▁▁▁▁▁▁▁
*New* CLEAR LACE is real clear lace, it’s undetectable on your head.
*New* CLEAN HAIRLINE is much more natural than regular pre-plucked hairline, we customized this natural hairline to make it melt skin much perfectly.
▁▁▁▁▁▁▁▁▁▁▁▁▁▁▁▁▁▁▁▁▁▁▁▁▁▁▁▁▁
—Share looks on facebook, instagram , youtube and tag @ #xrsbeautyhair , customers will get $15 dollar for next order.
Contact Us:
YouTube: http://bit.ly/2KXjerD
Instagram: https://www.instagram.com/xrsbeautyhai...
Facebook: https://www.facebook.com/Xrsbeauty
Pinterest: http://bit.ly/38VFY3a
My Socials let’s be friends! (literally) :)
IG: @kamanijeann
Twitter: @kamanijeann
TikTok: @manijean777
Snap: @manijean
Wig IG: @wigssoldbymani
Email me for business inquiries only [email protected]
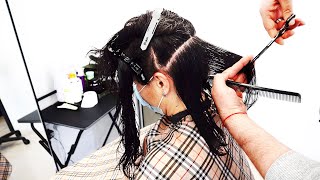
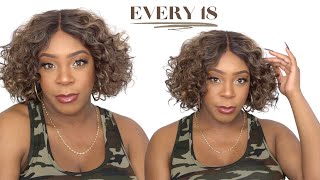
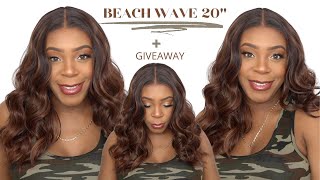
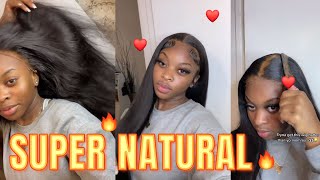
Hey guys welcome to my channel welcome back if you are a returning, subscriber and viewer so today what i did for you guys was this install that needed no customization? Okay, this was a wig from xrs beauty, hair, you guys know - or if you don't know they have pre-clutch pre-bleached wigs. All i did was install so you'd like to see how i achieved the install all the steps that i took keep on watching. So i'm going to take you guys through me doing my bald cap. The bald cap isn't necessary with this particular week because it is pre-customized, but it just comes out a lot better and more salon like when you do go ahead and go through with doing all the steps, including the bald cap. So i'm using my ebb and lace spray in the red can, as you can see, already cut around my ears for the cap to just fit better and i'm just smoothing out this spray slightly but surely and thoroughly around my hairline and on my forehead. Now that that is mapped out, i'm going to go ahead and blow dry this and on a cool high setting. You see me over here gym and that's how it be like my playlist is too late. While i'm doing my hair, you guys have to have a playlist going when you're doing your hair. Just puts you in this mood like yes, i'm going to get this done. It'S going to be cute as but anyways i'm going to go ahead and cut off all this excess cap with these shears, these hair shears it's way better to use shears rather than a razor or anything else like kitchen scissors or craft scissors, because the sheers just Give it a cleaner cut when you're cutting it off. You see how i'm doing it. It'S coming off. Super duper clean, so the sides never really lay flat for me on the first time. So i'm taking my ghost bond xl glue a little amount in the back of this razor to smooth it out and re-lay it, and then it's just going to basically dry on its own, because i didn't use a lot of glue and i'm going to tie the Back of my wig cap and cut off the x excess cap again so that my hair is secured so now i'm taking my makeup brush and my ruby kisses rd 1 5 cream foundation boom. Here it is at so i'm gon na be using that on my cap today to get it nice and bald, and i like to really cake it up. Okay, i like to really kick it up, because then it just looks more like skull once it's all said and done so this is the hairline. I did not pluck this. I did not bleach it. It came straight like this and it is clear lace. This is the inside construction of the wig. I put it on my wig head, so you guys can see how it looked when i just hot combed it back no product added, i just hot combed, the hairline back as i would with any other install. So now i want to show you guys how i actually put makeup on my cap, not my cap. Oh my gosh on my lace because i never show you guys, but i'm using the same cream foundation that i use for my cap, which is the rd15, and this is what it looks like once. The lace is tinted, so the lace is a clear lace. So it doesn't really need to be tinted, but for the best results possible, especially if you are dark skinned like me, i recommend going ahead and using makeup or if you are not, you don't have to use a lot of makeup, but for me it just comes Out a lot better when i still use makeup, even though this lace is really good quality, so i kind of surpassed me going through cutting off my ear tabs, but that part is pretty self-explanatory. But now i wanted to show you guys how the clear lace compares to transparent and medium brown lace. So right here this is transparent, leaves, as you can see, it's pretty gray and it's not blending all the way with my skin and then this is regular brown lace. This is the most brown and it's dark, and it's not really meshing well with my skin. While it's on my hand as it would on my hairline, but this right here, this new, clear lace. This is how clear and seamless it looks on my skin watch when i turn it to the side like it is invisible. That is how it's going to melt into your skin. Okay, this is the best lace on the market. Super thin super clear all that so i'm taking my 70 rubbing alcohol in a napkin and i'm going to be just cleaning off my skin because you don't want that makeup or any extra oils or moisturizer whatever on your skin, to interfere with how the glue is Going to dry, if it's going to stick at all, so i'm using my ghost bond xl glue and i'm just applying that around my cap, as you guys can see, i usually do dots and i squiggle it around and stuff. I just place it on there and i don't make sure to not use a lot. You do not need to use a lot of glue bruh. You just need to do a lot of layers, not a lot of glue, so i'm just moving it out with my popsicle. Stick, smoothing that out exactly where i know where i want the lace to lay. If that makes sense like i have the vision in my head of where this lace is going to go on my head because remember i have that lace forward or my hair, i'm not cutting the ear tabs and i was kind of paying attention on where it Should go so yeah? That'S what i'm doing and i'm going to be using four layers of this. So you always want to make sure it's the even distribution of the glue on your hairline and also smoothing it out really well and nice and flat on your hairline. You want to make sure it's smooth out to the point where it dries nice and clear and like no white residue or anything so now that that is done drying by the way i blow dry, that on a cool high setting. Once that is done, as you can see now i am putting the wig on my head and i'm pressing that lace in making sure i really get a firm grip of this weight because the lace is kind of big, so i'm really trying to press it in As the best that i can so that i don't get any wrinkles and it worked pretty much, you just want to make sure also that you do the uh little string elastic pin at the back. I don't even know what that is called, but yeah. You know the thing that straps at the back of the wig, so now i'm taking this comb that they sent me how cute and my blow dryer on a cool high setting again and i'm just really making sure that the lace is melted. While i am pushing the hairline back, this is what it looks like before. I melt it and now i'm going to go in with my melt belt and let that sit for maybe 10 minutes. So while it is melting, i'm going to be going ahead and making my part, i have to do a c curved part, and it's really just honestly what i prefer, but since it is 13x4 lace, i have to do a c curved part. So i'm just perfecting that for the most part and i'm going to go in with my heat, protecting serum by icy fantasia. Well, it's serum oil basically! But i'm just going to smooth that through the hair and i'm going to hot comb it to help it get flat, i'm gon na readjust y'all here, so you can see how i really pluck okay. So this is the angle that i like to pluck out. You feel me head all up in the mirror, trying to see exactly where i'm plucking it at. As you can see, this is in a real time. So this is how slow i'm going in real life, i'm just really making sure to pluck the hairs that i see that is making it not be a straight part, and you have to cut. I mean, oh, my gosh, i can't talk. You have to comb out the hairs. They have to come out the hairs as you do this okay, so i can see the progress that you're, making it's the same rules that apply when you're actually plucking your hairline. You feel me because you don't want to get the part so boom. This is melted. I was like, oh my god, look at this giving scalp absolutely absolutely so. Let'S get into cutting off this lace, so i'm using this eyebrow razor and i'm cutting in a zig zag motion, as you guys can see y'all. Oh my gosh. If i could be rich off of saying, as you guys can see, i would really be rich. If i can make money off of that, because i'm always saying that, but nevertheless, as you can see, i'm using my razor my eyebrow razor to get off this lace zigzag motion. As i said, and yeah the lace literally disappeared, like it was looking so good. It was looking so natural and to think that i didn't know customization like they sent this wig like this like, if i could have it this way all the time and just excuse all that extra work. I definitely would like don't sleep on xrs beauty, hair, because you don't have to really work. You just have to know how to install the wig. You feel me do the baby hairs, that's the main focus. It'S not the customization, which is a very hard part and just can be hard in general to do when you don't really know what you're doing so, if you don't know what you're doing and you don't care to learn, but you still want to wear a wig And install it yourself definitely go for xrs beauty, hair, but i'm just touching up the places that were not laid down all the way, using a little bit of that glue. The same popsicle stick and then blow drying it on the same setting high cool to ensure that this is really melted down. It'S the scalp for me already like. Are you kidding me it's giving fresh blow out, okay, fresh blowout, but yeah. Now it is time to carve out these baby hairs map these babies out. So i was going for like a soup. Y'All know when i do side price, i love to swoop the baby hair into the actual hair. If that makes sense, so yeah i'm mapping these out. I wanted them to be thin, but still thick at the same time, which that'll make sense later, but once they are pulled out - and i have an idea of where i want them to be - i'm going to hot comb them to ensure that they are laying flat Before i re-tie this lace down to ensure an extreme melody for me, it's much right now, but after we go in with that. Second, part of that elastic band is going to be so melted, i'm using some more of my cream foundation and i'm just tapping that onto the lace before i melt it again just so, it can really, you know, give the scalp to the best ability that it Can you feel me, but i'm using my finger on with my green fantasia, hold spritz spray because it is out, so i had to pour it on my finger, which you know it didn't bother me at all for real, like it was just massaging it into the Lace, you feel me a little bit more hands on action but yeah. Now i'm tying this up and we're going to get into styling this hair. So i didn't apply any heat serum to the hair, because i've noticed with my wigs lately, like the heat serum that i use, which is the icy fantasia one. It just has been making my hair all greasy like four days later and i'm like well what the hell is going on. So i just stopped using oil, sheen and hairspray, and i just did the curls. You feel me in its natural state which this hair wasn't washed or anything, because it was fresh at the pack, because you know we did not bleach it up like it. So this was fresh out, the pack curls i didn't blow dried or anything. This was like just boom straight out. I combed it out, but i'm not the best at doing curls at all. So this is definitely not a tutorial on how to do flat iron curls, because i barely can do them myself, but yeah. I just did the best that i could and it didn't really matter it doesn't bother me. I don't know how to do curl swirl, because i like the messy look anyway. So whatever i do once it's combed out and i have it shaped and with layers it looks good so yeah, that's the t on that. So y'all can just watch me curl these little couple, curls real, quick, my so so, let's get into these baby hairs. Now that that is done, i'm going to go ahead and shave these off now the way that i place this wig on my head. My baby hairs was closer to my eyebrows than the usual, but it all worked out really cute, so i'm not tripping, but i was that far so i'm like well how the i'm gon na do these baby hairs, but i'm curling them now. With my kiss fly iron, the kiss pencil flat iron and half of a inch half of an inch half inch, i got it from my local beauty supply store, but yeah the brand is kiss so yeah, i'm curling them under i'm curling, all of them under because Of the way that i wanted to swoop the baby hairs, i curled under this time, but um yeah some reason i got to make glue gel in the comb side of the edge brush. I'M just going to be sweeping these and really perfecting it. As i go really trying to train the hairs to go into the hair, if that makes sense trying to train the baby hairs to go into the hair, so it went with a lot of tweaking and fixing like that was my first little try. Then i did it again after i cut the baby hairs down some more. It'S really just something you have to play with, like you have to play with baby hairs in order to perfect them and to get them the way that you want them to be so so i was having a hard time molding the baby hair. So i took some tresemme holding spray and i basically sprayed a little bit onto the hair with the got to be glued gel already on it. Just to give it a stronger hold to really just measure to stay the down and then i'm going back and forth with the gotcha big blue gel too, to really ensure that it looks like you feel me. Some fresh ass delayed baby hairs excuse my profanity, but that's just how i am that's outside i'm cussing a lot in this video, but nevertheless i'm blow drying this now to make sure that it's hard, but not you, know crunchy hard but hard into the sense of It'S laid down and it's not going to move so yeah. That'S what i do on that side. It eventually came together really cute, but i was struggling for a minute but onto the sideburns side. Parts are pretty easy for me. I like to scoop the end and i give that a little curly look to it and i'm just going to repeat the same thing on the other side, which was easier on this side because they didn't have any parts but um yeah. That'S what i'm doing now. I'M going to finish off these baby ears, all right, so these curls, i decided to shake my head to give it a nice natural look and then i kept the shape with them by using a wide tooth comb and just kind of you know what i'm saying. Twirling the curls into each other, if that makes sense before i go ahead and start to make these layers, i'm not a pro at doing layers at all. So all i know is when i do layers. I know what kind of shape i'm going for like. I always look at a inspiration picture or something of this sort, and i know exactly how i want my curls to look, how i want it to lay and fall and stuff. I knew i wanted to have a bang and for it to be shorter in the front so yeah, i'm just cutting it all the way around cutting downwards and going in and just tweaking it all the way around. I pretty much have the shape that i was going for, so i'm just going to re-curl my bang, it's nice to curl the way that i'm curling like under instead of curling. Excuse me going towards the back, because when you do that it kind of takes away from the bang, like, i always had a hard time when i used to curl away from my face when it came to my bang, for it to like stay put. When you curl it towards your face, it looks so pretty like. Oh my gosh, i'm so glad i started doing this and i found that trick, but um yeah, so i'm just forming my bang. Then i want to take some heat serum to kind of soften up. This hair a little bit and i'm going to go in in hot comb again now, i'm going to take my rd11 ruby, kisses cream foundation in this small makeup brush that is skinny and kind of has to tip to it and pat the concealer into the part. Really smooth and nicely and curving it a little bit to give it that natural look. Then i'm taking this quick fix, mascara type, hair thing i got from the hair store a long ass time ago. Don'T even think this exists anymore, but yeah. I just touched it up, so it can look more natural and clean a nice clean part. This is the final result. I loved how these baby hairs came out. They looked so freaking good in this lace. Where in the hell is it, i don't see it. The hair is looking bouncy, it's getting natural, i overall loved this week. So thank you guys so much for watching make sure to check the description box for the information on this hair and i'll see you guys in my next one
Comments
Nelly Rochelle: Your wigs are always laid, got that shit looking like it’s growing out of your scalp! I’ve definitely learned a lot by using your tips and practicing and my installs have improved so much! Being able to do your own hair is FLEX fr! Thank you!
Xpensiveplastic: Crazy I was JUST thinking of doing this style with body wave hair. Lo and behold you’ve DELIVERED yet again ✨right on time ‼️
Rae: Love your vids❤️❤️really helpful
Ms ToxicBaby: love ur videos<333
sandy luv: needed this vid bae thank you!
ItsQueendom: You did that shidd
Sarina Ulysse: What lace glue would u say holds the best??
Mini DIOR: It the hair for me
Tayyyjah: What company would you say had the best hair you’ve worked with?
Fantasia Shaw: Do u have to bleach all your wigs? And you do your wigs so good
Sky: girl ya wigs are always plucked so well we need a tutorial on just that frrr
Megan Bellard: Where can we order
Tae Shantéz: bae fr <3
Kiara Octaviaa: I think you should do someone else