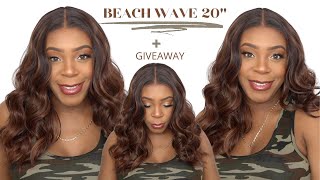
Melting Bomb Hd Lace | Ft. Wiggins Hair
- Posted on 08 May, 2021
- Fake Scalp Wig
- By Anonymous
Hey loves ❤️
I am back with another video! Todays install is on this bomb HD Lace front wig. I am in love! Although I love doing my installs its not always easy, so in todays video I show you guys the REAL STRUGGLE of doing baby hairs with a wig. I almost wanted to give up, but just remember wig installs require a lot of patience & consistency. The more you do, the better you get at it. If y'all want a detailed edges/baby hair tutorial COMMENT BELOW In the mean time, be sure to LIKE & SUBSCRIBE so you don't miss out on none of my videos
#wig #wiginstall #HD #HDLace #HDWig #lacefront #babyhairs #edges #laid
HAIR DEETS:
════════დ #WigginsHair დ═══════
Get $8 off with coupon code”Yan” !!
❤Direct Link➤https://bit.ly/3girkbG
Hair details:
Straight #13*6hdlace frontal wig
180% density
22 inches
Hot selling #lacefrontalwig➤https://bit.ly/3ahzRaZ
You may also like:
1. Invisible skin melt #hdlacewig ➤https://bit.ly/3tt6XvY
2. Premade colored wig➤https://bit.ly/3tE0E8Q
3. Lazy girl approved headband wig➤https://bit.ly/3mVwk79
Follow @wigginshair on instagram:https://bit.ly/3sr7P34
Tiktok@wigginshairbest
Facebook @wigginshair:https://bit.ly/3suULJU
Email: [email protected]
WhatsApp Wholesale: 0086 1513643857
WANNA COLLAB? BUSINESS INQUIRES?!
-----------------------------------------------------------------------
KEEP UP W TAI:
IG: @ItsGlamByTai
Twitter: @GlamByTai
SnapChat: @SnapGlamByTai
TikTok: @GlamByTai
-----------------------------------------------------------------------
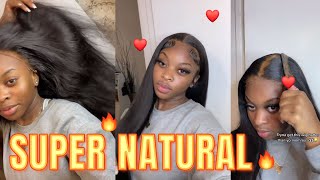
Hey guys welcome back to my youtube channel, it's ty aka glenn by ty, and i'm back with another video. Today'S video is on some bomb ass, hd links. Okay, y'all see that y'all see it yeah bomb. Okay, um! I'M super excited to bring you guys this video, i'm not sure if this is the first time i'm trying hd lace. I can't really remember like i do so many wigs and i can't remember if it's my first time trying hd lace, but it is my first time first time trying hd lace from wigan's hair, so this hair is from women's hair um. It'S super bomb super long! Super thick, okay, let me see if i can show you guys her and all her glory. But yes, one thing: i noticed straight from packaging like on packaging. I will show you guys all of that in the video, but the hair was thick from root to end. Okay from root to tip okay, see um, it is 180 density, it's 22 inches and it is um, of course, a 13.. I believe a 13 by 4 or 13 by 6. i'll have everything linked in the description below so y'all go ahead and check them out, but, like i said, this is from wigan's hair and it's super bomb. One thing that i did notice is that you get a lot of parting space, okay from this um lace. So if i'm not mistaken, let me see here like it goes all the way back, um. Of course with me, i just decided to do a side part. I'M not going anywhere today, probably give me some food because little bean is hungry, but yeah i'm not going to be doing anything today, so i figured there was no need for me to just you know, utilize, all that lace or whatever. Now. This would be great if you're trying to do like a half up, half down type of style with you, ladies or even just want to do like some braids twists, whatever bomb. Okay, you get more than enough for it. Let me show y'all, let me let me get into it real, quick, the bomb um. I did go in the head and bleach the knots on this wig and i plucked it myself, which plucking i'm gon na tell y'all right now. I did pluck a little bit like not a little bit. I it took me a while to pluck i'm not even lighting, but i plucked it to perfection like i plucked it to look exactly how i wanted it um when you are plucking your wigs. That is the key to making your wigs look natural, and that is completely preferable. Okay, how you want your wig to look is how you pluck it to look, keep that in mind um but yeah. I did go ahead and just be all extra with my baby hairs today. I'Ve never really done my baby hairs like this, and i was like. Oh let me do them like this today. I don't know i'm just like playing around with them, but in the video i'm gon na take the [ __ ] clip too so y'all can see. I was getting frustrated. I was getting so mad with these baby hairs like they did not want to lay down. They did not want to do what i wanted them to do, and i literally only show you guys meat on this side. Unfortunately, i couldn't show you all this side because it took me two [ __ ] long um, but i just wanted to put that clip in there. So y'all can see like it's not always easy to do. These wigs y'all may watch my videos and y'all may think like oh, she makes it looks easy and she does a 2.5 and i really don't it's all editing in my videos. Don'T get it [, __ ] up. It'S all editing. It is not easy to lay a wig. It'S not easy to you know let your baby hairs like edges. All of that. It'S not easy. Okay, but it is like doable. It'S not like something that's impossible, that you're never going to be able to get, and that's why. I hope that my videos are helping somebody out there. Do it themselves instead of you paying all this money for a stylist to do it. You guys, if you guys, want to see how i install this wig customize it, and i did show you guys the initial unboxing of this wig. So it doesn't look like this when you first unbox it, but you can tell that the lace is very very like blendable and everything like that in this hd lace. Okay, i'm done talking, i'm done rambling. I hope you guys enjoyed the video hit that subscribe button and don't forget to like and comment and share this video with somebody who was trying to learn how to do their hair at home, because we need to start saving our coins. Okay, get you a cute, affordable wig and do that [, __, ] yourself, okay, says period. Thank you guys. So much for watching i'll see you guys in the next video bye, guys so jumping right into the video. Let'S do this unboxing. This hair company was actually nice to send me two scarves if uh y'all haven't already peeped, i'm wearing one of them, which yes bomb okay, we love a good scarf for a night time to wrap our wigs up, but straight out the box, you get the wig Of course, duh and never kind enough childs to put me in a pack of lashes, okay and the lashes was bomb. They also did send another head wrap um in an elastic band that you can apply it onto your wig. I didn't use the elastic band, but it's up to you um. They also sent this cute little wiggins hair bag to actually store your wigs. In so now for the wig chow hd lace, we got some 22 inches bomb. One of the things that i completely automatically noticed when i opened it up was how thick she was like. I was surprised, literally thick from root to tip like everything about it was more than enough. Okay and like i said, i believe this is a hundred and fifty percent density or 180 either way it'll be in the description. So you guys go ahead and check that out, but it did come with a little bit of baby hairs, and this is just me showing you guys what the hd lace looks like on my arm. It'S barely detectable, like look at that. I wanted to put it a little bit further down on my arm because my arm's a little dark on this aspect. But yes, everything came out bomb, so i do plan on doing a very detailed um plucking video for you guys, but just for today's video i wanted to show you guys exactly how i start my plucking process and everything like that. Um, if you guys haven't seen i've done pretty much, i think i believe i've done a video on my plugin, but obviously things have changed throughout the years and i do things differently now. So my number one thing now is to pluck on a white tail um. I got this from arigante and honestly, it's changed my wig game now, because this hair was super thick from root to tip and it is 180 density. It'S thick, like the frontal, is thick okay, y'all, so um. What you guys are seeing me now is just pulling out the baby hair or you know the hairline of it, because we never plucked the hairline, i'm taking my non-slip tweezers and i'm gon na start. Plucking, honestly, i would say it took me about an hour and a half to pluck, and the reason was because i went in and actually detailed, plucked this unit because it was so thick now. A good part is it's thick. The hair is, you know, nice flowing boom. You get some full bomb hair. The bad part is you're. Gon na have to customize a little bit more because it's so thick so boom. Once all that is done. I had already went ahead and melted. My wig cap down when i wasn't playing um, i did go ahead and add a little bit of um foundation on the inside of the wig. So now you guys can see that that joint is nice and plucked with perfection, and everything is blending in with my skin, so we're gon na go on ahead and try it on real, quick just to see how it's. Looking and honestly, i like to be picky like i feel like i could have went in and plucked a little bit more, but honestly we're just gon na leave it like this, because it doesn't look too bad. Okay, i was happy with the result and yeah just so to start installing it y'all know, i'ma cut it up into four little sections. It just makes it easier for me to install um. I know sometimes that i have cut this lace off prior to the installing, but this time we did it differently. Okay, so i wanted to make sure everything was flawless with this install. So i went ahead and used some cotton pads with some rubbing alcohol and i'm putting the rubber alcohol on the cotton pads and i'm just going to clean my hair line up with that, because we did use the freeze spray to mold um our wig cap down And i did apply, you know makeup onto the wig cap, so i just didn't want anything to just like transfer over. I wanted to have a clean foundation and, of course, i'm gon na go on ahead and take my ghost bond um. I'M gon na be doing an updated review on my ghost bond because y'all i don't know what it is. If it's the baby and my hormones and everything like that, but the ghost bond started breaking me out like crazy like just two days ago so and i never had a problem with it like i ain't never been breaking out or nothing like that, and it's been Breaking me out, so i'm like oh [, __ ], i'm gon na, have to find a new lace, flute or just chill off lace glue for a little bit and just start doing my wig list units uh my wig lifts my glueless units they're lures, do y'all Hear me but yeah because i broke it up into four sections. Y'All see me do the first section on the left and then i'm packing that down using my comb to smooth everything out and then i'm also taking my um lace melting spray. This is my go-to. It'S my new go-to child and i'm putting it on a hairline, and then we are blow drying it until everything is seamless. Now i was kind of surprised because i only applied one layer of the [ __ ] ghost bond one layer. That'S it like. I didn't. Even apply too much, or you know just literally one layer of it and i tied the wig down and that broke me out child. I was so like what, because, if you guys see in my last video, i was perfectly fine, so i think it's just the pregnancy hormones, just switching [ __ ] up for me, but um yeah, comment down below. Have you guys ever had a problem with ghost bonds, laces glue and also comment down below some like lace, glue that you use so that i can go ahead and start trying some new ones out, um, i'm probably going to start trying the bow hold adhesives. I'Ve been hearing a lot of good things about them, so we'll see so, regardless of what lace glue you use, this is basically my same method, my go-to method. Whatever i start on one side, i completely do the whole side and then i just work into little sections that way, i'm not you know overdoing it um, but now, when i am working on each section, i do make sure that i bring the whole hairline together. Like if you see me, i'm pulling the whole front of the hairline together, even though i am working on the right side, if that makes sense, this is just to make sure everything lines up perfectly, and it doesn't look. You know crazy or jagged or anything like that, so another one of my pro pro pro tips: child um. As you can see, i am using the end of my rat tail comb, but when it is time like once, we blow dry this - and you know, get everything nice and clear and the glue is completely transparent when it's time to put that lace down and actually Lay that lace down take that end of that back comb and comb it through that way. None of the hair is sticking um. You definitely want to make sure your your uh lace glue is completely clear like transparent. You can't see it at all and then even when i go on ahead and use my spray, i'm also combing it as well, because we just want a nice flawless install so boom. I'M going to take one of the scarves that they gave me and i'm tying that down um, probably for like the next 10 20 minutes um. I went on ahead and put my eye patches on child because uh now this pregnancy has me getting some bags under my eyes, okay, but look at this lace. Look at it bomb! I'M going to take my scissors and i'm going to jaggedly cut that it's jaggery where jagged jaggedly child don't listen to me. I can show you better than i can tell you sis we're just going to cut that in like a zigzag motion, so we can get a nice a flawless cut. Okay, when we're doing our lace now, like i said in the beginning of the video, if you're going ahead and cut your lace prior to doing this, you are skipping this step and it might be easier for you to cut it. You know cut the lace off before you install the wig, it's completely optional, maybe i'll do that for the next video, which i think okay. So now this is my favorite part. This is becoming my favorite part. Child um, but, like i mentioned the beginning, video this, this baby hair process was not easy, so i think i'm going to do a very detailed baby hair tutorial for you guys because i may make it look easy job. This is hard, so what you guys are seeing me do right now is i'm basically parting out the hairline of that's gon na you know create our baby hairs or whatever i'm flat, combing um like hot combing. There we go. That'S the word dear lord, i'm hot combing that um completely forward so that it could be uh, nice and flat. Now i need to hold y'all. I did and i'm laughing at myself, because i did try like a new method to do my baby hairs. So what y'all see me doing right now is basically, you know just parting everything, our hairline of where we're gon na you know have for our baby hairs now boom. You see me cutting them completely optional. You know you can use scissors a razor comb, an eyebrow razor like you know, just something jackets, so you're not getting a straight cut. Okay, then my dumb ass tried to go in. Why try to go in with this big ass flat iron, because i couldn't find my little itty bitty baby flat iron yo, damn almost burnt my forehead that [ __ ] was not working okay, so i gave up on it um. It did work for the sides because the hair was a little bit longer, but try to use a smaller flat iron or a little little curling wand. Whatever you have you just don't use that big ass player like i did, okay, so now for creating the baby hairs. I am going to use my wrapping foam for this and you you know you can use whatever wrapping foam. I usually use the olive oil one, but i don't have that on hand. I ran out so this is all i got and you just start molding your baby hairs. I do feel like this could have been 10 times easier. Had i had curled the baby hairs with a smaller flat iron um and, as you can see, i got tired of the wrapping foam and i was just like [ __ ] it. Let me just use my gorilla snot and is it gorilla, snot yeah gorilla, snot girl, look gel glue whatever not that [ __ ] that the girl put on her head? Okay, we're using no real gorilla, [, __ ], but yeah you guys. I was struggling to do these baby hairs. They just did not want to lay, and i had a feeling that it was because i flat iron flat ironed it with that big ass flat. So don't do what i did child just just don't do what i did. Yo i cannot fake this. I was literally fighting these baby hairs. Okay, like i was fighting like. Why was it so hard like? I was getting so frustrated. Look at me. I was getting so frustrated. I kept like cutting the tail of the baby hair or the end of the baby hair just to like get it too late. Exactly how i wanted to win that [ __ ] did not just i just didn't want to lay like. I don't know help me help you y'all, i don't know, comment some some techniques down below some, but eventually you know the goat got it, because this is what i do. Unfortunately, i could not show you guys the whole side, but this is what the complete baby hair looked like, and let me tell you, after like 20 minutes of fighting with this [ __ ], it was well worth it okay because they came out bomb as well. I'M going to tie them up for like another 10 minutes and then it's time for us to style the wig. When it comes to um a styling, i did decide to do a side part. You know some quick, some easy and, as y'all can see, i am basically like parting away my um other side of my hair, because i'm going to use my hot comb to smooth everything out, you want everything to be seamless, nice and flat. You don't want no lumpy ass wig child. That is not cute, okay, so i'm doing the same thing for the other side, just to make sure everything lays flat, because when i put the wig on originally you know everything was towards the back and when i hot combed it i just was brushing it back. But yes, we're gon na get everything nice and smooth out and then we're pretty much done so yeah you guys this is pretty much the end result. It'S just a nice crisp, clean flat side, part. You know ain't, nothing too, od but yeah. You guys! Thank you! So much for watching don't forget to go ahead and check the description out um for you can see more details on wigan's hair and you guys can save some money on your wigs okay. But i am done rambling, don't forget to like comment and subscribe and i will see you guys in my next video bye


Comments
Wiggins Hair: Happy Mother’s Day! Such a wonderful job! Flawless install!
Erin McGoy: Happy Mother’s Day!! Keep your head up !
AmandaJane: What foundation and foundation color did you use on your bald cap and lace
Influencers Maggy Kloset: Hello, Please check you email from Maggy Kloset