How To: Get These Wand Waves On 30Inch Wig Ft Wiggins Hair | Assalaxx
- Posted on 16 January, 2022
- Fake Scalp Wig
- By Anonymous
welcome to- #wigginshair # 30inchwig #Wandwaves
Hey Babes,
Welcome back :) ! I hope you guys Enjoy it! Thanks for watching and dont forget to subscribe and like this video !! XoXo.
═══════დ #WigginsHair დ═══════
Get $10 off with coupon code“wiggins”!!
❤Direct Link➤https://bit.ly/3A760Ob
More coupons please join our Facebook group➤https://bit.ly/3pzwi8e
Hair details:#HDbodywave#lacefrontalwig 5*5 22inches 180 density
Hot selling #lacefrontalwig➤https://bit.ly/3tyYV7C
You may also like:
1. Premade colored wig➤https://bit.ly/3qxHhiI
2. Invisible skin melt #hdlacewig➤https://bit.ly/3qxAzJv
3. More Lazy girl approved #headbandwig➤https://bit.ly/3fw9Cjh
Follow @wigginshair on instagram:https://bit.ly/3nwMc1J
Tiktok@wigginshairbest
Facebook @wigginshair:https://bit.ly/3twesoX
Email: [email protected]
WhatsApp Wholesale: 0086 18339906150
Links to everything in video:
Equipments:
Camera: https://go.magik.ly/ml/16n3o/
Tripod : https://amzn.to/3hlfu0X
Phone tripod: https://amzn.to/2SND9wP
Hair Products used:
Wand- https://amzn.to/3KhKESW
Got2b Spray- https://amzn.to/3kIuvd3
Got2B gel- https://amzn.to/38rrOqz
Hair spray- https://amzn.to/3zyNugH
Glue- https://amzn.to/3gPg1qQ
Stocking cap- https://amzn.to/3t503xS
Concealer- https://amzn.to/3yEreAM
Lace Spray- https://amzn.to/3DKkRQ6
Makeup Products:
Nude lipglosses:
lipliner:
foundation:
primers:
https: //go.magik.ly/ml/16n2u/
contour stick:
bronzer: https:
//go.magik.ly/ml/16n3d/
blush:
eyebrow:
concealer:
setting powder: https://go.magik.ly/ml/16n31/
setting spray: https://go.magik.ly/ml/16n33/
highttps://go.magik.ly/ml/16n36/hlighters...:
Lash glue:
https://go.magik.ly/ml/16n4b/FOLLOW MY SOCIALS:
Personal IG: Assalaxx__
Hair Page: Assalaxxslays__
Tiktok: Assalaxx__
Connect with me :
IG: Assalaxx__
SC: Assalaxx__
Twitter: Assalaxx__
Email: [email protected]
Subscribe to my channel :https://www.youtube.com/channel/UCILXe...
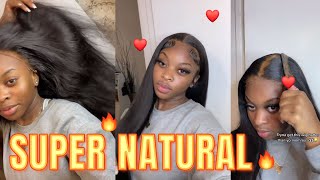
Hey you guys and welcome back to my channel now this this video is this video. This video is sponsored by wigan's hair and they sent me this beautiful wig, but before i show you guys what the wig looks like i'll be showing you guys what they sent me inside the package, so they sent me, i think 3d pair lashes. They sent me five pairs, three different styles. Actually they sent me, i think, a head scarf or like a headband that thingy. They also sent me some stocking cap and the bag to put the wig in which i'm always appreciative of because i hate when companies send the wigs without an actual bag, because when i take my wig off, where am i going to put it? Okay? So the wig that they sent to me is a five by five: what's it about yeah, so 5x5, 250 d, lace, 30 inches, so it's 5x5, 250 density, 30, inches, hd lace and guys i am absolutely low. Like i, when i posted this on my instagram, everybody was just like. Oh my gosh this here this year, like everyone loved it, the fact that it held the curls. I did some one curls in it and it was like yeah like very, very full. All the way down to the bottom like it was, it was not stringy or none of that. So i ended up doing some one curls in this way, so i'm just gon na be showing you guys like how i end up getting like the curls okay guys. So the key to getting these curls are almost like a wave pattern. Curls is using a um, larger wand because i did go in and i used a one, and i think this was at. I think it was 1.5 inches or two inches um thick. You want a thick one, because when you get like the smaller ones, then i don't know i just feel like the waves are more smaller. So if you want like a smaller wavier, look, then definitely go ahead and use like the smaller thickness or the smaller. The thinner, irons yeah, i don't know why i say smaller the thinner eye, so this was, i think, one more five to two inch thick. I'M going to be listing it i'm going to be um, putting it down below in the description box, because i i got it from amazon, so i'll put it down below the thickness, the exact measurement of it. But you want to make sure one. You have a thick one and then two you want to make sure you're not really parting, the hair um too, too small, because it's already like it's a long length here. So i don't feel like you need to do like tiny curls, because it's you know, i don't know. I just feel like tiny curls does not go well with longer hair like i feel like the bigger the waves like you know, because it's a big hair, pretty much like 250 density. 30 inches. You don't want tiny one curls in your head um and thirdly, you want to make sure you are curling in the same direction on each side. So if you're curling on the left, you know you're curling towards the right and, if you're curling on the right you're curling towards left. So you want to make sure the waves on each side are going in each direction. So, just keep in mind that you need to actually curl in one direction going forward like no, you can't do one direction on the left and then a next section is on the left, but you turn the one a different direction. No, you want to make sure you're going in the same direction on each side. Okay, so one you have to make sure you already have the thick one size, one two make sure you're not parting. The hair too, too small and three make sure you're going in the same direction on both sides. If you get what i'm saying but yeah, i'm just let you guys watch, as i finish, like one curling, this hair, okay, guys so for the installation process. I did go ahead and did i did my ball cap method off camera? I didn't do the full thing around my head because i'm not going to be it's a 5x5, so i don't need the full frontal, like the full front of my hair, to have the stocking cap um but yeah. I went ahead and i added my foundation to my stocking cap. I normally use eventually spray, but i don't have it right now, so, hence why i am going in with my foundation, so i didn't curl the front part of the hair because i wanted to make sure it was glued on my head first before i actually finished The front part and because i know it's going to be using like blow dryer the hot comb it's going to be glued, so it didn't really make any sense i would have had to like curl it over anyways. So i didn't do it as yet. So what i did firstly was cut off the thicker white area of the lace, which is like almost an inch, not even um wide on the ends of it. You want to make sure you cut that off, because that part will give the will not. You will not be able to give the illusion like this: is your hair, because it's so thick and white, so you want to make sure you take that off and i'm going to be going in with my glue, i use three layers of glue um. If i'm gon na keep it on for more than three days, but if i'm not keeping it on for that long, i'll use like one or sometimes two, and i always make sure to put the glue up of the stocking cap and not directly on it. So yeah, so so for this flat iron, if you guys don't know what it is, it's called um a pencil flat iron. So if you go on amazon and you type in pencil flat iron, the it will come up, they have different ones, but if you guys want as well, i will be linking the one that i'm using down below, but it's called a pencil flat iron okay. So i made sure to slow down this part, because i just wanted to show you guys that i am not really brushing or raking through the hair too too fast. I am actually going in one direction, just one comb through and that is it and then i allow i i allow the hair to kind of bounce back up a bit, so it shapes out. So you don't go in and actually like just comb out one single one or one single like curl, that you did you go in and you make sure you rake every single curl that you did in one direction. And then you see how like it's all waved in one yeah, so you want to make sure you're going down almost like you're brushing through it, where you're not really like cooling out too too much but yeah. That'S what i did okay guys. So this is the final look. I mean man. This is the final look. I know i'm not in the camera, but i still wanted to like show you guys like how beautiful these curls are, and it actually came out the exact way i wanted it to like. I wanted it to be one and that's exactly what it did, but yeah. Thank you guys for watching. I hope you guys enjoyed this one once again. I would like to thank wiggins here for sponsoring this video. I'M actually going to go. Take some pictures now so yeah. Thank you guys for watching. I hope you see you guys bye,
Comments
Shavvanie: It’s been a min since I watched ya videos cause of work but sissss loveeee the consistencyyyyyyyyy and the growth!!