Watch Me Install My Frontal Wig (No Bleaching! No Plucking!) | Supernova Hair
- Posted on 13 November, 2019
- Fake Scalp Wig
- By Anonymous
First time installing my own frontal from start to finish! Beginner friendly lace frontal wig install. Help me reach my goal of 50k subbies by Christmas! Subscribe xoxo
Business Email: [email protected]
STALK ME
Instagram: angwitacho | http://instagram.com/angwitacho
Twitter: https://twitter.com/angwitacho
Snapchat: Angwi
●▬▬▬▬▬▬▬▬▬♛Supernova Hair♛▬▬▬▬▬▬▬▬●
Coupon Code "Hotwig" Save $8!! (Available for Silk Base wig)
Wig In The Video: Body wave silk base lace front wig 22 inches 180 density,Direct link ➤http://bit.ly/363ZUi6
Go and find more surprises!Our official Site: http://bit.ly/2MQLNFv
New arrival!Body Wave Pre-Made Fake Scalp Wig: http://bit.ly/2psFPBF
Hot selling!#99Jburgundybodywave lace front wig:http://bit.ly/2BM8lk5
Use "Tacho " Save $6!! (Available for all product)
Follow our Instagram @SuperNovaHairStore, Direct link ➤http://bit.ly/31KOg8j
#Preplucked #curlylacefrontwig:http://bit.ly/2Jms1PZ
Body wave bundles with closure:http://bit.ly/2MMjRm2
Youtube @SuperNova Hair, http://bit.ly/2qNHAd1
Facebook @Supernova Hair, http://bit.ly/32UhBik
beginner friendly hair tutorial , frontal wig installation, deep side part tutorial, side part frontal wig, easily install frontal wig, how i apply my wig
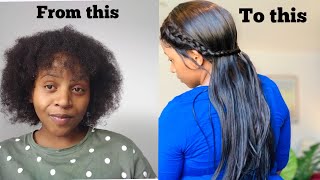
So today we're going to be working with supernova hair and I'm just showing you guys what the packaging looks like and everything that was included in my box. They gave me two wig caps and then this wave also came with an elastic band, which I thought was very thoughtful and then the little bag for it, which I use all the time. This is probably store my wigs and keep them clean and safe. The wig that we'll be working with today is their body. Wave soap base lace, front wig and I got it in 22. Inches in the density is 180 and I was really surprised by like the texture and softness of this wig with. Hence the face that I just made and like the curl pattern, it looks like really pretty naturally, so I was really impressed and the inside of the cap again, I said it's a soap base and I've never had a soap base anything before so it was kind Of different for me, but this wig also comes with combs, and then it also has an elastic part that is already built into it. So you can tie it in the wig if you need to, and then I just wanted to show you guys what the week looked like on the mannequin head and it's already bleep up pre plug. So I didn't have to do any of that. On my own. The level of finesse on box had to go through to get this week together is about to be crazy. This is the face powder that we are going to be using today its Iman, and I just pick this up from Walmart. I think this is the shade dark three that I'm using just looks like this, and this is what I always put on my wigs this or a similar powder, because I don't like to leach my knots. So I guess my camera didn't record me putting the powder on the inside of the wig, but I just took a big fluffy makeup brush and just put it all on the inside where the lace is, you don't need to put it on the silk face part Because, again, like that's supposed to mimic real scalp, so if you put like makeup or anything underneath, it won't show through anyways. But this part of the video is actually like. The part that I was like learning my way through because I've seen people put down the got to be glue spray, so they can like lay the wig on their head and then cut the lace off. So it seems to be easier. So I'm just showing you guys this part, but I really don't like doing it this way, so I ended up after I cut the lace I just like relayed the wig because it needed to be moved forward, but I just wanted to include this part just so. You guys can see like the whole process and like the mistakes I made all the way through you guys can see. My edges come almost to where my eyebrows are like. My edges come to where my fingers are so my edges come right here. All the way here and there's no way that the cap can go like that so um, the edges of the wig, have to success. So I'm gon na just place this. As far as I can like so and then glue that part down take this. Usually I have like a little brush, but today I'm use my finger cuz. I do knock here, hey we're being realistic today, okay, so after I made my little fumble or mistake, I'm now using the got to be gel instead of the spray to put that along. My hairline and use that to apply my wig that way, it just works better for me and then I blow-dry it a little bit to make it more tacky. And then I felt like I wanted to use the got to be spray a little bit towards the top. Somehow I make it stick better and then I'm gon na be blow-drying this and pressing it down with my comb at the same time, because it just works for, like a more flawless finish once I can start to see that the like lace is blending. In with my skin, that's how I know that I'm applying my wig right and you can kind of tell and see that in the video that, when I'm pressing it down is starting to look like the hair is coming out of my scalp. So you just do that whole process of spraying, pressing and blow-drying, and the important thing for me is trying to get the wig as close to my edges as possible without making it look fake, because my edges go too far out. So there's no way I'm gon na be able to fully cover them, but I'm gon na fix that later, with the baby hairs of the wig and make that blend with, like the baby hairs in the edges on my head that were sticking out so now. I'Ve taken the clips out of my hair and it's starting to look really really good, I'm actually like impressed and I'm just trying to part the part how I want it to be for the side part and like the thing about a silk base. Closure is that the front part of this wig was lace and then it goes into soap and it kind of looks like a Caucasian person. Scalp almost not really like my scalp, but I fix that at the end. Now I'm just going to be taking my hot comb and kind of creating the like slicked back part of, like my side, part just trying to get it like seamless and really straight right there and then I'm gon na be cutting out the baby hairs and trimming. Those and I kind of wan na keep them a little bit thin, because if your edges look too thick, it's not gon na really look natural. So that's what I'm trying to do here and you just got ta play around with it until the baby hairs. Look! How you want it to look, you can use any kind of mousse or wrapping lotion, and I kind of put that a lot there, but it ended up working out and I'm just gon na be playing with my baby hairs until I get them right and this Gon na took me a little bit of time because I'm not really good at doing baby hairs on a frontal and I'm pretty sure that this is my first or second time trying to do this, I'm more comfortable working with closure wigs. So I just played with this until I thought it looks like how people's doing so all right, so this is the baby put it just part baby, yours baby, I just put the I did so far and it doesn't look that bad from far away, which is The only thing that matters because who's coming close to me, nobody now I just going to take our scarf and put it over the baby hairs. But before I put on my scarf, I decided to do a couple more passes with my hot comb and then I'm just wrapping my scarf around my head and then I'm taking my argan oil of Morocco. I love this serum so much. I use it on all. My wigs and I feel like it, makes my hair healthier better taking a curl and then also, I feel like makes my wigs last longer. So I just put this all throughout the hair and then I'm gon na be curling. My hair, before I do my makeup and just trying to fix it up as much as possible, so I don't have much new after I do my makeup and I have a couple videos of how I wan na grow my hair up already on my channel this Time I was kind of rushing a lot, so the curls don't even end up coming out as tightly as I would have wanted them, but it still came out okay, and I think that the most important part of this look is using your hot comb on the Front of like the bane part, and then you're gon na, be taking your wand and curling towards your face the whole time I was kind of curling away, and this is just gon na - create like the look of how it does in the front of how it's Going towards my face instead of a way alright. So now I'm coming back looking smexy, I know y'all see me back there in the mirror, but I'm gon na be taking my soft focus powder and I'm just gon na be putting that on the lace a little bit more. Are we already put a different powder in the beginning, but this just like does like gives it like a finishing touch, and this is how I just like fix up anywhere that looks like lace just to make it blend in and look more natural. And can we appreciate how I'm looking on fleek, you don't see the process that was out of process, y'all, probably didn't believe in the process, but here I am looking on sleep wow, this side part I'm really feeling it, but now I'm gon na be taking my Karekare wax stick and I'm gon na be slicking down the flyaways and trying to like keep in place the front part of that bang cuz. It does like tend to fall as like. The night goes on and that's it. This is how I finished my frontal. I think I did a pretty good job for this being, like my first time, actually putting a frontal on my head from start to finish and I'm just admiring my work in the mirror. I really like this side part I feel like it accentuates my face. I have a very long and narrow face and I feel like this looks really good. So now, I'm just about to show y'all my little flex, video. You know, you see me, I'm cute, you see me, I'm doing it. You want to do it too. So, who does showed you how? I hope you guys really really enjoyed this video? Let me know down in the comments how you feel about my hair videos. If you think I need to work on something, but I'm really really feeling this wig, I'm inserting some little snaps in here as well to show you guys what I did look like on that night on insert them after, because I know I felt like I looked All sleek but yeah, thank you guys so much for watching this video. Thank you to supernova for sponsoring this video and I will catch you guys in my next video coming to you soon make sure you subscribe. Okay, okay, bye, guys, love! You! You


Comments
Angwi Tacho: Outfit linked on my Instagram! @angwitacho
iGladon: you did a great job with that, loving the hair x
Glory Kindo: I love everything about this wig. It looks really good on u.
septemberbabii16: Can we get an updated makeup routine please ? I love the simple makeup look you have at the end of this video, especially for a fellow dark skin girl like myself !
Domonique Chatman: You did a great job your look was beautiful
Jadzia K: omg Queen! You know how to work it! I wish I had the wig option, even for costumes or cosplay but my head gets so hot in them lol
Iris Highfill: Black women have to go through alot just to do their hair. Respect Beautiful girly ❤❤
rutssy: the wig looks beautiful!
Jocelyn Green: Beautiful
Joslyn Chigonera: I love this! you look good mama
Irving Taborn: That was a power play and you look marvelous yes three yeses
Perry Gonzalez: Ok I’m becoming one of your biggest fan, question where did you get your name and where in the states are you? Thanks Perry, I’m a fitness trainer in Las Vegas love to see you in some training videos it would be inspiration for a lot of women
Wandering_Addicus: Gurl u did good!! U and ur friend are so pretty!!
rocky crawford: so this is why it takes girls so long to get ready, but definitely the wait
Luis Mata de la Torre:
NX NEWS: I loved your intro the music had me dancing!!
Ms. Parkes: The denim top at the beginning pls tell me where to purchase
catmo59: Does it hold a curl? Was the hair too shiny fake looking. Good job
rutssy: 50k by Christmas!!!
uthamanj: My Wakandan Queen !!!
lowfunction 613: Angwi too fine,
Brownie-pie: Omg where is ur top from?
Gérard Blandin: coucou Angwi,tu es très joli
Amoya Clarke: random but where’s that top from?
Shada James: Ur auntie is so beautiful
lovelychriss: Intro song please
Ojukwu victoria: Hi