No More Wig Cap!! Reverse Fake Scalp! Super Pre-Plucked Hairline Most Scalp Like Wig Install!
- Posted on 14 January, 2022
- Fake Scalp Wig
- By Anonymous
New Fake Scalp Method! Reverse Fake Scalp!!
♡Wig in the video: https://bit.ly/3ntvEHF
Discount: "Maire" at checkout 10%off!
Fake Scalp Material: https://bit.ly/33B5tHW Color: Dark
Length: 22 inch
Lace: Invisible swiss lace
Density: 150%
Cap Construction: Glueless lace front wig
Cap Size: Medium cap size (22 inch - 22.5 inch) with combs and adjustable straps make it fit most people and is easier to wear
Parting Space: 6 Inch Deep Parting Space
Natural&Comfortable: Super pre-plucked hairline and bleached knots make it more natural
♡ Products Mentioned:
Slay Band https://bit.ly/3CMaF8Y
Wonder Wrap https://amzn.to/3GAhqwf
Ebin Wonder Lace Extreme Hold https://amzn.to/3ES0QGu
Hot Comb https://amzn.to/3Htu7Js
Hot Comb Base https://amzn.to/3pMJhn5
Olive Oil Fix It https://amzn.to/3FQn8d9
Kera Care Wax Stick https://amzn.to/31hBd46
Tweezers https://amzn.to/3zgdBcQ
Wig Caps https://amzn.to/3HvYXAW
Ebin Tinted Lace https://amzn.to/32Xe8Ew
My Amazon Store: https://www.amazon.com/shop/msprecious...
________________
Check Out My Wig Styling Playlist: https://youtube.com/playlist?list=PLDv...
Catch Up On My Latest Wig Installs https://youtube.com/playlist?list=PLDv...
___________________
Get the SCALP Look
Hide Knots & Grids https://bit.ly/3F983Dz
Fake Scalp Material https://bit.ly/3mp7qwU
___________________
Let's Stay Connected
♡Instagram: https://www.instagram.com/mspreciousma...
♡ Twitter: https://twitter.com/MPreciousMarie
♡My Website: https://mspreciousmarie.com/
♡ Tik Tok https://vm.tiktok.com/ZMRwbmjdu/
Sign up to get a wig customized: https://www.secretkreations.com
Business Collaborations Email: [email protected]
Send me a video request: [email protected]
________________________
Other Beauty Favorites
Feel AMAZING!!
Teami https://www.teamiblends.com/discount/M...
Discount MPM20
Whiter Teeth Kit https://brytnsmile370.grsm.io/b52sy2ww...
Discount MPM25
_________________________
Tech Info:
Camera used: https://amzn.to/39yd6Pg
Lens: https://amzn.to/3u767WO
Editor: Final Cut Pro
Music https://bit.ly/3ireQyM
_________________________________
*Hair or products shared are my OWN personal and honest experience. This video may contain sponsored content and affiliate links which I get a small percentage that helps invest back in my channel to continue to bring great content! Thank you for your support!* #MsPreciousMarie #FakeScalpMethod #FakeScalpWig
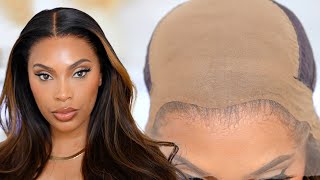
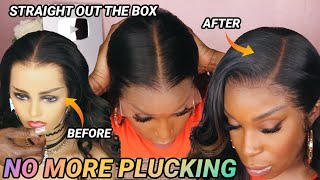
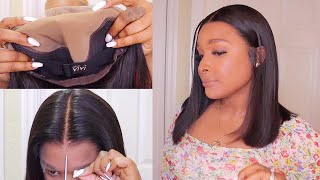
Before we get into today's video, let me share with you this beautiful wig from pretty luxe. I will be sure to put this wig down below in the description box. Today'S wig is a 22 inch and it has the beautiful super pre-plucked hairline. If you are doing any type of method that you want your wig to look natural, then you need a wig like this honey, because if the hairline isn't popping, then what's the point? Okay, you want your whole wig to look like scalp. So this is a 13x6 wig. It comes with combs and adjustable straps, so you can wear with or without glue with a wig like this. You don't need to do a lot of customization to it. It'S basically straight out the box type of wear um. I have plenty of videos showing you guys how to tint the knots if you don't want to bleach them, because you will probably need to do that if you want the most scalp-like appearance, but the hairline on this wig is absolutely gorgeous. The lace is a bit light. I believe this is swiss lace, so this is the wig we will be installing in today's video again it will be linked below in the description box with a discount so make sure you check below this video all right. So i'm going to start today's video by prepping my hairline before i glue down my wig now. I'Ve recently stumbled upon this product from another youtuber and i was like i want to try it because it's supposed to protect your edges by acting like a shield. Well, actually, it's for a quick weave. However, i've seen a couple of people use it for the hairline to protect it from the glue. So it is a darker color. I think it does come in clear, but the one i have is dark once you let it dry, it's supposed to be like a shield, over top of your hair, to keep your edges or your hair from breaking off from your installs. So it does dry fairly fast. It is very shiny. However, it does act like a barrier um on this when i put it on my skin now. This is what the ingredient list look like. If you want to pause the video and take a look at it just to see if it is in your interest, um but the product itself, i do notice that it forms into this cast um and it doesn't really wash away with water. I'M getting ready to show you guys that in a second but the color of it, like, i said it's dark. So if you have light hair like me, it's going to show or make your hairline darker um, but just with water itself, all it does is really loosen up and then it kind of hardens it's not hard, but it tightens back up into that shield again so Water does not really remove this. I would definitely recommend to shampoo and just wash your hair, to get it off your hair. However, it's not sticky um. It is a little tiny bit once it's wet. So if you were sweating, i'm going to assume that this would turn sticky and then once it's dry, it will turn back into that shield, but yeah that's how it looks once you wet it and, as you can see, just wiping it's still there. So i did try it out around my hairline for the first time now the color of it. I shouldn't want to clear to be honest, but it just smooths the edges down like gel um. The difference is that it will create a shield. But to me i still feel like it's just like applying gel to the hair a little bit, but it definitely smooths it down enough, so the hairline won't be in the way. Today, i'm going to show you the reverse, fake, scalp method. Now this method is for anyone who cannot find any use with the stocking cap method. For me, the stocking cap method is great. However, if you have ever dealt with pantyhose, you know that it rips rips rips, so i never find any luck with it. So this method right here is no ripping when stretched big girl head friendly, melts with the skin breathable with a non-tight filling and it lasts throughout multiple installs, meaning you don't have to keep buying 14.99 pantyhose. So, let's jump right into this method and i'm going to show you how to do it now. The first thing you want to do is get you some fake, scalp material. This comes with two different types of material right now, i'm only going to show you how to use one material later in the video i'm going to show you how to use the second. So this right here is the material that you're going to need in order to do the fake, scalp reverse method. Now this comes in a good amount, so you can do this with multiple, i would say at least 10 installs. It just depends on how much you're, using when you go to apply it and how big your head is. This first example, i'm gon na show you i'm gon na use with the wig cap on, because my hair is not as flat as i need it to be right now, so it's holding my hair in place, i'm gon na start by taking the sheer material and Placing it over top next, i'm going to take the even wonder: lace, bond spray and spread around the hairline just like if you was applying a stocking cap method to help this stay on and then let it dry completely. Now you can go ahead and cut your material in the back. I left mine for now, but i do go ahead and cut it off. Um, later after i get the area glued down, so once that's glued and tight, you want to go ahead and remove that extra fabric that you don't need at that forehead and with this material it is so lightweight that is non-noticeable as far as the feel so Be very careful when cutting this and if you need to you, can take your foundation powder and darken it. However um i try to match my scalp color. So if you just want to darken that forehead area, maybe because it's going to be a separation, if you are darker than me then go right ahead, it will work out very well. So, as you can see, once it's cut off, it's basically melted into the skin. You can't even see it but make sure you stay tuned, because i'm going to show you how this method will work without the wig cap, because i know you don't want to use the wig cap if you're watching this video. But i just wanted to show to anyone who may have this scenario that i have right now, because this material is so thin like, i said you can layer it if you need to just maybe two layers to get that scalp like appearance under the wig. Now this works for me because, like i said i cannot do the stocking cap because it rips every single time i go to stretch it um and if your head is bigger than mine, i'm pretty sure that you probably will have that problem too. When it comes to stretching that stocking, if not that's great, but if you do have that problem this material, you don't have to worry about ripping, and you definitely don't need to worry about it, not fitting your head, because you can adjust it to the area that You need it to fit and the one thing i truly love about it is how well it melts in the skin there's no rolling a lot of times the stocking can roll, and then you have to try to smooth it back down, but with this material it Just melts right into the skin, as you can see, so you don't have to worry about trying to trim away little pieces of that material. It'S just going to melt honey um. So i'm using the boho lace jelly today to do my install now. I haven't used this. I don't think i've used this before so i picked it up and i was like okay. Let me just go ahead and use it um. Another thing i like about this material is that it doesn't lift once it's wet again: um normally with the stocking cabinets start to roll back, once it's wet again and then you have those pieces, but as you can see, it stays smooth and melted the whole time. So i wanted to just throw in how i would do this without the wig cap on, so it does come with a second material. So if i did not have the wig cap on, i would take this second material and apply it first around my head. Attach it with the rubber band in the back and cut off the extra now it's very comfortable. This is also very breathable and it can be adjusted to any head size, and then i will take that material. That is the lacy looking material and apply it right over top of that, and do the same exact thing that you guys already see me do now. This is for anyone who is not wearing a wig cap under which i'm pretty sure you guys don't want to wear the wig cap under. So this is why i'm showing you what it would be like with just the fake scalp material. So you would repeat the same steps that we already went over and then apply your wig. Let me just say, because the material is very thin, it will not cause any bulging or lumps in the back of your head. So that's a great thing, but this is what it would look like with those two materials together. So you definitely want to use both of those together if you're not doubling up the lacy material and, if you're not using the wig cap under like i did previously at the beginning of this video. So this will hide the grids on the lace. However, you still will need to bleach your knots, as i tell you guys, over and over again bleach knots has nothing to do with the fake scalp. The fake scalp is meant to hide the grits on the lace and give you that scalp like appearance, so anything that you are putting under your wig. That is the color of a flesh tone is for that purpose, all right. So, let's move back into this install so i'm just laying that lace right down and, as you can see, there's no line of separation or anything and at this part of the video i still have my actual wig cap, along with the fake scalp material and for Some reason with the wig cap um it didn't have that line that you guys seen before i applied my wig. You know the band it did not show after i put that lace material over top. So that's a good thing um. So i'm just going to tie this down with the slay band. I absolutely am loving this hair. I will be sure to link it down below in the description box. Um. If you guys want this wig, it is a really pretty wig. It'S very long. I believe it's like 22 inches, but it does come in different lengths, so i'm just adding some curls around the hair and basically yeah just styling it. Now. I did decide to switch my parting on this wig, just because i wanted a side part. Instead of a middle part um, but it was very easy to do like i said you get a lot of parting space. I will be sure to put this wig down below in the description box and don't forget to give this video a like drop me. A comment and give me some feedback on what you think about today's video and also don't forget to share this video. If you think it would be helpful or if it was helpful to you and yeah. I will see you all back in my next video. I'M just going to finish out this wig. You guys can continue to watch and thank you so much for watching you.

Comments
Marva Lane: Thank You so much for sharing your proven techniques in such easy to follow details. I just received the fake scalp material and did my first bald cap using it and I am shook and hooked. Never have I been able to achieve this flawless “bald cap”. No pain from wig cap being too tight and no rolling; placing another order so I never run out.
T. Chancellor: Thank you for continuing to bring us helpful, reasonable, "do-it-yourself " tips. My slay game is on point, and you're to be credited for a lot of it, and for that I thank you!
CandypinkHeart: After the bleaching this makes everything go a lot faster I could imagine ... I could not take the time to wear wigs because of the time it takes to install it... I like to not feel like I am struggling to be pretty. This is a way more classy look I'm proud you did this honey
Graciously Blessed: Marie, May you and your family have a blessed filled weekend, and may each day be the same. We, your subscribers, need you to continue enlightening us with your expertise. Please!!! We continue to learn because of you. Thank you.
Kim Stanley: Your techniques are always innovative. Thank you for sharing!
Kay Mac: Love this idea! I absolutely HATE stocking caps!!! Thank you Marie, you are always thinking of new and fun ways with this wig game!!!
Classyh K: Beauty Perfection.... and the wig is nice too. You are good informational teacher, Marie. I love all your tutorials.
Regina Nickens: Thanks for always recommending great wigs, I've ordered at least three of them and they've all been great
Mammie Summers: Hey Marie, love the tips. Definitely going to try that method rather than the stocking caps. Beautiful hair!
angel face: I use this method all the time for layn down my stocking for wigs and quick weaves also 2 protect my edges. Sit under the dryer to set it.
bintagram: You look amazing, the finished result is incredible!
Kim Stanley: Your techniques are so innovative. Thank you for sharing!
Beauty by Jay Morris: Great versatility Marie, love the different options on how to fake scalp a wig, thanks for the tips
Chan Stan: You're so innovative and versatile.. Thank you for sharing your tips with us.❤️
Just Joia: Again… this is bomb!! Congratulations Marie.
Alebra Smith-Cooper: Great tips!Now hopefully I achieve the same flawless results when I try it.
Jennifer Brooks: Girl shout out for doing 2 installs!! All them sprays!
Darriah Lazard: I been on the quickweave shield for yearssss. That wig will slide right tf off in the shower. I apply a little bit more all over the front of the hairline though. Works like a charm.
Audrey Harrison: Hello Marie,how are you and family,thank you for your blessings,you are God sent to helping others and I greatly appreciate you and taking your time out to teach us how to learn how to install our units
Forever Fallon: Keep the pretty hair luxe wigs coming I like their wigs, I feel alot of ppl are sleep on them
Panda Manda: I love it! Definitely getting that material
Holla At The KI D: Sooo pretty! You did it again.
ALL BEAUTYBYJACQY: Love love a your ideas and thank you for all you do. Sis, when is the wig sale coming up?
Crystal Amos: Wow that hair line huny is popping looks gorgeous very natural.
tamasha williams: Thank you I loved the info and the wig is beautiful
Candice A: Love this, you're true innovator!
Kimberly Kyles: Marie I ♥️it thx for vid enjoy your weekend an stay safe. Peace and blessings
DISPATCHER92 DISPATCHER92: I’m feeling this new method ❤️
Diane on any given Sunday: Can't wait to try this method. Thanks Marie
Lakea Joseph: This looks amazing. How long does shipping take?
Kenatra Joseph: I've been watching you channel for a while NOW!! Love your content you are very detail love that:) thanks for the tip!! Can you tell us where you purchased your comb?
Pretty Mess: I just want someone to create a silk lined something for my barely there edges.
Cynthia Randall: Thanks for sharing with us. I would love to purchase one of the wigs you show but they don’t have grey hair as an option.
Tammie F. Taylor: Cool. I had bought this from Ali Express and another company and didn't use it after I started using Perfect Line Swiss but now I can use it instead of a cap.
Travina Tolbert: I’ve got to try this out
Jasmine W: Very helpful, I want to try, so is there a knot in the back from cut off?
Brenda Nelson: I would like to see how the back looks after u tie the cap
Stacey Y: Hi Marie, Thanks for sharing!
Kersha Beaver: Beautiful ❤❤
Serenity James: THANK YOU!!!
modelchiic17: Yes !!!! What she said!!!!!❤️❤️❤️❤️
Nancy Williams: Hey pretty lady. Gorgeous slay
Lisa Harps: So beautiful wow
Jackie Davis: Very informative
T. Cozart: Nice, what type of lace material ot that? & where can I find it?
Jazmine Gardner: Beautiful
Rochelle Katz: Another Hit Marie
Audrey Harrison: Much blessings and thank you
Francine Sanders: very nice video
Cherissa Albertine: Can you sew it on ?
Shirley Ann: I like the method
Nora Charles: Savage Fan ⚜ Stunning
Leya Nash: If you created this method i hope you patented it or copyrighted it so those chinese companies dont steal all your coins lol
Paricia Jones: ✅✅
AfricanSnowQueen Queen: Don’t understand. What’s the actual purpose of both layers? Yes, guess I’m a little slow, but help me out here, pls!
Rene Hill: Literally no one is ever going to do this. Girl….lol.
Alicia Edmonds: Gwurlllll
Bunni Pop: Do you have any tips for those of us with hairlines where a bit before the temples, we have hair? In the middle of my forehead, i'm usually good at laying everything down..but toward my temples my hairline dips down so my frontal ends up with a straight looking hairline to hide it ;-;
SLR Couture: That’s a waste of material, money and time. Stocking cap is to preserve edges and create a bald look. I think this is unnecessary.