Client Series: Ywigs 13 X 6 Fake Scalp Lace Front Wig
- Posted on 26 November, 2019
- Fake Scalp Wig
- By Anonymous
Hello beautiful people todays wig was sent to me from YWigs to review and show & tell.
Check out her amazing Hair Instagram if your interested in booking a hairstylist in Brooklyn besides me: ( Potentexperience ) - https://instagram.com/potentexperience...
The wig I received is from https://www.ywigs.com
Use my coupon "Keira19" for $$$ off.
The direct link to the wig: https://www.ywigs.com/ywigs-premium-6-...
Pre-made Fake Scalp? Yes
Connect with Ywigs:
http://www.instagram.com/ywigs_officia...
https://www.facebook.com/Ywigstore/
Snapchat: Ywigs Hair
____________________________________________________
P R O D U C T S MENTIONED IN VIDEO
Glue:
Heat Protectant Spray:
Curling Iron :
__________________________________________
O T H E R INTERESTING L I N K S YOU M A Y LIKE.
♛
How I pluck my synthetic wigs 13 x 4 hair line: https://youtu.be/UWVuG4-5pwQ
C O N T A C T L E N S: Hidrocor Ocre - by single lens: https://www.lens.me/hidrocor-ocre-by-s...
Block head: GEX 20"-24" Cork Canvas Block... https://www.amazon.com/dp/B00W1BT1SI?r...
Tripod: GEX Heavy Duty Canvas Block Head... https://www.amazon.com/dp/B071WC4G5D?r...
T pins: Salon Care Steel Wig T Pins https://www.amazon.com/dp/B004OKBZSS?r...
Hot comb; Andis High Heat Press Comb (38300) https://www.amazon.com/dp/B001BODO2A?r...
Tiny Chrome Scissors ✂️: LiPing Colorful Scissors Eyebrow... https://www.amazon.com/dp/B07HQ2JQD7?r...
Brown Colored stock cap: 12 Pack Dreamlover Brown Stocking... https://www.amazon.com/dp/B074PN157D?r...
__________________________________________
Camera: IPhone 7 Plus
editing: IMovie
Ring Light:
Umbrella light: Neewer 700W Professional... https://www.amazon.com/dp/B017D7W57S?r...
************************************************
****
***
**
*
I OWN NO RIGHTS TO THE MUSIC PLAYING IN THE BACKGROUND
*
**
***
****
*****
HEY LETS BE FRIENDS :-)
♀️HAIR Instagram: BodiedByKeira
Wig Sale Instagram: https://instagram.com/bodiedbykeirasho...
⚠️ Snap chat: BodiedByKeira
Email for business inquiries: [email protected]
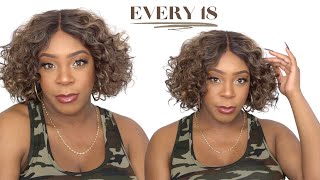
Hey boo, today's work is brought to you by y wigs. They was kind enough to send me one of their wigs to show and sell for you guys. Today. The weight comes in this long, clear, plastic baggy, with a little bit of wig details on the bag, which says it's a human hair wig with a 13 by 6 lace, parting that comes with a fake Scout. The cap size is medium and the wig length is 16 inches. This is what the inside of the wig look like. You get your 13 by 6 lace, parting space with a sub material attached to the lace to help it give that fake scalp. Look behind the parting space. You get two combs, that's not so far from the temple and another comb in the nape area with adjustable straps. The lace is Swiss lace and the hairline comes pre plugs, but the knots do not come bleach. I mean the knots. Do. Come late, sorry also attached to the way, comes a adjustable elastic band, but you can also remove the elastic band that it comes with. If you don't want to wear it, I wanted to show you guys what the hairline looks like a natural sunlight but, like I said before, it came like this straight out the box, and I say they did a great job plucking, the hairline plus the fake scalp, Is looking really nice and realistic, the hair texture is on the silky side and the hair color is in a natural black off-camera. My beautiful client went ahead and dyed the hair jet-black before the install. The glue that I'm using today is called hold me down by Erika J. You guys don't even understand how much I love this glue and to apply my client wig, I'm going to do it in sections. Doing sections is more easier for me most of the time. So first I'm applying three thin layers of glue only to the forehead and the right side of the hairline, then I'm going to go in later and apply glue to the left side of her hairline after I finished doing the section I'm doing it now. I smooth out the glue with a popsicle stick until it's spread nice and thin. I make sure I'm gliding the edges of the wig cap into the glue, so it can lay flat also when you're applying so much layers of glue make sure the glue is dried. Clear and it's thin and tacky before you move on to the next layer of glue and to help speed up the process. I just used the blow dryer on cool to help blow dry it and make it dry a little faster. I thought I went in with three layers of glue with this wig, but it's actually four layers. Sorry about that again. Usually, when I do my client series for some weird reason, I'm always in the way when I'm starting to pull the glue down on to the lace. But I already went ahead and cut the lace off of the way when applying it. So I know exactly where it's aligned the edges of the cap up with the glue. Sometimes this is more easier for me, or sometimes I apply the glue with the lace they'll attach, but this is just what I'm doing for this install. I don't know what she said, but she is so cute. I freaking love this client. You guys, you guys don't even know and she's, also a hairstylist in the Brooklyn area too, and she be telling that so I'll be sure to leave her Instagram below if you're interested feel free to check out her work. So right here we know that the hair line of the wig doesn't really match her hairline, and we know that the tempo of the cap will be showing, but she'll rather have her hair line protected from the glue instead of applying the glue on it. So right here, I'm just applying the glue to the left side and we're gon na cover up the cap with a piece of a beer. Also, I'm applying four layers of glue to the left side, the extra lace, that's on the forehead of her hairline, I'm just gon na cut it off, so the hairline could kind of line up more evenly and also now there's a few parts of the lace that I missed, but that's okay, I like to go in and apply the glue instead applying too much glue and having it show. So I just take the end of a rat tail comb and put the glue on it and spread it out till it turn nice and clear then go in and apply three layers. Off-Camera went ahead and tied her hairline down. That was time to go in and style the hair and to style the hair, I'm going to be doing some light curls. So first I spray in my density hair, no heat protection spray on the hair, and then I also go in and I'm going to be using a one and a half inch barrel iron and I got this iron from Sally's. I think this is the ion iron. I believe, and I'm just throwing some curls in there - the curls aren't really going any certain direction kind. Some of them I end up going towards the front and some of them I'm doing under. I don't even know why I did that. I usually have a pattern on how I curl hair, but I was sick and not feeling myself this day, so I think I just lost all sense of it, but it still came out gorgeous so stay tuned. Right here is pretty much my end results and I think it came out really great and nice. The hair had a zero tangling, as for shouting shouting was super low. On this way. The density on this wig is kind of on the low side, but it's like in-between medium, not too thick, not too thin, and I really like it and the scalp looks so great like what do you guys think like? I really don't have nothing bad to say so if you have any questions, feel free to comment below and I'll get back to them as soon as possible. And I see that's a nice video and also, if you're, located in the Brooklyn New York area. I'Ll be sure to leave my info below if you want to come and get it install see you guys later,
Comments
Tracey Boyland: The hair is perfect. Everything about this unit is what I would love when buying.
Qua-Denia Watts: That came out beautiful, your work is flawless. Awesome job
Tateisha Page: Love it!!
Magikalblackness: I'm so proud of u and all your accomplishments She just got slayyyyyed by the best
Crystal Morgan: How long will it last?
Alfreda Scott: Did the dye affect the fake scalp?