Watch Me Slayup/Down Curly Lace Wig Install|Unicehair✨
- Posted on 19 December, 2019
- Full Lace Wig
- By Anonymous
UNice Official amazon website: https://amzn.to/2XcwGgl
10% Coupon Code:UNICE123
Same Hair in Video: ★3089 Sold 13X6 lace frontal wigs curly hair:➤https://amzn.to/2YYV3ez
------------------UNice Hot Selling Wigs ------------------
New arrival fake scalp wig: https://amzn.to/338M5wl
★90% Girls choose 13x6 body wave lace front wigs➤:https://amzn.to/2HKYeB7
★968 Sold 13x6 lace frontal wigs straight hair➤:https://amzn.to/2WrVXhy
★The Hot sale 13x6 water wave lace front wigs➤:https://amzn.to/2UxmCbx
★The popular 13x6 deep wave lace front wigs➤:https://amzn.to/2ZGrcr3
★13x4 highlight lace front wigs➤: https://amzn.to/2NGZ0Q5
---------------------------------------------
Want to Promote or wholesale UNice hair?
Contact:[email protected]
Whatsapp:+8613290756878
Chat with UNice: https://api.whatsapp.com/send?phone=86...
Follow UNice hair Instagram https://www.instagram.com/unicehair_am...
Facebook:@UNiceMall: https://business.facebook.com/UNice
Welcome to IAmBeautifulHustler Channel
Be sure to SUBSCRIBE & TURN ON YOUR ALERTS
CONNECT WITH ME✨
Personal IG: Iambeautifulhustler
Business Instagram:_Beautifulhustler & @thebeautifulhustlerbrand
Twitter:_Beautifulhustl
YouTube: IAmBeautifulHustlerTV
✨SLAY WITH BEAUTIFULHUSTLER✨
TO PURCHASE MY PRODUCTS Or BOOK :
WWW.iBhSlays.com✨
Lace Melt Ashesive,Melts Belts, GLAMWAX and more✨
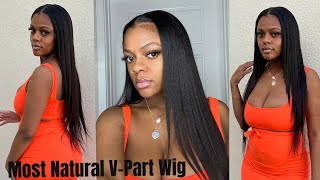
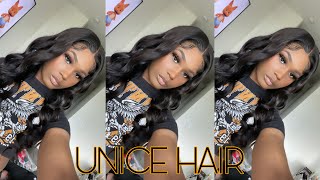
Hey beauties and welcome back to, I knew before TV. If you are new to my channel, just go ahead and click that subscribe button internal here bells. Now, today I will be doing a top ponytail curly hair, look with a lot of baby hairs, and today's wig is by a you, nice hair, and they did send over this curly wig here, and it is a thirteen by six curly week, which means that I Have a lot of carting space in the center and it's just like a regular lace front one decided, so I took advantage of that extra space in the middle and decided to do a top ponytail. Now as far as the wig, it did come. Pre plugs. I didn't only had to do just a little bit more plucking and after you know doing that and after bleaching, the knots and everything like that. So now, I'm just gon na go ahead and begin to apply the wig on my sister's head and install in style. Now I do go ahead and take their same Ruby, kisses foundation that I showed you guys that I applied on her stocking cap and I applied that same color foundation on the inside and on top of that lace, wig and, as you can see, I'm still like Touching up the spots where I feel it needs more foundation and I'm just going to go ahead and pull that back and begin to apply my four layers of that boho actively school. After applying all four layers, you want to make sure that that glue does turn clear and lots of times clear. You could begin to pull that lace down into your glue now make sure you bring the lace past the cap and don't put it directly on top of the cap. That way, you would get a seamless, I'm looking installation and you won't see the separation of the cap and the lace so always playing your lace. Wig, a little bit past that cap, your nose just to make sure that you don't see that cap underneath it and once you get it in place, just go ahead and have them hold inside as you blow dry and comb that lace on in and make sure You are using heat to blow dry and melt that lease in as well. Now, once you have melting that later on, you could go on with your services or you can use an eyebrow raiser, whichever works best for you, and just go ahead and begin to cut off that extra lace. And you want to cut as close to where the hair is glued as possible, still cutting off. You know in a jagged motion and just taking all your tail comb just make sure you push the edge of that lace into that glue as well, and I'm just want to continue to cut off the edge delays. And then I will begin to tack down. Whatever else is still lifting, and now I'm just gon na, follow those same steps on the other side as well, cutting off the extra lace typing down, whatever needs to be, you know glued down, and then you know just pulling out a section of those. You know their hairline and just kind of going against the you know the direction of the lace wigs supposed to fall, just using that lace in those hairs to apply pressure to make sure the lace is melted in so I'm gon na do the same thing as I mentioned, as I did to the other side, but just explain it a little. You know more on this so now that I have everything set down. I'M gon na go ahead and put down a section that I will use for my baby hairs because, as I mentioned, this style will have a lot of baby hairs with the top ponytail look and I'm just going to take that bad head. This is the new extra-strength one that I found out about and just spread that over the hairline then going on with my beautiful husband, Mel belt, and you know secure that lace by doing that. Second, step melting process and as that lace is melting and I'm just gon na go ahead, and I part off a bad section of that wig and I just want to so that we want to that bottom braid just to secure the knee is not going anywhere In the back, so now that that holding spray is completely dry, I'm just gon na go ahead and reload that note Bell and, as you can see, is very very giving very much stop tease and I'm just going to come out that holding spray and I'll begin To section off the top area, where our points out is going to be so because this is a thirteen by six, there is, you know, tracks on the sides, so you just want to make sure you part a nice part where all of those trucks will still Be covered so I'm gon na start by parting here on this side, and once I get that part on this out where I wanted, I was going with my flan wax: stick which releases January first guys so get ready to purchase these as well. As my, he said that I have to tour those coming for as well and your milk doses to really secure and that your lace is going in and all of that will release on January 1st so make sure you guys stay tuned for that. But, however, I am going in with my hot comb and my glam wax stick and I'm just applying that wax and hot coming those roots out, because you know, even as I asked as I always mention you get a little time to stay here guys. But as I always mentioned, you want to make sure that you, hot comb out the roots on any pattern, texture of hair that you are using and that will help you get those really really neat and natural-looking results. So I did a hot comb, the roots out on this side, and I'm gon na do the same thing for the other side as well, and when you are creating the top ponytail try to make these section as symmetrical as possible when doing the top ponytail. Look. You don't want to be like once I was really we are today, and the other side was really low, but try to get it as symmetrical as possible. It is gon na be a little harder, especially if you're doing like a certain shape party that you like whether it's gon na be like the round or, if you're doing a square part or even like a triangle, part to try to make it symmetrical as possible. And once you get the part on how you want to just go ahead and take some holding spray just a little bit, you know you don't really want to get it like super super hard, but just enough to you know, grasp all those hairs and lay everything Down and just for security, I'm having a client hold down in front of that lace. I should create that ponytail that way the lace doesn't ripple in the front or lift up, and you can just pretty much get that ponytail nice and neat and tight without any issues, and I am using a thick white rubber band. But as always as I mentioned, whenever you are doing any type, when you tell look whether you're using the same color than I am using or the black one, you still want to make sure that you do the wraparound part to cover up that rubber band, because If I would have just left this rubber band, showing it is very, very techie, so I'm just gon na sneak up any air, as I feel you know, got my stuff and creating a ponytail, and I'm just gon na take a thin section of that head. Ponytail, hair and wrap it around to cover up that rubber band completely, and while I'm doing that wrap around you can use a spritz or you can use a strong holding spray and you just take a little piece. You know comb it out spray that holding spray and just wrap it around that rubber band in a nice little wrapping smooth motion like comb. It out make sure we slew with inches stretch it out and wrap it around and said that ribbon is completely covered and it is looking nice cute and neat and then blow-dry. So it is secure that way it does not unravel baby is and the first things. First, rule to cut those baby hairs down, really really short the shorter you cut them the easier it is to swoop them and the more naturally your baby hairs can look. So I'm just gon na cut them down really really short and I'm just gon na go anywhere for my all-in-one slave care home and just begin to swoop my baby hairs. Now, as far as baby hair placement, it all depends on you like, if you did not want to do the sensor baby hairs food that I would be doing in this. You know if you don't even have to pull down baby hairs. For that section, you just got to pull the top the front hair that will follow to that ponytail straight up, but if you didn't want to have that such as hope like I am, then you know your first baby hair we're starting the center going. You know into that ponytail and then the rest of the baby here is you just pretty much scoop and it will fall into place as far as placement, so I'm gon na do one process Center, one cross the side - and you know I'm just going to continue To scoop and a blow-dry each baby hair one down so that so that it does not move and it is secure. So, just using my edge personal ad, I'm just gon na comb swoop the baby hairs into place in blow-dry one in, and I just like to put the gel on the back of my hand, that just makes it you know he's you know year for me and You know just put that up the teeth of the comb into the gel and I'm just coming on to the baby hairs and begin to schools in so worn, so pretty much what I'm doing to this side, you already know, I repeat the same steps at the Other side as well foundation that I use underneath and on top of the ladies engines, conceal up the areas where the parting space is just to make it. You know pop warrant and stand out more, and I did not show this part, but I did go in with a little black spray in the front of the lace to make it look a little bit fuller at the ponytail part cuz. It was just looking like a little plucks for me and you know you so much a ponytail to look nice and full, so I did go in after recording and add a little blood spurt towards the front only at the ponytail area. So you can kind of see the difference here and I deal with the hair just a little bit, but overall I totally love this look like everyone else loved it. So, let's you know you know, let me know what you guys think down in the comments and thank you for watching.


Comments
jennifer miller: I love watching you work Sis! You explain every detail well, and honest when it comes to hair.
GeminiBeauty12: Omg I just found you and can’t stop watching I wish you could do my hair absolutely amazing talent
tenice0526: You did that I love how natural your sister hair looks very nice
Tameka Mathis: Baby girl know u slayedshe was feeling herselfU always come through
Carla White: Omg I'm in love truly your a gifted artist❤❤❤❤❤❤
Princess Toyia: My homegirl does it again!!!
Chanel King: SLAYED !!!!
Red Tucker: So pretty..Look so natural
Drecka So Lovely: Did u get this wig from unice website or the amazon unice website because i ordered from the direct link and it didn’t look this full at all??
Kelly Etin: Hello please can you do a video making this wig I really needs to see how you make your wig I’m new to your channel I just subscribe today you are creative that’s why I like you
Davina Dawson: I love it
Kia: Whn u put the foundation on the top and bottom, do u add hair spray to keep it frm transferring
Empress Nene: This is fireeeeee
Laura Lormeus: U slay that girl