The Perfect Synthetic Burgundy Wig! | Amazon 99J Wig Install (Pre-Colored Wig)
- Posted on 20 November, 2020
- Full Lace Wig
- By Anonymous
***Welcome Back***
In this video I'll be showing how I installed this burgundy synthetic wig! This is a great inexpensive way to wear any colored wig, and make it look natural! Let me know if you try out this same wig, and how it works out for you! Link will be down below...
Like Comment, and Subscribe for more videos from me!
*Make sure to. watch in 1080p!!!
*Comment ANY video. suggestions you have for me to film!!!
LINK TO WIG- CURRENTLY UNAVAILABLE
SUBSCRIBE SUBSCRIBE SUBSCRIBE!!!
#burgundywig #syntheticwig
Social Media-
IG:@goldendia_
Snapchat:@CourtAdia
Twitter:@Courtney_adia
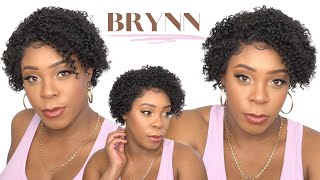
Hi welcome or welcome back to my channel so in this video i'll, be showing how i installed this synthetic burgundy wig. So this is how the inside was looking um. It is a hole on the lace on a couple of spots there, but i am going to cut it off um. I accidentally got it when i was plucking the wig. So now i'm using this powder foundation and i'm going in and coloring the lace and then i'm going to go ahead and put it on and i use some clips to hold the hair back. So now i'm taking my scissors and i went ahead. I cut three sections or three cuts in the lace. This helps so much when trying to lay it down and get it flat instead of doing the whole entire lace, um and then yeah. I'M doing that and i cut the ear tabs off. I did have to cut some hair. It wasn't a lot actually, but you're gon na have to cut some hair off and i made sure that it fit over my ear and then i did the same thing on the other side and then i went ahead and just showed um how much hair like Came out from that one little piece that i cut off, so it wasn't that much and yeah. So that's how that looks. It fits on my ears on both sides. So now i'm flipping the lace up and i'm gon na work on one section at a time. I'M using this ghostbun glue um. This is my probably my fourth time using this and i feel like this is way way better than obviously got to be glue and stuff. So anyway, i'm using that, i put it and i dot it on my forehead kind of like above where the cap is and then i'm using the um bottom of a comb and just spreading it up. You can use like a popsicle stick and stuff like that, but that's all i had to use right now, but anyways. When i put the lace on, i want to make sure that i get that hole over the glue. If that makes sense, so i am able to cut it off if that makes sense, and then um you want to wait for the glue to be completely clear. I didn't, but it kind of it worked out at the end so and then i'm just repeating the same thing on the other sections. Also, while i was waiting for the glue to dry on that side, i went ahead and got some scissors and i cut off the lace on the middle portion um. I i know you're supposed to do it like you know, zigzag and not straight across, but i kind of did it across, but it doesn't really matter because i didn't even leave that much lace to like be noticed. I guess if you, if that makes sense but yeah, i went ahead and did that and i put a little more glue on that little corner piece because it wasn't laying flat and then i'm using a blow dryer this time. When i did the middle section, i didn't use a blow dryer and it helps a lot actually and yeah, i'm just putting and laying that down and yeah. Also, when i was laying the wig down, i used like the back of this comb and i was like pressing it down. I didn't want to use my fingers, so i just used the comb and yeah so then i went ahead and cut it off. I wish next time when i do a wig like this. I definitely need to pluck more hair, because on this side it looks really like boxy and like fake, so that side and on this side as well, it just looks like i didn't, pluck enough hair so yeah. This is how it's looking. I laid the lace down and everything and now i'm doing the middle part again. I should have plucked more hair because it looks fake so but anyways. I went ahead and detangled that side first and i'm moving on to this side. All you need really to detangle. The hair is water. It doesn't really tangle that much. Actually, it does have a lot of shedding, though that's one big thing about it, but the actual detangling process it doesn't take that long. It'S not that hard, which i was kind of surprised about, but it's a good thing. So there's all the hair that shedded, which wasn't that much at the moment, but it sheds a lot by the way. Now, moving on to baby hairs, um i'm just pulling out some hair. This is where i feel like made. The wig look just like 10 times better, so i'm pulling out some hair and i only pulled out hair on the front part up here. As you can kind of see like towards the towards my ear. I guess i didn't pull out any hair because i wasn't going to bother with that. So that's how much i pulled out. It'S a good amount and now i'm starting to cut it and i'm using my got to be glue gel and i'm just going in. I'M doing my baby hairs, how i normally would with my hair and i'm just going in i'm swooping it, and you can kind of just watch me do it and for this part, like i said, i'm trying to do my baby hairs like how i would on My normal hair um, so this part i'm like pulling out some hair and i'm making like a little curl with it. This took me so long to do um and i ended up switching over to the comb side, but this side, it just took me a while to do and to finally get it. I eventually kind of like moved on to another piece, but i went back to it. So i went back in on that piece that i was trying to swoop and i had to cut a little more hair off and i eventually did it off camera just because it was really hard to do it on camera. I had to go into a mirror that was a little bit closer, so, but now i'm going in with some foundation - and this is just a powder foundation and i'm going back over the part to help it look a little bit better. So this is how the hair looked when i finished, i did comb through it a little bit more after, but this is how it looks, and this is the final result a couple days later. This is how the sides look and nothing lifted, or anything like that, since the first day i installed the wig. Also, this is how long the wig is, since i never showed how long the wig was before it's a nice waist-length, wig um, and it's how it looks in the front. It was a little frizzy at the bottom, but using water and brushing it out helps get rid of that. But that's all for this video hope you guys liked the video and everything that i showed and if you did make sure to like comment and subscribe for more content and more videos from me and i'll see you guys in my next video bye. You


Comments
Courtney Adia: Make sure to Like, Comment, and SUBSCRIBE for more content from me!!
Raquel Johnson: Omg thank you! I just bought a wig from my local beauty supply store! I’ve never applied one before. I tried last night, it was ehh okay, but i will definitely try again tonight after watching this video!
Fifi A.: lovedddd thishow long did it take for the wig to arrive?
Silky Saks: You did a great job on laying this wig down. I agree the baby hair helped with the hairline. New sub
itslewababy: I love this so much!!
mandiscurls: That wig looks great!! Did it frizzy at the ends ? Or could you curl it?
Olive Dove: What’s the link x
Ann B.: Can you straighten it? And you look gorgeous btw
Daishawithai: I need this link
Engu Fontama: The link takes me to a black curly wig, but the reviews show a burgundy wig Is the link right cause I want this wig :)
Rin: Is this big head friendly?
Tumininu Victoria: Perioddddd
semajariah: i used the link & it now says 19 dollars is that the right one ?