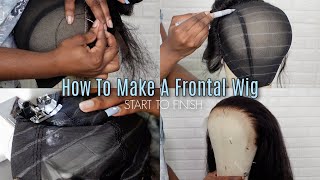
Diy Frontal Crochet Wig With Xpression Braiding Hair: Diy Wig Using Xpression Braiding Hair
- Posted on 21 November, 2020
- Full Lace Wig
- By Anonymous
In this video I'd be showing you how I made a kinky straight frontal wig using kanekalon hair.. please like, comment, share and subscribe to my channel for more amazing contents xo
Shop tools on Amazon
1.Brass ventilating needle set
2. Two holder brass ventilating needle set
3. Full lace net
4. Canvas block head
5. Wig stand
6. Tiny crochet pin
7. Styrofoam
8.frontal lace
9. 1yard Swiss lace
10. Coloured tape
Like this week looks so so natural, i haven't even used any foundation on this list and it's already looking this good. Can you see that? Can you so, as you can see, i'm done with the back part of the wii and in case you're wondering the lens. It'S i cut the expression braiding hair into three equal lengths, and so this is what the back out of the wig looks like. So i just understand: i'm going to start with the front part, so the first thing i'm going to do is to properly add hair. The lace to the money queen head so that it's going to stay so with my foundation, my foundation and my angled brush, i'm going to outline way. I want to be very serious with the ventilation. Okay, i don't know if you understand what i'm trying to say, but there are some parts that i'm going to be very serious like i'm going to ventilate it's the proper ventilation weight and then there are some further i'm going to just do it the way. I think i did it back okay, so i hope you understand, as you watch how long, but just watch what i'm doing okay. So these two lines this line here and this one here - will serve as side pattern so that i can you know um. I can use this as a part when i want um to do side parting at this side. I can also use this as a part. What i want to do side pattern at this side and then this one is for the center facts, and this line back here is in case i want to like pack the wig. So when i'm done you're going to understand what i'm trying to see like, i want to pack the wig okay. So that's why i did this um this line right here, so we are going to properly ventilate the lace around this line. This line, and this line this line and this line and for this piece inside here and this face here - we can do just a random ventilation like the one at back. I'M not i'm. You know really serious with it. So as i go along you're going to see what i'm trying to say in case, you don't understand so we're also going to make um a line around this area as um the front of our hair. So it looks very natural. You want to also ventilate this part properly, so you see from the hairline to this line to this line right here, i'm going to do proper ventilation because you want it to look like your natural hairline mind you. I already marked the um mannequin head according to how my hairline looks as you can see right here. So this is how my hairline looks. You can also mark your money, queen line based on how your hairline looks. So this is how my hairline looks so i'm going to populate this because the weight is for personal use. Okay, so i'm going to start with the parts that i said. I want to be very serious with the ventilation okay, so i'm starting with the center part. First, so i didn't know my um camera wasn't recording but yeah. I haven't really gone fast, so you can start again so with your crotchets needle and crochet needle, you put it inside one hole and bring it out from the other hand, and then you pick one or two golden hair. Like i said this, sponsor i'm going to be very serious with the ventilation. You don't want to pick so many braiding hair, because you want it to look as natural as possible. So when you pick the braiding head, you drag it out of the way and then you keep the other parts out. You just continue that way until you get to the end of the line, so i'm going to put it inside another hole and you pick your braiding hair and drag it out. You drag it out again and then you're just going to continue like that. So so i've gotten to this point and i just decided to show you guys i couldn't wait till i finished the whole of the line. So what i did was to do um 10 holes across i don't know if you can see it dude the starting is in. I think i did just five here and, as i progressed, i increase it to ten. Let me show you what i'm trying to say. You can see i did 10 holes across like across, like 10 from here to here. It'S 10 holes so that when i want to pass it, i can pass it. So you wouldn't see the line clearly because of the foundation that i used to remove this line. So the foundation won't make you see the line kind of, because what i'm trying to say yeah, so i'm going to continue like this. Did i get to this place so i get to this line. I guess here i'm also going to do the same thing for this line and this line and this other line. So when i'm done, i'm going to come back to show you guys how it looks down with all of the um, please that outlined with concealer. Let me show you so you can see. I did the back parts, then these center parts, the parts on one side and the part on the other side. So this so you can see the space the space the space here and here so now, all we'll be doing is the hairline so doing the hairline and the hairline is that straight line that will cut across the front spots. So i already started it at this. Other side, so there's nothing to worry about, because i'm going to be showing you guys how i did it so i already started for this other side. Well, i'm going to use this remaining side to show you how i did this side, okay, so to ventilate the hairline you're going to be using the same method, the same method you used in ventilating these lines, but the only difference is that you know, while we're Doing these parts we did the ventilation close to each other like um, the ventilations were very close, but for the hairline we are going to be leaving spaces in between each ventilation, because you want it to look very natural, like you can see how this part looks. You can see because i left spaces in between each ventilation. So that's why it looks fancy in the front. So that's how i'm going to be doing this part. Then, as you progress, you can start to close the space and leave little amount of space in between the ventilation. So i'm done with the hairline and we're going to be feeding those spaces we left inside the way i'm going to be filling these spaces now, and this is more like the second easiest part of making this week after feeling, the back of the week like the Backfill in the back of the week is the easiest part, and this is going to be the second easiest part. So, let's head right into it. So for this part you don't really need to worry about how much hair you're picking or how much space you are. Leaving okay, so what you just want to do is to feel it. I'M feeling it depends on how full you want your weight to be so just going to do it anyhow the same way. You do this part okay, but if you are patient enough to properly think this is the way you ventilated the other part of the week, then you can go right ahead to properly ventilate it. But for people like me, who don't have the time to you, know properly ventilate, you can do it this way because it doesn't really matter so you're just feeling the space. It doesn't matter how much braiding hair you pick but try to make it okay, so it so guys we're finally done with the wig like wow. This is so nice. I don't know if you can see what it looks like. So this i'm going to show you what that part like field looks like. Let me take it closer, so you can see. I didn't do the proper ventilation like i just feel the lace. I can't wait to slay this honestly. I just can't wait to see this. So you can see how natural and transparent the lace looks. I just tried to put it on. Let me see so i can do. I can't do a proper installation because i'm currently not with my gel, but you can see that. Oh, my god, like this looks so so natural. I haven't even used any foundation on this list and it's already looking this good. Can you see that? Can you like so i'm not going to be using any hot water on this hair, because i wanted to have this texture like? I won't look like a stretched, kinky hair. So for that reason i'm not going to be using any hot water on meats. But if you want it to be straight, you can use hot water on the waist. Is the center part wow? But i can't wait to install this week. I can't wait to do a proper installation. Can you see that wow like wow so yeah? That'S the end of the video okay, i'm sorry, the wig looks a mess when i do i'm going to definitely do a proper installation video as soon as i get my gel and i'm going to be putting that up on my channel. So please make sure to like this video leave your comments in the comment section below and subscribe to my channel very important. So you don't miss another amazing upload because i'll be you know, doing a lot of this kind of tutorials on my channel. So thanks for watching and bye,

Comments
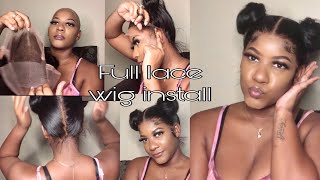
SHARON O TV: Watch the installation video https://youtu.be/P4KdVndRnXA
The Uptown Body: Omg you are talented & patient sis. It turned out lovely
onyema precious: You're sooo creative....this came out beautiful
Vallery Mbue: This is beautiful
Afo Cecilia🇸🇸🇲🇦: Wow so nice
Aretha P: Wow beautiful sis thanks for sharing
Vivian Idowu flecia: This beautiful
TheSaraya29: Did you just do customised hairline by looking or did too do it on you head ?? This is amazing!! X
Nathalie Aboghe Ekomie: Very nice!! Do you sell this wig?
Charna Lewis: How long did this take you?
Dickson Jenwhite: Is the a video of how the front net was made
Okereafor Otito: Pls I'm having a lot of trouble ventilating the lace.I'm using a crochet hook and the problem I have is that the Space I give while ventilating is too much and I can't pass my crochet hook in just one hole of the net, I keep on passing it through 3 or 4 holes and lastly I pick too much hairs and they turn out to be lumpy
JUSTICE FOR ALL: Nice job dear how many packs of hear do you use