How To: Knotless Braided Wig/ Ombre Braids/Cute Hairstyle
- Posted on 04 March, 2022
- Full Lace Wig
- By Anonymous
This is a tutorial on how to make knotless braids wig. Hey fam! I hope you find this video helpful and please subscribe, like, comment and share.
products used;
22inches canvas head
tripod stand
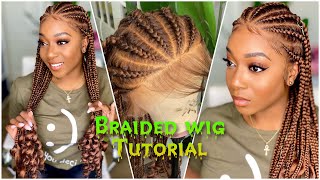
Ombre attachment in colour C17 and length 24inches
5×5 synthetic closure made by me.
to order a wig,
send a dm via WhatsApp on this number for more inquires and to place an order +2349050094815
or reach me here for business and collaborations [email protected]
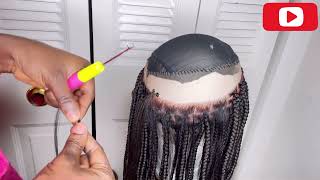
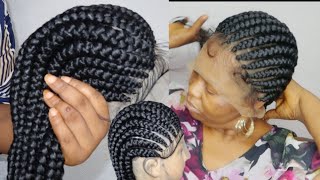
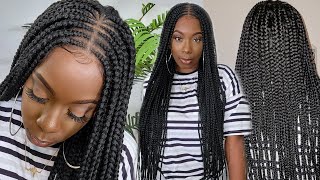
What'S up guys in today's video, i want to show you how to make a knotless braids, i'm using a medium sized cap, and this is a closure five by close five closure made out of kanekalon hair by years. Truly me, of course, this is what the creation looks like and this i have already sewn down the closure to my wig cap, and this is what it looks like. So i'm going to start right away to start making the lot less breads so guys so welcome to my channel. My name is chilly my case you're new. Here you are highly welcome and for you, my old subscribers, thank you for tuning in bye. Thank you for coming back, so in today's video i want to show you how i make this is the one time i'm making this video, my not let's braids. This is the hair, i'm using say cherry tone: ombre color, hair trish on color ombre hair. This way comes how it looks like it's a hundred grams same hair, i'm going to feather update just draw out different tips a little bit before using it, so the color i use is color c 17 in 24 inches. So after stretching out the tips a little bit, this is what it looks like now. I will start you know: braiding the not less braids yeah. As i said, i've already started making some. So i'm going to quickly show you how i make my left braid. I feel like i like further first, i like to resection my hair, like with a on a cornrow or cornrows, so once i pat out the parts of the hair i want to make, i go in with my tweezer to block out some hair. I don't want to make the routine look. Um thick i'll, go in with the tweezer to block out the hair on the closure to make it fine and thin. Then i braid one to like two or three rounds with the hair. Then i start adding the braiding hair like so you can add to the how many rounds or how many braiding hair you want for you to get your braiding hair. That'S the braids to be in the same size. You have to first bring down the size of hair. You want to break with. Then you divide them. According to the number of times you want to add the hair to the braid so guys i will let you guys sit and watch this video. Then i will come back again and see you guys stay tuned, so, okay, guys, i'm back. I want to quickly put it out there that this this pattern uh the way and the way you are seeing me put add my braiding hair. That'S the pattern i enjoy. Most i have tried different patterns of adding your braiding hair to the braid, not less braids. You can try any other patterns. There are different ways of adding your braiding hair to your, not less braids, but this is the way i love to add my own breaking head and again after making this part. As you can see, the other parts i'll go off camera to braid it. Okay, i'm trying as much as possible to make this video short. So once i come back from braiding the other side, i will show you okay. This is what the hair looks like. As you can see, this is what it's looking like so far. You can see that the roots are not that thick and dark. That is a sense of blocking the hair to look thin and fine. Yes, after bridging the parts of camera. Yes, i want to read this. What it looks like i want to quickly show you how to fill in to cover the scene between the what they call it. That'S the location between the weak cap and closure. But the point i the part i pointed out is i'm sure where i want to add the braids now in between the braids, the last braid close to the seam of the closure in between the braids. I add my crochet gradient hair because i'm going to break it at the end of the game, it's going to cover uh the demarcation you're not going to see where the closure starts or where the closure is soon to the recap. It'S going to make everything appear. Seamless yeah, so this was how i'm adding using a crochet top is a crochet pin in case you are wondering what i'm using the crochet pin, but the handle broke off. That'S why i'm using the pin like that. So after adding the hairs today, as you can see that i'm adding it between, i make sure that the hair passes through the closure and the cap at the same time, you know, i hope you understand what i'm trying to say here yeah this is what's um. This is what's uh what they call it. The crocheted hairs look like then i'll go ahead and braid the hair after braiding, the hair i'll, add more and as i was filling the parts of the cap, then i will go off camera as usual to trim the hair and dip it in hot water. Then i will come back and show you guys the finished look so guys if you have watched till this moment, i want to say a very big. Thank you. I really appreciate your time. I really appreciate your support and again please, if you have not subscribed yet to my channel, please i'm begging you subscribe to my channel and make sure you turn the notification, the bell icon close to the subscribe button and put on the notification so that you get Notified whenever i post amazing goals, i have more amazing videos coming your way, so you'll not be left out whenever i post such videos. Okay and again, if you're interested in ordering any of my products, be it weak breaded weeks, be it closures, frontiers foolish week, please check the description box. There is a column in the description box that says to under a week. That'S where you get my contact, then i will be ready and i'm available always to taking your order so guys make sure you share this video comment. Let me know what you guys think about this braided wig share this video, give it a thumbs up. Please and again, don't forget to subscribe if you have not subscribed yet to my channel yeah. Thank you very much. So in total i use six packs of the braiding hair yeah i used to have of six parts of the braiding hair. That'S the umbrella hair. For this particular week side, oh yeah, for the week please stay tuned i'll, come back again and talk to you guys. So let me show you what it looks like after a bridging day, adding the hairs yeah as you can see, that the partition or the the vacation between the closure and the cab are nowhere to be found. They are seamless. I can see everything now blends in effortlessly. Can you see that is essence? So that's what i show if you want to cover the scene or the vacation between the closure and the recap and i'm filling in the rest of the cup yeah. Okay, guys after making the hair, i have done the trimming and putting in hot water. I want to quickly show you how i add my elastic band. I want to. Please show you this part on camera, then go off camera as we can do the other part. So this is how i add my elastic band. You cut out the length of the elastic band you want. I first like to measure it from my head to ear to get exact the exact length i want. Then i turned the wig upside down just for the sake of this video. So you see how i sew down the elastic band. I use my needle and through it and start showing it this. The way you are seeing this video after sewing the elastic band to the maker, make sure you set your decrease tightly. Yeah i've done this, but then i'll go off camera to that yeah. So this is what the wig looks like so far. This is the end result as you can see how the wig looks like, as this weekday next day from swiss lace, is not my skin tone color. So what you can do, what you would do is just to use your powder or your foundation or legs and let's tint spray to tint the list, and everything will become a waste and sinking to your scalp and look more realistic. So this is what the wig looks like on my manual queen head. As you can see, the closure is wider than the normal four by four. Please. It looks like, like mini frontal. This is what the wig looks like, and i hope you guys enjoy watching this video. If you do, please don't forget to thumbs up like comment share this video and if you have not subscribed to my channel, please subscribe, i will leave you guys here. Hope to see you guys again in my next video bye, bye,
Comments
Sikiru Atinuke Tv: This came out so beautiful
pretty: Beautiful ❤️
Fuseini Khadi: Beautiful work
Slay’d By Tanaka: Omggg i nnnneeeddd this! let me get my life together cause baby u know u gotta make me bout 4 wigs so far
Larose Bia: How many it takes you make it and also to make the frontal and closure
Ruth Agbogun: Beautiful What brand of hair is that?
Larose Bia: How much you selling