Diy Hair Bundles Using Expression Braiding Hair
- Posted on 08 December, 2020
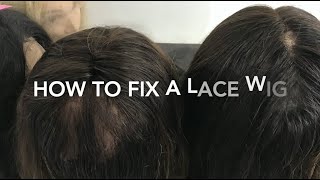
- Full Lace Wig
- By Anonymous
Hi lovelies, welcome to my channel
I will be posting tutorials right here on my channel every now and then and since it’s completely free do ensure subscribe and turn on your notifications, so you don’t miss any video.
PRO TIP;
To be good at whatever you are doing, you have to practice until you perfect it.
First trial may not be so easy but don’t give up on yourself, you’ll certainly get there
Personal Trainings are available and you can book us for your special day.
Videos;
HOW TO MAKE 2 by 6 LACE CLOSURE NET;
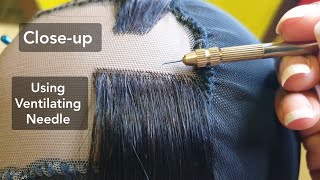
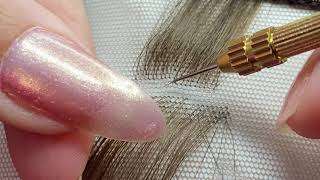
HOW TO VENTILATE HAIR: https://youtu.be/HkOj3zc3zlk
Connect with me;
Instagram; https://Instagram.com/Annessignature
WhatsApp or call; +2348106760720
Email; [email protected]
#WEDDINGHAIR
#e
#BRIDALHAIRSTYLIST
#HAIRANDMAKEUPTRANSFORMATION
#WEDDINGHairstyle
#WEDDINGTRANSFORMATION
#MELANINBRIDE
#BLACKBRIDE
#BRIDALHAIR
#BRIDALMAKEUP
#LACEFRONTAL
#naijahairstyletutorial
#MAKEUPFORWOMENOFCOLOUR
#LONDONUK
#MAKEUPTRANSFORMATION
#VIRALVIDEO
#Hairstylistinnigeria
#Naijahairstylist
Hello, everyone welcome to my channel if this is your first time of tuning in you're highly welcome if you're, an old, subscriber you're still welcome just relax and enjoy in this video i'll be doing a tutorial on how to weft hairs. Okay, if you want to put your hair in wefts, so you can use it for making revolves. This is the right video to watch i'll show you guys two different ways you can achieve this. They are both good. Both of them are very good, but i think the first one is more professional, but just do whatever you feel is best what works for you best, so you're just going to tie the rope like you've seen me do, and the next thing is to wet your Is to wet your hair with water, just water, i'm not using anything. It'S very important to ensure the hair strands are equal, very, very important. So now let me zoom closer, so we can see what we are doing. We have to realize a b and c. First thing first is to pass the hair behind c. Then go over a and b, as you can see me do. This is a very gradual process. I made it very slow so that you guys can understand what i'm doing so. You pass in front of c now, we'll be going behind c again and then over a and b, as you can see just in front of a and b, then now we are going in between a and b okay, then behind c and there it is, you Can see that m, we formed right there. That is exactly what you need to have and then you gradually tighten it up and push it to the end. Very, very simple. So i'm going to be repeating this over and over and over again just for you guys to have a better understanding of what i'm doing so next thing again, we go behind c, go over a and b, then behind a and b, then in front of c. Actually i wish this video was a bit faster, but for you guys to understand better, it doesn't matter behind c we're going behind c. Now then, over a and b, then in between a and b okay in between a and b, then behind c now we have our m right there tighten it up, just tighten it up and then push it to the end like that. Yes, there you have it. Okay, next, i think, okay, at this point i'll be showing you guys how to start up it's very, very important to know how to just the same process of going. You know in between these alphabetical lines, don't mind me so once you find your once, you form your m next is to take that short one, the shorter one and then pass it okay! No, this is the longer one. Actually you pass it across c and then you push it to the end. This is how you should begin your wefting very, very, very important. This is how to begin so it doesn't loosen up easily. So you go ahead and form your m again, i'm just repeating it for a better understanding. Now going in front of a b, then in between a and b, then behind c. As you can see me doing, this video then we'll bring that line at the end down that hair and then we bring it across c. I don't know if this is making any sense, but just carefully follow the video you understand better after this i'll be doing. Okay, the next one i'll be teaching you guys is how to end your wefts okay. I should have done this at the beginning. Sorry, everything will be in order, but just trying to understand please. So we are going um behind c, over a and b in front of c behind c, again in front of a and b over a in between a and b okay, then behind c now we'll take the shorter one, the shorter length of this hair and we'll Pass it across c again so this way, this is how you should end your wefting. Okay, that's your weft! This is how you should end it bring it together and you push it to the end just like that. So this is all you have to do. I'M just going to let you guys watch to the end of this sweating process and uh foreign foreign. Okay. This is the second way of wefting your hair. I think this particular method is all over um. The internet. All you have to do is just to form a tiny look. Is it look? What is it called? I don't know just like that. Just follow up. Okay, it's very, very simple. This is the easiest way of making your wefts, whether it's professional, i don't really know. I think the other one is more professional than this. Well, the finishing is almost the same. Okay, so just watch to the end of the video and i'll be right back before the very end of the video, so we can seal the wefts. This is, in fact, the most important part of this tutorial, because if you don't see your wefts, you just end up. You'Ve just ended up wasting your time, so this is very, very important and, while fixing your hair, i think it's important for you guys to know that cutting this weft is a bit risky because, if at all, you'll be cutting it even after fixing the after a While, after the sealing process whatever it may still just loosen up okay, so this is a very dangerous. No sorry no danger, but a very risky way of making wefts, but trust me. It still works. I would advise, if you're going to be making your wefts like this. Just do a continuous sewing. Okay, it continues sewing. That'S the best thing for you guys to do rather than sew and cut sewing cuts, that's very, very risky. If you want to sound cutting make sure you use the regular um sewing machine to do that, so i'm just tying the ends of this weft. So i it doesn't loosen up okay. So now it's time to seal the hair and i'm using the lowest heat settings on my flat iron. Don'T worry, i did too. There are two different ways. I will show you guys in this video so just that they just heat it up like that. It melts the hair it melts it down and at least with that, it's not going to be shedding so much - and this is a very, very important step, like i said earlier, very, very important, so i'm just going to stretch it stretch the hairs to give it This silky smooth finish okay, but if you want the hair to have that, kinky look just leave it like that. There'S no need to stretch and another way you can achieve this stretching is to put it inside a very hot water. Very hot water. Add a little bit of shea butter or just hair conditioner just to soften it up, and that and that is it don't overheat it the way. I did i almost this hair almost burnt, because i did it three times just you just you're just supposed to go once go over it once so. This is the second method, and i'm using this for my um. The first type of wefts i need so you have to do - is to spray a little water over the hair, and then you use your pressing iron to just slit up like that. So i would advise to use medium heat for doing this. If you use high heat trust me, your hair will burn like it's a bun bun bun, so just use very medium heat on your um pressing iron settings. To do this afterwards, we will reduce it. A little bit more and then stretch the remaining parts of the hair spray, the hair with water and then stretch it using the iron very, very um, simple, there's nothing really special, it's just very, very simple. So i think, in this video i've covered the three different ways to stretch your hair, to give it this silky smooth finish. Otherwise, if you don't want this silky smooth finish, you can just leave it. If you put that kinky, you know finish, you just leave it that way, just seal the ends the wet itself and then just leave it that way. So you just keep pressing until you get a desired result once you've achieved your desired results. That is it so. This is the two um we did today. They are really short left. You can make it as long as you want. Okay, just take your time, do whatever you want and i'll get i'll show you guys a closer okay. This is the kinky. You can see how kinky this other red hair is still looking. I didn't stretch it okay, but you can see how sick it smooths so now look at the wet. Let me give you a closer look. I want you guys to see what it looks like you can see how it's looking a bit bump like it's melted, the hair. So with this it's not going to be shedding, and even when you cut it, i would advise just try. Please just try and melt just the edge, and i hope this tip was helpful. Guys have a nice time. Bye,
Comments
Gladness Dossu: Great, thank you
Stacy: Nice. Thank you !
Nikita Edwards: How many pks of xpression makes enough weft and for ventilating to make a wig
Gladness Dossu:
Nikita Edwards: Is it weaving thread and are the thread double