1 Hour Sew In??? Side Part Sew In With Closure Tutorial | Wondess Hair
- Posted on 14 October, 2018
- Full Lace Wig
- By Anonymous
Same hair in the video:
Wondess Hair on AliExpress: https://goo.gl/BCxqNe
Malaysian Straight 18"18"18" with 16" Closure: https://goo.gl/Mi9MWC
#Wondess Hair Official Store: https://goo.gl/9osJhj
Body wave hair on Wondess Hair: https://goo.gl/eJmH7o
Wondess Hair E-mail : [email protected]
Wondess Hair Monthly Giveaway: https://goo.gl/yEMY8J
Wondess Hair Instagram: https://goo.gl/CWXbfM
#wondess 10A Grade hair Features:
1. Lifetime: Wondess hair can last for more than 1-2 years. As general, has more than one years lifetime than other human hair.
2. Material: Wondess hair is donated from one young girl, all hair is unprocessed and with the same direction.
3. Cuticle: 100% intact cuticle, can be permed.
4. Suitable dying colors: Can be dyed to #613, other hair such as Remy hair can only be dyed to #27.
WONDESS VIXEN SEW IN TUTORIAL https://youtu.be/50EzUXJPMKI
THE BEST SEW IN TUTORIALS ON YOUTUBE!
Detailed: How to do sew-in with a closure https://www.youtube.com/watch?v=cthbGJ...
LACE CLOSURE SEW-IN | ELASTIC BAND METHOD BRAZILIAN CURLY https://www.youtube.com/watch?v=1PZVQC...
WATCH ME SEW IN LACE CLOSURE ON MY HEAD ||DIY https://www.youtube.com/watch?v=zaOmr3...
HOW TO DO: Full Sew In WEAVE No Leave Out Tutorial Video For BEGINNERS https://www.youtube.com/watch?v=33-9yz...
Invisible Sew In NO GLUE NO LEAVE OUT NO CLOSURE! https://www.youtube.com/watch?v=4jqaln...
HOW TO |Slay A Sew In✨ https://www.youtube.com/watch?v=hSC3Qe...
HOW TO DO: Full Sew In WEAVE No Leave Out Tutorial Video For BEGINNERS
https://www.youtube.com/watch?v=8vEXuc...
NO LACE CLOSURE ➟SEW IN WEAVE TUTORIAL Video For BEGINNERS (HOW TO) https://www.youtube.com/watch?v=snqHrz...
How To Do Natural Looking Sewin Weave compilations....✔.| Amazing Transformations 2018 https://www.youtube.com/watch?v=Mlg9xf...
Business Email [email protected]
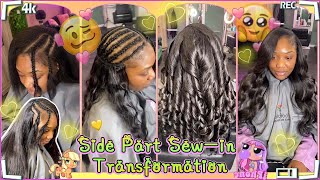
Hey everybody: this is breanna rutter and in this hair tutorial i am going to teach you how to do a side. Part lace. Closure sewing step-by-step for beginners. I wanted to challenge myself to pull this look off in only one hour, and i will show you exactly how I did it. The hair I installed is three bundles of Malaysian straight virgin hair from one this hair in the links, 18 inches and 1/16 inch middle part. Lace. Closure, if you are new here, make sure to subscribe and turn on bail for notification so that you never miss a new tutorial from me again now. Let'S get started with this look, so this is how I received my hair in the package and up close, I'm gon na show you a few shots of the hair. It did come in a plastic packaging that was clear, but I took the packaging off so that way you can easily see how the hair looks that I received, and this is how quality their website as well as they here now we're starting off with my hair. Already straightened so I lightly press my hair with a hot comb and, as you can see, I have a lot of oil in my hair. So that way I can keep my hair protected, as I braid it in styling. So right now I'm taking a wide tooth comb and I'm separating the front edges because you don't want to break the front edges of your hair and you're gon na go ahead and continue to break the rest of your hair going back in the front. But in the back of the hair, you're actually going to braid it going into a zigzag pattern, so I actually tested out this new braid pattern and I absolutely love it. I use this braid pattern now when I'm doing so ins as well as when I'm doing crochet hairstyles, because it's absolutely perfect, it allows for you to have the right amount of bulk in certain areas of your head, because you want the brazen back to be a Little thinner and abrasive front to be a little thinner and you want most of the boat to kind of be dispersed in the middle area to kind of the back area of your head. So with this braid pattern, you can easily do it on yourself without having to do the Beehive, because if you do the regular beehive, you have to go in one complete circle which requires you to be able to actually breathe upside down, and I cannot do that To save my life, so I'm just showing you and pointing with my fingers as I speed up some scenes to show you how you actually do this breathing technique so, like I said, I recently showed this braid pattern in a recent tutorial of mine, which was a Crochet style, so if you haven't seen it go ahead and check it out so in the front I wanted my part to be on this side and I'm defining the area with my comb and then I make sure to comb the party hair so that I can Very, very small bracelets near my hairline, so this is the thing in order to do your sewing in under an hour, you have to be very selective about the sizes of your braids. You always want the braids near your front of your head to be smaller and you want the rest to be a lot thicker. So, as you can see, I'm parting the parts on my hair, bigger and bigger, so that the braids actually get larger in size. This is going to speed up the time that you're taking to do your hair because remember you want to only stand an hour doing this, so I challenged myself and I made it happen and I'm barely editing these clips. So that way you can see and slow down in sped-up version the realistic time of me actually doing my hair without too much editing. So if you really appreciate the style of tutorials be sure to give me a big thumbs up, and let me know what other hairstyles do you want to know how to do in under an hour? Let me know - and I will be sure to put it to the test and then, of course I will make a tutorial to show you, ladies, how it's done so. This is how I like to braid my hair nearest my ears, and I like to go past. The ears, so it makes it very easy to track placement when I'm actually sewing down my extensions making sure to put one braid until the other to form this tail. So now, I'm doing the same thing to the other side, some of my braids were frayed. It underhand and some were ready over here, so you might notice the slight difference in texture when you're looking at the braid, the braid - that's very missed my hairline. I actually braided that under here, because it was a lot easier for me being that it was so far on the other side, my head, because I'm not wearing a middle part. So now all of the grades in front are braided down and their braids in the back are braided in a zig-zag pattern. As you can see here, and all of my braids are not equal in size. I just wanted to make them as thin as possible or as thick as possible, without having too much bulk now. This definitely saves time from actually doing it, so in is by using a crochet hook to crochet the ends of your braids. Throughout your braid pattern, when you're sewing down your hair, it takes you a little longer in any way saying it actually speeds up the process. So I highly suggest this tip in order to pull off this look, and this is how my braid pattern looks right before I begin selling my stitches now. This is not the most amazing braid pattern you will ever see. This is literally for the sole purpose of being able to achieve a soin in one hour, and this is how my braids look after I finish: braiding them down so now, at this point, as you can see, I have a weaving net here now highly debating this, Because I wanted to add a little extra sturdiness, but I realized you know what most times the wind. If we do our summers, we don't necessarily use a weaving net and it saves on time. So I'm just gon na go ahead and begin sewing in my extensions, but we're only going to be sewing two rows at a time. So, as you can see, I'm putting my needles we're going up the webs and then I'm gon na grab that needle pull it through and pull it through the other web as well we're going to double track so throughout our entire install, no single track rose because We want to add as much bulk as quick as possible without taking too much time with single track drawers, so I'm gon na start at the side of my head and I like to so making sure to go into a slight C curve. So, even with my very first track, I like to go up a little bit of the waist so that way I can stitch it kind of behind my ear. So you just pull the nail through your brain. You go under your weft. You wrap the string AB, run your fingers twice and pull through to create a knot. So if I explain that's a little bit too fast, just hang in there, because I'm gon na show you over and over again in little different ways, little tricks that I do when I'm actually sewing it down. So, like I said, you want to make sure you create your knot by pulling it tight. Put your needle under your braid under your 2x wrap the thread around the needle twice: pull the needle to create and not you're, going to do the same exact that you technique throughout the entire process sewing down your hair extension. So when I normally do my summons, I'm always in like a slight routine, because I know exactly how I do my hair, I always do one track in the back and then I do two tracks kind of in the middle. And then I do my flip over single track. So if you guys or ladies know what a sewing is and you've seen as plenty of times, you know exactly what I'm talking about so once again to make sure you're speeding up this process. You want to do everything as quickly as possible, meaning you want to leave out some steps. So that's why all of my roles of sewing your my extensions, are going to be double tracked only even when I do the flip over and there. My edges is also going to be double track, because when you do the flip over with a single track, it turns to take a little bit more time to kind of the hair. No one's gon na see that you did a double-track fold over on the edges of your hair and no one's going to see your braid pattern. So don't worry about it. I highly suggest this style for those of you who are pressed on time or who just don't like the stick long periods of time now, the time for doing this type of look is that it won't last as long as a traditional sewing. The reason. Why is because, with a regular sewing, your braids are a lot smaller, which allows it install to last longer and your tracks are a single song which allows for them to stay attached longer on your hair without the tracks auditioning. Now, as I was wearing a style, I did not notice it loosening at all. So now we're at the point where I'm showing you to fold over and like I said you keep those two tracks together, you fold them back over and you so you're not right. On top of the fold I like to sew on top of the fold about two to three times sometimes four times I tend to have to do that with curly hair, because this hair straight I've only had to do it about two or three times before. I continue to stitch going back in the opposite direction, so for those who are not new to this, when you're actually doing so in so those who are new, you want to make sure that you're actually doing the photo method so that you're not cutting through your Hair extensions, because when you cut through your hair to change that causes exactly where that cuts, the beads have some shedding, and it's not necessary to do that. If you're pretty much going to be using all the same link and you're just showing it in. As you see right here, so as you can see, this is how it looks with the double fold-over method at the edges. Now that I'm almost done, I like to save a little bit of space at the top to show my closure. Now I noticed some women like to sew their closure first and then sew on all the extensions, but I notice that for me when I'm sewing, it causes my actual lace area to be way too tight. Because I like to stop right here and then sew it and then finish off with the rest of the web, so really to each their own. This method works for me, preventing my lace closure from being too tight on my head. It'S like I said if I saw my legs closure first and then I sewing all of my bundles. This exact area will be just extremely too tight for me, so you're just working your way around making sure to go by nearing braids, and then you want to make sure to represent around twice to pull through to create your knot. So, as you can see here, I'm finishing up that last row and like I said we weren't doing double tracks, but now I'm kind of being a little bit hypocritical because we're finishing it off, but it's very important that you keep the area around your lace as Flat as possible, because it makes for a very flawless install, so what I did is I cut the extensions where they were doubled and now I'm just stitching this very last row with a single track instead of a double track like I said, this allows for to Be very flat and your your lace closure, so then I'll just fold that back and then I measure about how long I need it to be I'll cut off the weft of finished stitching it now we're left with our legs and, as you can see here, I Had to remove the lace yet because first I wants to define my part now you can do this with water and the blow-dryer, but for me I noticed that using a hot comb works a whole lot better. It also depends on the hair. Sometimes this one, this hair is extremely easy to manipulate and the texture is so real. It feels exactly like real hair because it's a 100 % virgin hair, so you don't have to worry about any issues when it comes to adding heat or color in your hair, or anything like that. So now that I've defined my part where my actual scalp additional I'm not removing the lace, I'm not cutting a straight line, I'm kind of doing a little zigzag throughout. So that way it can lay a lot natural against my skin. So now, at this point, I'm gon na be using got to be glue, hair gel and I'm also going to be using that particular hair spray to pin down the top or glue down the top of my lace. Normally I like to sew through the braids. That'S at the very edge where my lace closure is anchored and if you want to see detail, tutorials and then I already have playlist on how I do my techniques when I'm doing traditional in stop, but because we're doing this in one hour. I want to limit all the times I normally sell, so I'm actually going to be gelling this down. As you see here, this technique is also used when you're actually gelling down a lace, wig or a frontally, so it definitely works the same way when doing a actual lace culture. It'S the same technique, even though the amount of hair is a little bit smaller. So now I'm just using water in a brush, and this is just a regular edged brush for styling your edges and I have a little bit of the hair gel already on the slight edges of my hair. So I just put a little bit of water on that, so I can reach soften it and manipulate it exactly how I want without needing to add more product. So if you'll notice that you literally have a ghost sitting on your hairline, that's because you're adding too much gel so just bring wet your brush and then brush over your hair. So that way, you can manipulate the products again to allow for a very smooth and beautiful finish, so I just blow-dry that in place making sure to use the rat tail end of my comb. So that way, I don't allow it to lift from my scalp and I'm pressing down, so I can fully dry. Now I put a little bit of hair gel on my brush because I didn't put any products on this side, so I'm just adding little scoops along my hairline or what i like to call a little scoop attraction. Okay and then I like to just smooth that in so that way, I can try out my look one trick. I also like to do to allow my hair to be extremely flat, as I used a back of a hot comb to smooth in my hair, and then I like to finish it off with a little bit of smoothing spray. So that way I can tie in the look all together. So there you have it how to do a sew-in in under one hour. So, as you can tell, I skipped a lot of steps to make this style be able to be achieved and a little bit of time. This style lasted me for a good strong two weeks and when I hit that three week mark I had to let it go because, like I said when you do smaller braids and you sew in single track, it allows for your install to last a lot longer. But if you were pressed for time, let's do one aware sewing. I highly suggest that you follow these tips, so I want to thank out so much for watching this and I got more tutorials coming on the way. Oh by the way, if you watch this farm, I got ta, ask you a question: are you team leader, or are you team no leave out my so if you want to get this hair, be sure to click the links in the description box to get your Wondrous hair extensions, which I absolutely love until then see you guys, like

Comments
MrsLina 313: I'm not sure if I want to watch the whole video just bc looking at the first 20 seconds I know you bout to snatch my whole life away. This hair looks beautiful I love the way you do your hair and how you take your time to explain everything
Kemi .A.: Thanks for this tutorial. I have been using this braid pattern for years now. I never could do the new style. This is so easy. Love this.
Rae Rae: Love this video. Team no leave out for sure and I can't wait to try this hair style. Thank you so much.
Life with Lolo: Team NO LEAVE OUT! I want to protect my hair as much as possible
Black_ Diamond: aww, You look amazing Breanna. Thank you for the tips. I'm definitely trying this hairstyle.
Picaboo76: You do such s beautiful informative job with the sew in technique…Love It!!! Do More Videos Please ♥️
LaShea69: I love this braid pattern. I'm not much for wearing weaves, I'm more of a braid or a wig person, 'cause I don't like fussing with my hair, but my hair is so thick that I usually keep it in braids or toss on a wig, but maybe one day I'll get one. If I had to choose, I guess I'd choose #TeamNoLeaveOut because I want to keep my hair protected as long as possible.
Yolanda Jones: All I have to say is WOW I really learned a lot more about sew-ins great job
Chinese China: I love her videos.. These help me when I first started learning to do sewing..I like this I don't use nets either make my hair come out and its hard to moisture the hair
Abbi Williams: I've never worn a sew- in, but I've noticed that when I do the hair of a person who is 'team leave-out' that leave-out hair is more stressed than the hair that was protected under the bundles. So, as someone who has had to bring hair back to life, I'm definitely Team No Leave-out.
Ivy Grace: Have you thought about adding hair into your braids to help support the weave and take stress off of your hair? Also, can you share in an upcoming video if your hair breakage was due to relaxing? Your Sew in turned out Good!
MsCandy S: Baby girl I love you. This old school girl has been a licensed beautician since 1992. But I’ve been doing hair since I was 12 years old. Thank you for helping me tackle a full head sew in with closure that they didn’t teach me at school. But I learned a lot in the kitchen but I did not learn about closures until I started watching YouTube and that’s your tube channel. You’re a smarty-pants and making that money quick and accurate. Smarty-pants in the good way. Me personally I am team no leave out I do not have time to see demarcations with this natural hair and artificial’s. I wear no leave out for easy maintenance.
Garritte Hitchens: Team No leave out! I have found the area of area that I leave out (the one time I chose to leave out) was so irritated! I decided to never do it again! Protect everything
MyOwn DayOne: I like the idea of both. Having leave out is more work. No leave out is more protective
Gustavia Traylor: Team no leave out... You do such a wonderful job.
Arionna Topazz: Team no leave out! I used to wear leave outs in high school and my middle part curls were terrible never again
Adrienne Kirkland: Team No leave out.... Healthy all natural hair.
Monique Mzmo dudek: It depends on what look I'm rocking. I dont use heat to blend and I dont wear straight hair I run a little texturizer through my edges so it's not so tight water black castor oil flat twist tie it down boom done
j brooks: Love it girl very beautiful
Feinyx L’Shae: Hi.... #TEAM.NO.LEAVEOUT My clients prefer no leave out because of their hair texture. They hair is more than the hair used for the sew in. I really like this video. I will use this technique to decrease the time and increase my clientele base. Thank you... ♡♡♡♡♡♡ Also thank you to those who respond to Briannas videos. I have learned a ton of knowledge from you ☆☆☆ ♡♡♡♡♡♡♡♡
Chimerenma Anne Akomah: Amazingly great.
Saber's: Thank you for making this video : )
Dimplies Kerr: Hi Breanna love your video i learn so much from you.Good job
Styl Propr: Amazing job!! How I wish I could cornrow...
NARISSA ROSS: #TeamNOleaveout stress free is for me. I dont want to add any additional process. When hair is put away put it ALL away.
toya Samuel: WOW! Great job!
Akua Boamaa: No leave out ...wanna make sure my hair is on the safe side
Terrie Brown: It's beautiful. And yes Lord, the time it took!
Jan Marquier: Team no leave out. My 15 y/o daughter doesn’t like maintaining it. She has natural hair but likes it straight
ESTHER EBERE OKORO: Beautiful, so cute
BossBeautyButterfly: Team both. Leave out all depends on wat hair im wearing. If its straight, its out. If its curly its in. All depends on my hair and styles...
Charae LaQuenta Ratliff: No leave out with straight hair; possible leave out if wearing curly/kinky hair.
Rodney Williams: Breanna can you do more of these videos on lace frontal closure wigs can you do like 20 or 6× 8 inches frontal lace wigs closures leave outs and I'm really enjoying your tutorials videos ♥️♥️♥️♥️♥️♥️ you rock
Frances Nixon-Grant: Can you show a tutorial for a versatile parting of the the sew in?
she who lives: Looking goooood!!
Perler Angel: I have my sides cut and they have grown in about three inches. Is there any braid pattern that would allow me to have a sew in?
Monsie Babe: Team no leave out
zennah williams: Yes I wanted to see u do the box braid methods where u box braid ur natural hair first
Dominique: You go girl ! Can u do crotchet with Jamaican bounce without pulling the curls apart .. can u install the whole curl ?
Andrea Gibson: It's beautiful ALL
Janeen Conde: Im team no leave out, because i don't want heat damage.
thalasin+ user: No leave out im not tryna damage half of my hair and protect the other half
Lakeisha Griffin: Love you hun and love it thanks for sharing
Tete'Lynn M: I do my hair like that and it actually stay in for awhile but I have leave out cause it look more natural
Kare Bear: Leave out bc it looks more natural..... your hair turned out really nice
AM: Team no leave out. It's easier.
Quiera Collins: OMG I needed this
Ciera Cooper: Team no leave out got to protect that hair
Angie S: Team no leave out.. natural girl. No flat ironing for me
Miss D: Team no leave out!
Sharell Dungeon: Team No leave out my hair does not cooperate and all the heat from straightening every day could cause irreversible damage
kesha hudson: #Team do you &what works for you as long as it looks good
lorraine johnson: Team leave out yeaaaa. Thank you
Bety Gtz reyes: Super natural que guapa
William Nuels: Alwaus apply your frontal or closure first tho especially for beginners and take your time
Fashionable on a Budget: 2 week sew in? I rather just take the time and have it last for a month or so. My quick weaves last longer than 3 weeks before needing to be redone
Jovian Owusu: Team no leave out,I like to have everything cover
Ayala Childs: Team no leave out my hair is weak and I need to protect it as much as possible
chryztina wonderland: I really wish it looked more natural,but I still might try this.
Truenews: My hair is falling out, what options do i have ?
Stephanie O: Have you done a video with no closure?
Quita Mack: No leave out to prevent damage and avoid rain... lol
M Williams: I like the way you speak. You are classy and there wad not silliness in your video. Also, informative. Go head, little Sistah!!!!
BossHogg4050: No leave out I’m natural and I do wigs for protected style I
life with Daliha: How would you fix this to make to look natural
Nadesha Pinnock: Team no leave out... my hair way too coarse to blend in...
Starprincess _516: Leaveout looks more natural
nikita freedom: Did you do another big chop since 2013? I've watched your older videos dating back to 2013 and your hair is still the same length.
Chef Disaster3.0: Nice video
AKIYIAKELLY: ❤
Jprincess: Team no leave cause my hair dont take to heat that well
Pam Willingham: Team No Leave Out
𝑰𝒔𝒂𝒃𝒆𝒍𝒍𝒂 𝒘: Nice hair
Caresa jayy: Team no leave out
Chaz Wiggins: Team no leave out cause I’m all natural it i get hot it shows in my hair
Chanell J. Wilson: Team no leave out
Kate Osamwonyi: Nice
dia fall: Waouuuu that really naturally vert good Tito like it Thannk uuu
Courtney Christine: Did you pluck it to make it look more natural...because sorry in my opinion it really doesn’t look that natural compared to others I have seen
Noelle Danae’: Love
YALIXSA ESCOBAR: Wooo love
Happy Child: No leave out
Diana gloire: You are too beautiful
Tracy Austin: But the glue on the edges tho ♀️
ESTHER EBERE OKORO: I love ur hand work, pls I will like to be like u,ur the best tech me
Lasting Impressions: Team no leave out
Lodys Diaz: muy lindo
Michele Kennedy: Team No Leave Out
BossBeautyButterfly: Nice doll
Shaye Baby: Yesss #SheComesThruuuu
kaaydiior: why didn’t u pluck it ?
Vickie Campbell: No leave out
Biigg Flexx: Damn your beautiful girl.love the smile
Terry Lapper: Team leave out
C T: No leave
Donyel Foster: Glad you're back.
Akeila Briana: The front looks a mess
Carl Baker: I don’t think because you have a closure you should braid Big. I think you should actually braid smaller so that it dose lay as flat as possible with no lumps, humps or bulkiness. And you get that Very natural look. Didn’t come to put any one down but theses braids are too big.
Migo Migo: This has to be a joke
Miss J: Erm I wow