How To: Do Braided Wig Without Closure, Using Braiding Hair
- Posted on 27 April, 2021
- Full Lace Wig
- By Anonymous
Thanks For Watching The Video. Please do subscribe, Like, And share.
Leave your comments in the comment section, Thanks as you do so
PRODUCTS USED
WIG CAP
TIN PINS
NEEDLE AND BLACK THREAD
BRAIDING HAIR
These are the video you will like
How To: Do Braided Wig Without Closure Using Braiding Hair
How To: Cut And Sew Female Short Pant With Pocket And Zipper (Part 2)
How To: Do Ombre Kinky Braided Twist Wig, No closure, No Glue.
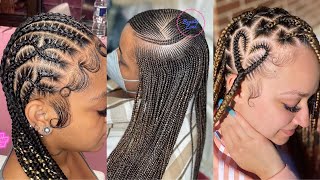
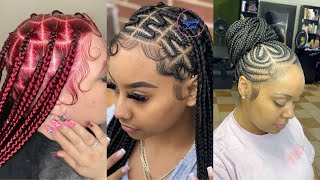
Hello, everyone welcome back to my channel, i'm florence, i'm worried. How are you guys doing hope you all are doing great in today's video i'll be showing us how to achieve these red and wig with that clothes or yes, i said guys. This is without closure. No closure guys. I would like to appreciate all my subscribers, both old and new. I appreciate you guys for your support. I say very big. Thank you. All you guys are the best with as much of our glue. Let'S get straight to the video, so the first thing i did was to put on the wig cap onto the mannequin head. I got this recap at amazon, so i went in with my tipping to secure the wig cap family to the manikin hair. So the next thing i did was to trace out the way i want my braids to go. I don't want to have a straight line right there, i'm just giving it a kind of shape curve. You know if you want it straight, you can just draw a straight line on both sides, but i don't want mine to be straight. I want to give it a kind of shape. You know give me the kind of fancy you know so i'll be doing that same thing on the other side trace it all the way to the back, like i said before, if you want a straight line, you can just draw a straight line all the way To the back, it's the same thing, but i'm just leaving it take off here and there. So i've traced the same thing on this other side. So that's the middle part, the big braid that will be in the middle. So i noticed that the one the the middle part, if i should braid it that way, it's going to be too big, so i'm going to reduce it half inch. So i don't want it to be too big, the one in the middle, if it's too big those ones on the side will be too small, so i wanted it to be relatively the same size. So that's why i'm going in to reduce it, i'm just basically reducing the size i have in the middle. That'S why you see me having two lines: it's not necessary. You have you have two lines once you notice, you made a mistake, you go in and correct. It so i noticed that the first line i drew is going to be too big. That'S why i'm reducing it right now, so i'm done with the middle part of the middle portion of the of the the one i was drawing now. I want to mark up the decide. I told you guys that i'm having five big braids on the mannequin head so i'll be having five big braids one in the middle two on each side. So now i want to share. I want to trace out the one on the side. That'S what i'm doing right now. Yes, we got you, we i have to trace it up since i'm not using a closure. I just have to make sure that my lines are correct. The same size, you know, so i'm done tracing out the sides. So the next thing i did was to get the center center of the the middle portion, the one on the on the top, the middle one. I want to get the center right there, so i'm starting from the nose of the mannequin head to be able to get the center so that i've gotten the street. I just drew a straight line straight to the back now it's time for me to start crocheting hair onto it. I use the expression color, for i cut it into three stretch. It out brush, give it a good brush, and that is it right there. So the next thing i did was to go in and crochet hair any kind of braiding hair. Actually i use them. I use them the cheaper braiding hair to crochet the hair. So so i'm done crocheting the hair i'll, not start with it. I'Ll start braiding. The hair i first took a little portion of braiding hair, the expression hair i'll be doing feeding braids so do so. The purpose of the line in the middle is to ensure that the braids are all coming to the line. If you not see the one i marked right now, i marked it very short: it's not going to be long. The line will be a kind of guide so that when you draw your when you draw it's, your line is going to stop at that middle line. You will see what i mean in a minute, so so so guys, you see what i mean by you trace all the the hair will be going to the to the straight line i drew in the middle i'm trying to make it all meet at that middle Point at the middle line, so guys i'm done with the middle, the middle portion of the the hair. You can see all they are all going to meet. I braided through that to the straight line you can see. Breathing is straight that straight line i drew would be a guide for where we are able to stop. So the next thing i did was is to start to braid the hair. You take your time. Take the head. I took like 2 2 and i breathe you. Don'T need to rush, do it little by little and you braid it. If you have watched the video up to this point and you've not subscribed. What are you waiting for support your girl by subscribing, don't forget to turn on the bell notification to get notified whenever i upload a new video give this video a very big thumbs up, don't forget to share share with your friends. Let me know what you think about these braided wigs leave. Your comment in the comment section. Thank you as you do so. Thank you all appreciate you all so so so i'm done braiding it. I want to start the other section of the of this. The other two side, one of the sections - i will start to read on it. So on that section right there i'm pointing right. Now i will stick it. I will have a center point. I will have a straight line, so i'm going to draw a straight line. So as to break exactly the way i braided in the middle, i will braid on the sides too. So i will have a straight line so that all my braids will be going to this to meet at the street at the line. So the braids will be meeting added at the other line yeah, so i'm going into crucial hair right now, starting on the on the straight line. I braid first on that straight line very short grid. That will give me a kind of guide on the other brakes that i will be doing so guys. I finished braiding on that side. You see what i mean. This straight line is kind of like so i did this thing. I did some single braids at the back so as to let it you know kind of for you to be full, so i did like two rows or two to three rows of single braids at the back, so i'm done with the braids, so i will do The same thing i did for the one on the center, so i'm gon na braid this right now, i'm taking two on each side and braids, take it little by little and you breathe. So if i should braid it this way, it will be too small compared to the middle portion. That'S why you see me going with the feeding braid. I want it to be a kind of um, not gon na be the same size, but almost a little bit b. That is not going to be on the same side like if i don't put in the feeding braid it's going to be too small compared to the middle one. So, that's why you see me going with the feeding going with the braided hair to give it that big size compared to the one, the middle braid, if i braid it without adding hair to it, it's going to be too way too small. The comment the purpose of this is for it for the braids to all to be almost the same size, not really the same size, but almost the same size. That'S why you see me going with the braiding hair to give it that that size, i'm looking for? Yes guys the bridge i was it, took me like three days, not that this hard but i'll work to walk, come back. You know, take my time relax and continue with it with the with the breaks so and now i'm going in with a needle and thread. Why i'm going in with the needle and threads, because i want, if i don't use the needle and thread it to unwrap since i'll, be doing a single braid at the end, so i use the needle and thread to tie it at that point. Just watch what i'm doing you wanna you'll, see you understand what i'm saying, i'm using needle and thread at that point to hold the braids in place, so i'm done using the needle and try to hold it to hold to hold it in place. Now i'll be doing you see the ends, i'll be doing single braids. I want it full at the back, so i'll be doing single braid. That'S the essence of using the needle and thread to hold the braids to hold the weave in place. So now i'm doing a single braid at the ends of the of the wig just to give that kind of to make it full at the back. That'S why i'm going in with a single braid, i'm adding more hair for for for length. I want it to be long, that's why i'm adding more hair to it to give it that length so now went in with the baby hair. The next thing i did was to dip it in her wall. After i'm done with the baby hair and now dip it in hold on that's it right there guys you can see how beautiful it is. You have the middle braid two braids on each side of the of the of the hair. You can see guys it's beautiful without closure. It'S simple. It took me three days because i'll go to work, come back and continue with it, but this can take you for less than a day and a half, i'm telling you guys it takes a day and a half to achieve this. Thank you all thanks for watching. I appreciate you all


Comments
Symply Tricia TV: Wow, this is really creative and beautiful, Weldon sis, you did a great job
MsNike A: Wow this is so beautiful love the style
Empress Chronicles: Wonderful job
IHEANYICHUKWU ONYEMARA: Awesome! Creativity at its best.
Mrs. Kenyatta Akins Scott: This just awesome work I enjoy and beautiful I love it
Noodie Harrilson: Great job I love it Im gonna a just like this one
Cay: Beautiful
Kayon Mitchell: You are the bomb you are so creative