Detailed Diy Braided Wig With Bangs Using Braiding Hair Extension | Mixed Color Braided Wig
- Posted on 21 October, 2021
- Full Lace Wig
- By Anonymous
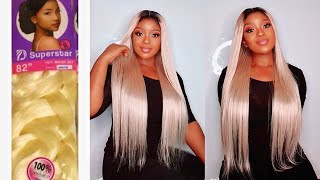
Here is a detailed DIY Braided wig with bangs using braiding hair extension. I used color 27 and 350 to achieve this style..
Materials needed:
Mannequin head and stand
Mesh wig cap
crotchet hook/needle
Braiding hair in color 27 and 350
Scissors to cut and trim
hair conditioner
hot water
lot and lots of patience
Thank you for watching please like, share and subscribe to my channel
#braidedwig #braids #wigwithbangs #wig #wigs #braid
Music:
Track: Cartoon - Don't Be A Stranger (Ft. Jason Diaz) [NCS Release]
Music provided by NoCopyrightSounds.
Watch: https://youtu.be/82FyrLo5N4Y
Free Download / Stream: http://ncs.io/DontBeAStranger
- - - - - - - - - - - - - - - - - - - - - - - - - - - - - - - - - - - - - -
Hey beauties welcome to my channel if you're new here my name is joy and on this channel we do everything around here. So if that's the kind of content you're interested in, please consider that subscribe to join the family and if you are existing subscriber. Thank you and welcome back for today's video, i'm going to show how i made this braided wig with bangs using braiding hair, of course, to start off i'm using this braiding hair. I got from aliexpress i'm using color 27 and color 350., so i cut each the hair. Like you see me doing in the video, i don't know how to explain that just pull them little strands. You know one after the other until you are done with that section of hair and then after doing the hair, when i had to comb it out and brush it out to be smooth to that, i went ahead to offer prep the hair. You know just separate it into the little pieces. I would need for the braid that way it should be easier, just grab and braid. Now i'm securing my wig net onto the mannequin head, i'm using a badge cap that i also got from aliexpress now for the braids. What i do is for each piece i want to use. I divide it into three and use one part of that to crochet onto the net. I crocheted that and just knotted to secure it onto the weak cap and then i go in with the remaining part to wrap around that and start breathing down. I don't know, i think it's quite safe explanation, i'm not really good at extending things, but if you watch me closely, you will see what i did there. You know i just wrapped it around the hair nicely i held it tightly and just start braiding down. Can i follow you back watching you bloom in the light on the moon? Another way you can also do this is just crochet there onto the net. You don't have to knot it just you know, pull the other end out and then just wrap the braiding hair around that and break down. So each method you want to use is up to you, but i like to like make that not to secure it, because i feel i don't know i feel better that way, it's not necessarily better. I actually think this town is better, but no because of that i just feel like it's more the secure. Can i follow you back to your arms? Don'T be a stranger, don't be is when i go to this point, you can see how i'm doing it here. You know the higher you go, then the closer you make the braid. Now i'm mapping out the area i want to do the banks just use my markers. I want the banks to be in then i continue trading, don't be a stranger for the bang. I cut the hair into four, so cut four for the band area. I didn't bother to feather it out because i'm going to cut off the end. So what i do is i do the same thing i did at the back. You know crochet a thought of it onto the net and you know wrap around with the remaining part to break down and once i get to the length i want. I then take a piece and tie it around to secure it at that position. So i cannot tie it two times or sometimes three you know depending on how loose it is. If you want, you can cut at this point, but i don't like cutting it off at this point i like to leave it on until i'm ready to like burn the end. So that's when i cut it, i'm just going to end immediately so that it will not round now. I'M i'm afraid that if i cut it at this point, i'm completely breathing some of them might unravel and then it will be difficult to correct. I continue doing the same thing for a third of the hair onto the wig cap, braid down with the remaining hair. Once i get to the lens, i need and then secure by tying it with a piece of the hair three times or three times, and that's it. Please don't forget to thumbs up this video because to help me a lot, have you done it already? Don'T be a stranger, don't be a stranger is. Can i follow you back to your arms? Don'T be a stranger, oh will never be lost on me, so reach out and laugh and don't be a stranger. So now i'm done with the bread and it's now time to point the ends in order to secure it. So i cut off the excess hair. I'M using cigarette lighter for this, and the way i do it is, i shake the light as i'm burning it, so that the light will not be concentrated on at one point. I didn't want the ends to darken, so i just shake it around like that. Just to make the heat uniform that way, it will melt, you know and secure the ends without burning it. If you understand what i mean so after that, i'm now going ahead to gently trim the hair, we want to be careful at this point because you don't want to cut your braids, though so after i'm done trimming the hair, i'm not going ahead to dip the Hair in hot water, before i dip in the hair, i add a little bit of conditioner and stir in say it a bit and dip the hair into the hot water guys wan na be careful. This thing i did here was totally wrong because he made the ends crumpled, so i had to place the hair on the net and re-dip it in the hot water to straighten it out. I let it dry, i finished a towel. You know on that. The mannequin is like the water will drip onto the toilet so that seeds once the hair is dry. It'S ready, i'm rocking my braided wig like this is the first week. This is the best braided wig i've ever made in my life and i'm so proud of myself. I made some mistakes actually like there are places i'm still going to feel up a bit. I'M still satisfied with the outcome, like guys, i'm rocking this hair, like it's so beautiful. So that's it for this video guys if you enjoyed it, please don't forget to subscribe like share and leave a comment in the comment section below. I love you all um bye-bye. So reach out and laugh and don't be a stranger
Comments
Something Better: You made you own wig. That is very cute, It looks good