Diy Curly Crochet Wig Using Xpression Braiding Hair/ How To Curl Braiding Hair
- Posted on 16 February, 2022
- Full Lace Wig
- By Anonymous
Hey Loves,
Here's a detailed tutorial on how to do a curly crochet wig using braiding hair
It's a DIY loves
Please dont forget to like,share and subscribe
I LOVE YOU
Afro wig, afro, wig, bangs, hatwig, hat, braidedwig, fringe,Bun,naturalhairstyle, 4minuteshairstyle, crochet wig, curly crochet wig, outre, expression hair extension, braiding hair, curly wig
MY SOCIAL MEDIA HANDLES
[ ] INSTAGRAM @Simplyalbie_
[ ] TIKTOK @Simply Albie
Crochet, curl, synthetichair,braiding,curls,
More videos
DIY Bone Straight Using Braiding hair
Diy blunt cut using braiding hair
How to get smooth and nice lips
Lace closure using braiding hair
DIY bone straight using braiding hair
How to easily do your eyebrows
DIY curly crochet wig using braiding hair
How to Tuck and grip roots
Sleek down fluffy ponytail on 4c hair
How to gain weight in the right places for skinny girls
Curly crochet wig using Braiding Hair/How to curl braids
Easy natural Hairstyle
Men braids
How to Pre Stretch Natural hair without heat.PART 1
Products for long healthy hair
#braidinghair #xpression #outre #crochetwig #curlywig #howto #diy #crotcheting
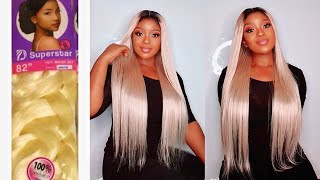
Hey laughs, welcome to my youtube channel, so it's all better here again to my returning subscribers i say: welcome back to the channel and if you are new here, hello, i'm alberta or you can just simply call me i'll, be so if you'd like to see how I made this beautiful, curly wig then keep on watching. So these are just the items i'm going to be needing for my curly wig. So i used radiant hair in color 39. That'S the wine color, so i just cut it into three different sections and then stretched all the sections. After doing that, i just went ahead to place my adjustable wig net on my mannequin head and then i just started to crochet. So you already know with a crocheting, i just take a little section of hair and then crochet it onto my adjustable wig net and then secure it firmly in order for it not to come out. This is a different curl pattern that i use. So that's why i want you all to keep on watching till the end to see how i killed it. So i do have a detailed tutorial of how to do this closure part on my youtube channel, so you can definitely check it out. That'S why i keep skipping those parts, because i do have a detailed tutorial on that. Most of my videos are all about this, so you can definitely check that out. So right. After doing this, i just applied some concealer on there and then i started to curl. So i used bending rollers to do this. This curls are tighter. I made the skills a bit tight because, from the beginning of the video you can see how the wig looks on my model so yeah. It definitely means that the curls are a bit tighter. They are not loose, so i just squeeze it just like this and then wrap it around. My bending, please don't mind how my hand is looking is because i did make up. I didn't make up for my client. So, that's why my hand my hand kind of look that way. So please, please please, please forgive me, okay, so after wrapping it around the bending room, this i just went ahead to prepare my hot water and then dipped the whole hair into the hot water. But before doing that, i poured in some conditioner into a bowl and then poured in my hot water, after which i dip the hair the whole way into the hot water um. So do okay! So with me in time, i'm making a crochet wig that involves hot water right after taking the hair out of the hot water. I just allow it to dry for a bit. I don't wait for all the water, so i come out of the hair when when, when i feel it's it's cold enough here, let me put it that way when it's not too hot, when it's not hot anymore, but it still has water in it. Then i start to unravel and then separate my curls. So that's what i do. That'S what works for me. So that's what i do so after unraveling, the curls from the bending rollers. I just went ahead to separate the kills and voila voila. My wig was ready. It was ready so just as you saw in the beginning of the video, my model worked so so well. So if you do love this video, please don't forget to give it a big thumbs. Leave a comment for me in the comment section down below, because i do reply to every comment. I'Ll see you guys in my next video and subscribe. If you are new i'll see you in my next video, i love you bye.
Comments
Life with Efua: Hair came out beautifully, model is beautiful , makeup was on point. I learnt something new
glory and shine hello: great work keep it up l hope we always communicate
Freda Boampong: When are you bringing me one