How To Slay A Natural Lace Front Wig Like A Pro Step By Step | Ft. Sunber Hair 100% Virgin Peruvian
- Posted on 20 May, 2018
- Full Lace Wig
- By Anonymous
Now this is the definition of " What Lace? " Today I will showing you guys how to make your lace front wig look natural without baby hairs. I will also show you how to apply the wig. No tinting! No Glue!
R E V I E W I N G
Sunber Hair - 100% Virgin Human Hair
Hair details: Peruvian straight hair, 24" 24" 26" 26" + 20" Lace Frontal
you can get it by clicking here: http://bit.ly/2ojDKnM
4% OFF for all your orders, Coupon Code: sunber01
Sunber Hair Official Store Link: http://bit.ly/2opLuUk
Best Selling Hair:
Straight Hair with Closure 4+1: http://bit.ly/2Cdr8Hx
Body Wave Hair with Closure 4+1: http://bit.ly/2F17aRe
24 Hours Handling Time;3 Working Days Delivery Time;
You could find Sunber Hair here
Youtube: http://bit.ly/2CDQVUX
Instagram: http://bit.ly/2HCxi38
T O O L S
Electric Hot Comb https://goo.gl/ykg81J
P R O D U C T S
Beyond Zone Turn Up The Heat Protection Spray https://goo.gl/pcV8NQ
T E C H
Lusana Studio Softbox Light Kit
iPhone6 ( Camera )
iMovie (I edit on my MacBook Pro)
S O C I A L
Snapchat : Lxvedom
Instagram: DomTheTastemaker
C O N T A C T
Business Inquiries: [email protected]
FTC: This video is sponsored by Sunber Hair
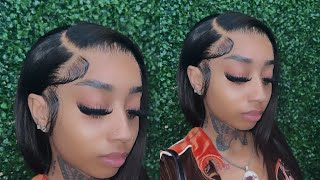
Hey what's up, everyone is to tastemaker and welcome to my youtube channel, if you're new here and if you're, an oldie but goodie, hey sis how you been today, you guys I have a video that you guys are going to absolutely love, and that is on how I apply my lace frontals, so you guys can get this extremely natural-looking frontal. Oh yes, honey get into it. Just get him, so I'm gon na give you guys a moment to get into this lace frontal and this amazing hair like this hair. You guys to be honest with you guys. This is honestly the best that my hair has ever looked like. Oh my youtube channel. This is the best like this is the best it's. The best of my hair is every look. I think a lot of you guys. Will like this video as well, because I did not do any baby hair in this tutorial and a lot of times people feel like you have to do baby hair in order for your hair to look natural and as you guys can see, that is not true. You can definitely skip the baby hair and still having her look natural. This right here is a really considered baby hair to me. I just have like a little piece, slicked back just so that this part, you know kind of, goes back and looks you know more natural, like a natural hair line, so this hair is by sunberg hair. They were nice enough to go ahead and send me over there a hundred percent virgin human hair. This is Peruvian stray I have in two bundles of 26 inches and aparts when I say a part, a part of a 24 inch and then a 20 inch frontal. When you have a frontal, you can definitely part your hair anywhere. If I wanted to flip my hair over this side, I could and have it back like this. If I wanted to part it down the middle, I can part it down the middle as well, and you guys can get this natural. Looking scalp, you guys see my scalp looks extremely natural. Everything about this hairline looks like it is my natural hair and I'm gon na show you guys how to do exactly that in this video. If you guys want to know how I pluck my frontals, I will be showing you guys how to pluck a frontal in a very detailed video. You guys will see that video coming up next week, but I did want to show you how to at least layer front so because plucking, it is one thing, but the steps that I'm gon na show you in this video is a whole nother thing on how To get your lace friends to look very natural for those of you guys who are dark-skinned like myself, you guys don't have to worry about tinting the front or anything like that. I know a lot of people on YouTube like to temp their front tools, but that is not necessary if you follow the steps that I'm going to show you guys today, you guys don't have to do any of that. I am absolutely blown away by how natural my hair looks and this frontal the hair itself is really nice, and one thing I like about this particular frontal is that this frontal is extremely dense, not in a bad way. It'S dense in a very good way. In my pan a lot of times I get frontals and they're really thin and because they're so thin, I feel like I have to add more bundles in the back or I have to do a little bit extra for me to get. You know get this kind of look, so that's one thing I like about it I'll, go ahead and do a flip over on this side as well. Just so you guys can see the versatility of this hair. I did pull my friends'll a little bit too far up. I could have definitely put it back some, but you know that's. Okay. There is no need to do baby hairs in the way that I'm gon na show you how to do this. If so, the first thing that I did was what the frontal and brush all of the hair back and then I let it stay overnight and let it air dry - and this is what it looks like. So I'm going to use some of my turn of the heat, which is a heat protectant. I will leave a link down to this product below I'm like running out of this, so I sprayed the frontal with that first and then I'm gon na go ahead and press out the entire front, so it's already flat, but we can get this a lot flatter. As you guys see that frontal is plucked to perfection, I will show you guys how to pluck a frontal next, so stay tuned for that video. So the hot comb that I'm using is an electric hot comb. I will try to find one online and I will link it down below for you guys, so I went ahead and preheated the hot comb, and now I'm just going to pretty much comb the hair backwards. Now I know you guys are thinking like all the front wheels already flat. Why are you doing this part? Now? The thing is it's flat, but there's parts in the front so like towards the back part that are not flat just yet. So we want to get this as flat as possible and that's what's going to give us a really natural-looking frontal smoke. So now I'm taking the back of the hot comb and I am using a little bit of pressure and pressing that frontal down. So we want to make it nice and flat - and I know some of you guys are like, oh my god, it's flat enough with the honey. No, we need to get this thing together. Okay, so now I just want to make sure that our tracks are nice and flat as well behind the frontal, because some of my tracks are buckling just because I was rushing honestly once I got towards the top. I was so tired making this way. So I'm just taking the back of the hot comb and I'm going to press these out and try to flatten them a little bit before I sew them down, because I am gon na reso some of these. But you do want to try to get. You know a lot of that as flat as possible, so I'm just using the back of the comb. So now we're going back to the frontal and I'm just parting different sections in the hair and I'm just trying to get the back pieces laid really flat. So I'm going to do a run-through in the back part of the front. So excuse my hand right here, but you guys can see. I just wanted you guys to get an up-close personal look on how I'm friending this part out. You want to use the comb and kind of use the back part as well to put a little pressure on the sides, and you guys see how nice that looks so now that our frontal is good to go. We'Re going to start working on the bundles in the back, and this is another heat protection that I'm using on here. I like to use this heat protectant as well, because it also gives the hair a beautiful shine, but be careful with this, because you don't want your hair to end up being too oily and weighing down your fresh bundles with oil. Okay. So the first thing that you're going to need is the gossipy glue spray. I typically like to just use this when I am applying my wigs, rather than using the gel personal preference type of thing. It'S not a must you're also going to need some kind of mixing bowl if you have one or you can use like an old Tupperware Bowl that you no longer use and then you're also going to need this hair dyeing brush. So I got this set from forever 21. I think it was like five dollars or something like that, so check them out. So I have the bowl and then I have the brush as well and then the final thing that you're going to need is some scissors. Now these are all like gunky, because I have done so many wigs with these, so I really need to clean them, but that's what you're gon na need and then, of course, your wig. So before we put on our wig, I do have this stocking cap. That is really light, and I know some of you guys are like girl. That is not your color. Why are you using that? One, no problem, so how we're gon na fix this is I'm going to take a makeup brush. This is a flat top brush that I have from when wow. This is probably like three dollars or five dollars or something like that, and then I'm gon na take my foundation. My fancy Beauty foundation. This is in the color 440 and then I'm just gon na put a little bit on the back of my hand about that much. You really don't even need that much, but there you have it and then I'm just gon na get my brush like this and then go across the front of the cap. All in the front. I do need to pull this down some. I like to pull it like kind of down over my ears and then we're just gon na get a little bit more and then just apply this all over the front. Part of our lace. You don't have to go that far back, but you do want to cover a majority of this, so just cover what you can and then this will look more like my scalp once I cut all the lights off and everything, but this is just the first part. Okay, so I think we're good just take whatever is left over and just put it on here as well, so BAM. Now, if you guys see it now, it looks more like my skin tone right. So the next thing that I'm gon na do is I'm gon na take my got to be move spray and then I'm going to spray it inside of the bowl. So then you'll have like something like this. Okay, you just want to keep spraying it inside of there, so you have like it should look kinda like water, so it's just a whole bunch of it in there. So the next thing that I'm gon na do is I'm gon na. Take my brush and I'm going to dip it inside of here and then I'll come in closer for you guys and I'm going to begin to apply it to my cat and I usually like to go like a little bit past. My hairline. I don't like to go right on my hairline, because I don't want the frontal to be there, so we'll just go you're also going to need a blow dryer. So if you have a blow dryer now would be the time to get it out. The free spray dries a lot quicker, then the gel, and it holds a lot better than using the got to be blue Joe. In my opinion, that's just my opinion. Some people they like the gel better, I like to spray better. So this is what I use. If you have like bolt holes or some other kind of adhesive that you like to use, you can use that. But this is just something that I like to use. It'S a lot less um. It'S also a lot less expensive than using bold hold and then sometimes both hold is sold out, but you'll always have like the gossipy glue free spray. You can even get this at Walgreens, so that's a plus! So now I'm gon na go grab my blow dryer because I forgot to grab it and then I'm gon na blow dry this area. So now I think we are just about dry yeah. So what you're going to do is you're going to take your scissors and I like to make like an incision like right in the middle, like just a little cut like that, and then I like to work in sections. So I'll cut this side first and then the other side. And then another thing I'm going to do is kind of clip right by my ear and just keep cutting up so that the cap goes behind my ear, okay and then we're going to go as close as we possibly can when you're pulling it. You want to kind of pull back and then cut along that area. Okay and then this little extra piece don't worry about that. We'Re going to handle that in just a minute and then I'm gon na do the same to this side. I'Ve cut up down the center, like in the center of our eared, put that back there this section here, perfect example: it's not ready yet, so what we're going to do is we're going to get our brush again and our free spray, and then I'm going to Put some right there so now that we have our cap down and we're nice and secure I'm going to go ahead and put on my wig. So this is the wig that I made. I haven't cut the lace off of it just yet, as you guys can see, it has a very natural hairline. So what I am going to do, I am going to go ahead and cut the lace off of here. So now what I'm gon na do before I put my wig on the next thing that I'm gon na do is actually put some of the got some good hair spray on my hairline. Well, my new hairline and I'm just gon na spray once again in the bowl, just wanna friends that you have a nice in here and then I'm going to take that and then put that right where I want my wig to lay so like all right here. There we go so there's this part and then this other half here you see how we can see that line. So what I'm gon na do is take my scissors and actually cut some of this, so that it's all flat, because we don't want any kind of a line like that. So now I'm gon na take this half and I'm gon na pull it down some take this half over here pull this down where that's supposed to go, and I will do a tutorial on how to pluck your hair line, because I did try something new and I think it works for me. Well, it looks like it worked so now that I kind of have an idea of what I'm doing, I will do a tutorial on it, but now I'm just going to kind of part part my hair, I did already flat iron. My hair, like you, guys, saw on camera, so I don't really have to do too much flat ironing, but this is what my hair is looking like on the sides and it looks extremely natural. As you guys see, this hair is amazing. There is no tangling, no Shetty. This is the box that the hair came in. It is a nice sturdy box in the back. It gives you some details on how to maintain your hair. So, for those you guys who are new to human hair, you're, not really sure, on how to maintain and take care of your hair that do have instructions here in the back. These kind of boxes are always great for storage. When I'm done with my wigs, I always store them in these boxes, so I love when companies give me these boxes. It does also come with a nut stocking cap in there, along with the individually wrapped, frontal and bundles. So when you get it, you will have the bundles like this. Each bundle is also labeled. So you never have to worry about, oh, which one is this one. It says the hair texture. It says that it's Peruvian and then at the bottom. It says how many inches it is, so the bundles are also pretty full, in my opinion, as well. All the way through this here is the I don't know why eyeballs it up like this, but this is the frontal that I didn't end up using. I mean this is a bundle that I didn't finish using. This is the 24 inch. I still have a lot of this hair left over and then another track right here. That'S left over, so I have all this hair that is left over and then I also have a bundle that I haven't even opened yet so, if you do like really full wigs, you can definitely add 4 bundles in. I typically go for like 3 bundles. Sometimes two, but most of the time I fit like two bundles in my hair is a hundred percent virgin hair, and you guys I have to be honest with you guys. This is probably the best like hair like that I've received thus far. I know you guys are like, then you always say that no, but I'm like serious like this is some really nice hair, and not only that you guys this hair is extremely affordable, like I'm talking about very budget-friendly, so all you girls out there who are like College students, or maybe you're just trying to save me some money on some human hair. I think this is a great vendor. They have their own website. You can reach them at summer, hair, calm, hair that I have in right now. This is 7, a Peruvian 100 % human hair, and one thing that one thing that I really appreciated about this particular hair company is that all of the bundles and the frontal were consistent. The frontal was just like all of the bundles. Every time I opened up a new bundle, it felt just like the last one. The same thing with my frontal inconsistency is always great and that's how you know that this was from one donor, because a lot of times when you have companies you'll, have inconsistencies in the bundles and the reefs being is because it's non remy hair and what non Remy means is that the bundles are coming from different donors. So that's why sometimes, your frontal will be different from your bundles or one bundle will be really good and the other one is like not so great, whereas this hair that I have in right here. This is from one donor and the hair is consistent all the way through. There is no difference in color from the frontal to the bundles. So if you did want to dye your hair, you don't have to worry about. Oh, I bleached my I bleached my frontal or I bleached my bundles and my friends when my bundles aren't matching. I also have a discount code for you guys as well, so you guys can click on the link down below, so the handling time is 24 hours. After you place your order with them, your hair will be processed within 24 hours, which is great because I know a lot of us, especially in today's society. We don't like to wait for anything the delivery time after they've processed. It is three business days. Thank you guys so much for watching this video, and I will see you in my next one deuces


Comments
wylesiavm: This looks crazy natural
Tracy Jamison: Love it you make it look so easy
K Hart: Gorgeous! I love the makeup and hair
Fernandez 714: Black long straight hair looks really good on you ☺️ btw I’ve been watching all ur videos lol Love ❤️ ur good attitude
Talesha Duncan: New subbie soooo beautiful
Eva Beasley: Yes huny.Looks so good on u.U did good with this wig
Myeisha Clemons: Geezus that hair line looks so damn natural!!!!
Lisa Marie Anthony: Here for it!
Teagan Martinez: You are my new obsession ♥️
Felicia Holmes: I literally love all the vids you do, sunber hair seems good but I can't afford it, can you do some aliexperss hair review like celie hair, virgo hair? they are affordable but I hav lots of hesitation
india rogers: Thank you so much!!!!
Chill Vibes Music: That wig looks great
jewelzofthasea: Girl this video is on point! Thank u!
All about Mika: You did that mama!
Flowers !: This wig is LAID!
Jackie’s Vanity: You're so gorgeous!
Cedeline O.: Do you blow dry on cool?
wylesiavm: Do you make wigs ? And how much would it cost around @thetastemaker
Frysnelle Mabiala: Magnifique
Tiffany C: Much needed video!! And the music !!!!! I need it please link ty
Devine Mimi: The hair is beautiful but I sometimes feel like when the hair companies send their sponsors their best hair and then when we buy it its not like how we see it in the videos. Packaging is different hair looks different and all. So sometime I'm a boy skeptical about buying hair
MissOsoSlick: Well Damn Glow the fuck up sis
The Real Neeka Joy: Yesssssss!!
Myeisha Clemons: Do they have 360 ftontals?
Jade Davis: How is the hair now i just ordered some and i have seen bad reviews
Melissa Monee: Nice but what lashes r u wearing
Pretty Brownskin: Bombbbbbbb
christiana Doms: Too much makeup