How To Apply A Full Lace Wig W/ Bold Hold Maxx & Bold Hold Active
- Posted on 18 May, 2020
- Full Lace Wig
- By Anonymous
This is a quick tutorial on installing a full lace wig from start to finish using Bold Hold Maxx along with other products from the line. Please follow the directions listed on the products for the best results.
Follow Me
∙∙Instagram: @hairkilla_dre
∙∙SnapChat: @hairkilla_dre
∙∙Facebook: Hair Killa Dre
Music By
Megan Thee Stallion "B.I.T.C.H." Instrumental Prod. by Dices *FREE DL*
https://www.youtube.com/watch?v=pnhsR8...
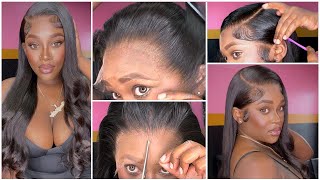
Hey guys welcome back to my channel it's raining and if you are returning, thank you so much for showing constant support. If you are new to my channel, go ahead and like comment and subscribe, make sure your notification bell is turned on, so you don't miss out on any of the new videos that I'll be going ahead and posting here in the near future. Today, what we're gon na be going ahead and doing is applying in full lace, wig, yes and I'll, be going ahead and showing you how to install the nape of the wig as well. Now, of course, this is my very first official hair tutorial. I am getting used to recording me doing my clients, hair and, of course, this whole editing thing is not for the faint of heart, but bear with me. I'M sure we'll all go ahead and get through this, so I'm very proud to go ahead and show you my techniques, little tips and tricks that I've learned over the course of learning how to do lace installs. So if you do see something here that you like and you find helpful, go ahead and use it, and I hope that everyone enjoys the video. What we're doing right now is simply doing some cornrow straight to the back, because that applies some nice in the flat finish and it's very important to make. There make sure the clients hair is as flat as possible when doing lace installs, because you're creating an illusion of it being their natural hair. Now, if you notice my clients front hairline is a little weaker, so I'm not gon na start right at the front edge of her hairline we're gon na start about an inch and a half to two inches back, because I don't want to apply any any extra Tension that may create any future damage. You want to go ahead and assess the clients hairline very thoroughly in the initial consultation, so that you can make sure that you are not creating any extra stress or damage so the clients hair. So, as you notice, I did go ahead and bring up that tail end of the previous braid into my current braid, so that will have a nice flush finish as well. You want to continue to do that process throughout the braids, because you'll go ahead and make things a lot easier for yourself and it's just a lot easier to work smarter harder. So I'm gon na go ahead and continue to do her, hair of course, braiding. It straight back and nothing fancy and I'll be back with you. So what I'm doing right here is going ahead and taking that tail end of the braid and I'm just gon na go ahead and tuck that in and stitch it to the rest of the braids. That way it's out of the way and then I'm gon na go ahead and cut the end of that, and no it's not her natural hair. So just go ahead and keep that in mind. That is the end of the braiding extension that I'll be going ahead and cutting off right here. I'M gon na go ahead and apply some Cantu shea butter, tea tree oil and jojoba oil into her scalp to go ahead and make sure that things are nourished and making sure that we are going in implied moisture so that, while she is wearing her wig she's, Not having any I'm itching or flaking and making sure that her scalp is still protected and nourished overall. What I've done here is. I went ahead and applied the bald cap. There'S plenty of videos on this. If you want me to do a detailed method, I'll go ahead and show you we're gon na go ahead and clean the clients hairline with 91 % alcohol or any astringent such as sea breeze as well. That'S to go ahead and clean off any debris such as makeup that we're gon na go ahead and apply here. So you see me right now applying a concealer powder concealer. I do think it's concealer, I'm not into makeup. I think it's a um. It might be foundation, but you want to make sure that it is a powder and not a cream, I'm I do see people applying cream foundations and concealers and hey if it works for you. If it ain't broke, don't fix it for me personally. I'Ve noticed that when I do apply cream products they it doesn't help with the lasting of the wig. Basically, it prevents the wig from sticking and then having a long. A long life of you know wear so I prefer powder. It gets the job done it stills. A play still applies that color that you need, and you know we just want to make sure that our clients are wearing their wigs as long as they can, because with the products that I use, you can get anywhere from a 2 to 6. We code, depending on your pH balance, I personally don't recommend anything longer than a four-week hold just because you want to make sure you're still taking care of your natural hair under the wig as well, and it's good to get in there and wash and condition your Scalp so for weeks, I'd do recommend as max but hey. If you want to go six weeks, it's your prerogative! So after you went ahead and applied makeup to the entire cap and the hairline go ahead and go back around the hairline with a 91 % alcohol or the astringent, such as sea, breeze and then you're gon na go in with a skin, protect I'm using the Bold whole line, and so you're gon na go around the hairline. What does skin protect because it creates a barrier in between the clients, skin and the glue once you've applied your skin, protect around the clients hairline. You want to go ahead and grab your glue of choice for the nape of the hairline. What I'm gon na use is the hair diagram. Bold, Oh Maax. It is silicone base, not acrylic. This is a new and improved formula from the hair diagram and you can go ahead and purchase it from the hair diagram comm. So you want to go ahead and be careful. You can see the consistency of this glue. It'S not as messy honestly as the previous acrylic based glues and it's a lot safer because it's silicone based and it also is waterproof. So that is the proven feature. If applied correctly, you can get in the water. You can go ahead and submerge your hair underwater and go ahead and you know still have your wig intact. Of course you want to go ahead and make sure that you do know how to take care of your wig after you get out of the water. So you want to make sure that you dry things very thoroughly when doing so now me personally, I do apply only two layers. I think I applied to two three layers, three max, because if you see the consistency, it does build upon itself and it actually is a very strong glue. You'Ll see that in a moment, so you can get away with basically maybe two layers and still have a great hold. Now I'm gon na go ahead and make sure that you understand it is very important, very imperative that you do not under any circumstances. Well, not cannot should not, must not do not like this glue. I repeat, do not apply this glue to the clients, hair, follicles whatsoever. This is a strong adhesive. You want to make sure that you're protecting your clients, natural hair. Again, it's very important: do not have this glue come in contact with the clients, natural hair line, all right so and now it's the moment, we've all been waiting for here you go. You see the full lace wig. This is actually a full lace. Wig from my vendor, it is a 14 inch or a Brazilian straight that she purchased from me, and you can also purchase your her from me as well. You can go ahead and contact me on instagram at hair, killa underscore dre. Now what i'm gon na go ahead and let you guys know if you see and you look at the lace of course this is transparent - lace, not HD lace, not regular swiss lace, it is transparent. So it's gon na give you a good belt immediately anyways, but I want to let you know with, of course trying to go ahead and set up the camera. Get the right angle make sure I'm not in the way I forgot to tent the lace. I did not apply makeup inside the lace, so just bear with me. It does give a good finish. It does still work out in the end, but I would have prefer to go ahead and sent the lace and you'll notice that a little bit in the front hairline not so much in the back. As you can tell right now. It is melting flush, honey, she's, giving scalp already, and it's not really even you know, pressed down into the glue fully and you'll also see how strong the glue is. Just by simply, you know, dabbing not really pressing it into place, but just dabbing it so that we can make sure we have it aligned correctly. But I do want to go ahead and make sure that you guys understood it is important to go ahead and sent your legs if you do have a client look at this. Look at this. Oh, your father yeah. She was stuck honey already, but I know it's very important to go ahead and make sure you sent the lace so that it has a alternate blend, but you'll go ahead and see in the end we apply and make up. So everything worked out. Fine, my glue of choice for the front hairline is going to be bold. Hold active both hold active is for your clients who have oily skin or they're prone to sweating. This glue works very well with their pH balance and a little goes a long way. This little dot will go ahead and give you a nice even then layer is very important to have each layer, nice and thin, so they dry evenly and clear. I went ahead and apply three layers and you also have the option of both hood extreme cream by the way for clients with a normal to dry skin. You want to go ahead and make sure that you are thoroughly following the instructions on the label of the product. Their way you get the best outcome and your client gets the best hold possible after all of it. I can't believe I did not get footage of laying down the front hairline, but it's no different to laying down the nape and, as you can see, it's a very natural de lace has melted and it's looking extremely realistic. She, of course, is loving her hair. The hairline looks very natural, not over plugs, but I do want to let you know that it is very important because you can see a little bit there's a cast right before we apply the makeup. There'S a white cast because I did not apply lights, tent or makeup on the inside of the lace. It'S very important that you want to do that. So you give the ultimate illusion - and I wanted to show you this mistake, so you can see what not to do and how to fix it. I do want to go ahead and thank you so much for watching this video and tuning in make sure you follow me on all my social media platforms and see you in the next one.


Comments
Nurse Nicky Slayys Life: You did soo good in explaining your process!!! Just subscribed!!!
Flamboyant Touches: You did great ❤
LenTa WuzGood: Thank you so much this really helps me !
Monebyrd: Beautiful thanks soo much for sharing
TimeWith Kie: Hey!!! I love your video!! Keep it up ❤️
Yourdailybeauty daily: Beautiful
TheHair Diagram: Awesome job
chigozirim Wellington: You killed it love it
Royal Armani: Hi! I enjoyed watching this videoo, you are so well spoken!! lol I swear I forget how to speak in my videos, once its time for a voiceover. #newsubscriber
Dzintra Lewis: Enjoyed watching
Yourdailybeauty daily: Yes