Detailed Explanation Middle Part Lace Wig Install❤️|How To Do Baby Hair|
- Posted on 16 November, 2019
- Full Lace Wig
- By Anonymous
My Most FREQUENTLY USED PRODUCTS
BED HEAD MASTERPIECE
BIOSILK ROCK HARD STYLING SPRAY
BIOSILK FINISHING SPRAY
PUMP IT UP SPRITZ
SHEISBOMB WAX STICK
KERACARE WAX STICK
SHEISBOMB SLICK AND SLAY GEL
GOT2B BLACK STYLING GEL
GHOSTBOND LACE GLUE
BOLDHOLD LACE GLUE
(EXTREME CREME,ACTIVE)
99%ALCOHOL
RUBY KISSES CREAM FOUNDATION
(LEVEL 9-16)
TruMATCHLACECONCEAL (LACE TINT)
NAIROBI MOUSSE
HOT TOOLS:
MARCEL IRON HOT COMB
CONAIR FLAT IRON
A WAVE WE GO CRIMPING IRON
CONAIR CURLING IRON
BLOWDRYER
Welcome to IAmBeautifulHustler Channel
Be sure to SUBSCRIBE & TURN ON YOUR ALERTS
Follow My Socials:
Instagram:_Beautifulhustler & @thebeautifulhustlerbrand
Twitter:_Beautifulhustl
YouTube: IAmBeautifulHustler Channel
To Book or Purchase With me and my Brand
MINK LASHES,CLASSES, WEBINARS,WIGS .
#BeautyInfluencer #IambeautifulhustlerTV #_Beautifulhustler #Youtuber #MiamiHairstylists #BrowardHairstylists
#AtlantaHairstylists
#MiamiMakeupArtist #BrowardMakeupArtists #AtlantaMakeupArtist
#MiamiHair #AtlHair #Celebrityhair #Celebrityhairstylist #Loveandhiphop #Lhh #LhhMiami #Miamilashes #Minklashes #MinkLashVendor #Rawhairvendor #Minklashes #explorepage
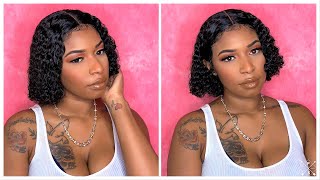
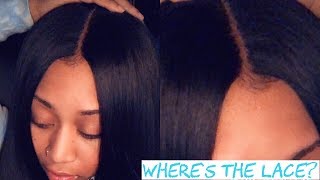
Hey beauties and welcome back to iron, beautiful husband TV today I'll be showing you guys how to do a little part in baby hairs, LASIK installation. Now I do not have any details to this hair whatsoever and this is supposed to be a hair review for a company, but they sent me this wig and a plain white box for no other information attached. So I'm not sure who this week is from. So if you are a company watching this video - and you know you didn't send me a 24 inch, curly wig and a plain white box - please email me ASAP, so I can update this video as far as the descriptions and details about this wig, but, moreover, guys I will be showing you how to install this wig today and I will be using that boat whole active lace, clue so jumping straight into this video. I'M just gon na apply all my layers of that glue and then begin to lay the lace down now. Today'S video is 20 minutes long, so it is a bit lengthy, but I know you guys actually love a longer video, so you guys should enjoy this tutorial and I will also be going a little more in depth as far as doing the baby hairs um in This video as well, because I know a lot of you guys - do struggle with doing baby hair. So if you like the finishing results, as you know, based upon seeing the beginning of this video, then you should definitely stay tuned for more now, as I mentioned in my previous installed video that I am doing free, wigs and free installs for my lawyer, clients. Now this is my lawyer client. She is number two as far as the video and her name is Ashley she's been rocking with me for a minute and she is one of the clients who always gives soand. So it's always a solar enclosure or frontal, and she definitely does not try. You know trust anybody else to do her hair, and this is actually my first lace wig application on her. So she was extremely excited and, as you can see from the beginning of this, video like this installation was very, very nice, so I am doing her this style she chose to which she wanted and she chose to style, so we're gon na get straight into it. But now that all of that glue has been applied and has turned clear, we're gon na go ahead and pull that lace down and sew that glue and I'm gon na have her hold each side of that wig as I blow-dry it, and melt that lace in And just be sure that you are using a warm heat, because that will help melt that lace even better and then based on a new technique. I showed you I will be doing it in this video as well. So once I finish blow-drying this lace clue I will go in with their bio silk and spread it across the hairline and continue to blow-dry and melt that lace in - and I saw also mention before in a previous video, the benefits of doing the steps like this Is that when it comes time to you to cut off the extra lace, it would not be anything really love for you to like glue and tack down like they're holding spray, also catches, those pieces that have not been glued, and it still, you know, just may Be very, very tiny areas that you rein me to with the glue, and since I have upgraded my technique to doing this stuff after applying the glue when it comes to my second step of melting, the lace I just you know incorporated a previous technique of mine And that's that Nairobi's mousse, so I will use that mousse to do my second step of the lace meltdown once you have blow-dried. All of that - and you can go ahead and begin to cut off the extra lace and you want to cut as close to that lace as possible. But, as I always mentioned in some cases, depending on how your client hairline is, you may have to just leave. Like a tad bit of that lace to shape and mold the hairline to kind of match, you know like using a little bit of that lace on there to match and mimic the person's hairline, especially if the hairline of the wig does not meet the shape of Their natural hairline - I hope I'm not confusing you guys by what I'm saying but try to bear with me on explaining that. But, however yeah so I'm just going to continue to cut off the extra lace and just tack down the little piece that may still be lifting, but as you can see, we are getting very, very natural results. I did use level fifth level. Nine, I'm sorry guys! I did use level nine, which is like one of the lighter shades I believe they have and that Ruby kisses foundation and it does like match her skin perfectly so yeah clients with that. You know the same skin tone is her or you know a little tad bit darker or lighter. That palette will work perfect for their skin and basically, what you're doing what you did to once. I just want to follow the same steps for the other side cut. It off the extra lace and taking it down, and once I finish with that step, I will go in with minor abuse moves, as I mentioned, and do my second step meltdown now. I'Ve seen recently a my comment. Someone asked how long after laying down the lace do I apply that moves and honestly I don't wait any time like once I get it all tapped down. I just go right in with that mousse, but the trick with the mousse is you want to move very very quickly, so I quickly spray that mousse on there and I just tap it all across the hairline and it's best that you comb. The hair is back at the same time, but while I'm combing those hairs back to just make it you know neater, I do hold the lace down as I'm combing those hairs back because it will lift or I can live. So we just want to be very quick and very gentle and that's why I hurry and attach that milk belt. But you do want to let that that mousse dry completely before removing that milk belt or you know whatever you using to tie down the hairline and try to wait at least 10 to 15 minutes. You can blow dry and let it air dry or slip them under the dryer. It'S really your preference, and once you let that dry completely. It should be good and melted and they should actually be a little sticky like when you pull it off and that'll. Let you know that it's dry and anything extra outside of their hairline. It does pick up. So your install does look very, very clean now we're about to get into the baby hair it's pretty pretty shortly, and that was like something I really wanted to focus more on in this video. Now, as far as baby hair placement, you have to try to place your baby hairs kind of like where it makes sense, especially if you wanted to like match every person hair you are doing so for her. I decided to just do like even baby hairs on both sides. Most of the time when people do middle parts, they do the baby hair swoop like across the middle, and I even do it sometimes, but not all the time. But some people do request to have like the one swoop across the middle, but because I love how natural this install was before the baby hairs. I kind of want to keep that natural look towards the center and not do like the exaggerated baby here, and I just wanted to do like two scoops and then the sideburns on the east side. So I did kind of like see where I wanted to place them and section off those little pieces of hair and I'm gon na do the same thing with the other side as well. But I'm just going to show you one side pretty much in detail and then just you know, touch bases on the other side, but before I even get into cutting and shaping the baby hair, I'm just going to use my wax stick and hot comb. The roots out hot comb, the front groups like just really get it all combed up and you know, need and flat looking because I always tell you guys whether the hair is straight curly or wavy. It'S always best to hot comb out the roots of their hair, and that will also give it a more natural - and you know, like neat, finishing touch and something else I did different in this video for the curls today I did use the no Roby's moves to Give it like it's definition. Usually you know I just do like my water bottle and conditioner and stuff like that, but I just actually used that narubu smooth to get the curls nice and pop him. So you will see me going with that mousse and I'll use that or the curls, which is right now and I'm just applying the mousse at the top and just you know bringing it down rubbing my fingers through it, and this will also keep the curls popping. All day long, because that mousse holds that curling there really really good - and I did want to you - know, get that hair sleek and out the way. So I can focus on these baby hairs now the key to getting the best results when it comes to baby hairs is cutting the hair down nice and short, like some people, leave the hair too long, and that makes it harder to swoop, and everything like that. So, as you can see, I cut those hairs to about an inch and as far as throwing the baby hair today, I am using that she is bomb collection, all-in-one, hair gel, and I really like to use this gel because it dries quickly, as you are swooping And in comparison, so they got to be what the got to be is pretty much. You know more women, you really have to blow-dry it dry, but with this gel it does pretty much start to dry up on its own. So that's why I like to you, know, use it, and I also like to use the edge brush to swoop up those baby hairs, and I still going with my blow dryer to swoop them. But, as you can see, I zoomed in so you guys can really get a close-up and see what I do as far as that, but the key to the baby hairs. As I mentioned first, you want to cut it down really short and you want to use your finger and edge brush to really like form like small seeds like your creating seas. Of course, on this side will be backwards seas, because this is the right side of the head, and you know baby hands have to go towards the hairline, so you're, just creating like backward seas here - and I just really like to take my time and just really Scoop it until I feel like it's perfect and use your finger to push the hair and a direction that you want it you know to flow and just a pride apply just a tad bit of pressure, but don't be too too too rough to the point you Can lift your lace so use that you know use your fingers? Use that see. Motion is swooping, and once you get that baby hair right, where you want it just go ahead and blow-dry to secure that it stays the way you want it to be, and that's just pretty much what I do and then I'm just gon na go on with That got to be spring and spread it behind the hairline and just comb and smooth that hair out. So if she wan na pull it behind her ears, she can. It would be nice flat and neat, and it also gives it that nice push back. Look if she's gon na wear it regular like how you would see at the end of this video, so whether you want to do a push back or just wear regular. It still gives it that nice natural push back a look. So what I'm using a God to be, or the bad head or the biosilk they all do you know I all use it for that. I use it all for the same purpose, because it all do the same things, and I'm just going back in with that. In the world be smooth and just rubbing that mousse in there to get those curls nice and poppin, and then I will start to work on the other side and people same exact steps. Now, with this side, you are still creating those seeds, but you are creating your seeds in a regular direction that sees a poster below. On the other side, of course, that would be backwards seeds, but on the left side of the head. This just create. You know, like your perfect, see and just push and smooth everything how you want it and, as I mentioned before, when you get that baby hair right, where you want it, you just go ahead and blow-dry that right into place. So now that I'm done with that side and the baby here is, I'm just gon na take that mousse and rub it on those curls once again, and then we are getting closer and closer to the final step, we're just concealing the part and black spring. But as you can see like the part on this week is already super super clean, and this is before I even added that concealer, but I'm still gon na go in with that step. Just to get it even more like popping popping popping. So I'm gon na go on with that same Ruby, kisses level, 9 of the foundation and just using a angle brush that is the best brush to use, especially if you want your part to be nice and narrow and clean, do use a makeup angle brush and That will give you the best results for concealing the part out and it's so crazy because someone actually thought I plucked my parts. But I don't pluck my parts out and I highly don't recommend it, because when you want to wear your wig again, you will basically have like that line patch permanently stuck in your wig and you can still start another way. But it's like that part will always be there. That'S why I do not pluck my parts and I highly recommend that my stylist don't so I rather just going with that concealer and that black spray and give you that part. That perfect part look, but I am pretty much done with this installation. I hope you guys learned a lot from this tutorial and thank you guys for tuning in leave some comments and stuff down below

Comments
Ms Pretty Hustler: I never miss an upload now! I used your techniques to apply my wig today and hunny when I tell you this wig is LAID! I mean LAID! Thanks so much for the consistent vids ❤️ blessings
Reasonable Radiance Hair: Very pretty! I use a lot of these techniques also! Love the make up match up underneath!
Princess Toyia: Another gorgeous install!!! Its crazy that a company just sent a wig in a box with no information. The hair is pretty.
what you looking at huh: I’m here!!! My girl did that ♀️per usual. I love this
Sam Willis: LIKED BEFORE THE VIDEO EMM STARTED. Sussss you ain’t playin’ the hair was definitely POPPIN’ but that part Scalpiana. . . Im convinced you do NO WRONGS all yo pieces hittin’ & as always THANK YOU THANK YOU THANK YOU for all the helpful tips that you provide definitely stick like grits.
Ashanna Janelle: That's her real hair at this point
Divion Deshae: how long did you wait for the glue to dry before applying the 2nd layer ?
Phat Codei Boss: This is so bomb flawless to me laided to the gawds❤
Lifesizebarbiestacy: Love when you say,but however Slay as usual!
Mz Chocolitt: I already knew better so I liked before I finished watching, another slay!
F. Fowler-Stewart: Gorgeous install. Did you find the deets of this hair yet?
DomO Jackson-Grant: Wow amazing job! that is some really pretty hair wish you knew what company I would definitely order
GG Jones: So gorgeous
Killaxflow: Beautiful
Nianna Taylor: When I use the mouse it takes the lace right off with the ghost bond glue on It takes the wig completely off in seconds and I went really quick
Kyla Johnson: 2 uploads in one day whew thank you I was waiting for this one
Allwayz BeenBadd: Fye ❤️❤️and them baby hairs popping sus I’m learning cut them super short and C motions
Emprezz Channer: Perfect
what you looking at huh: This is some nice hair!
NeviaBeauty: Hey ma! Thank for sharing your work. I loved yours baby hairs techniques. So ... U used the black spray in the end for the airline . What was it???
Trudy ann Dixon: Love it
Naudia Judge: I enjoy all of your vids
Davina Lee: WoW Truly Flawless
alonzia besweet: My name Ashley also an you did her on my birthday....great job
Lacey Ann: Very amazing video,four days ago I purchased the same product from eseewigs
roxycutie78💅: Thanks a lot my dear
Jordan Williams: Where can i find that foaming lotion
Deborah White: ok so I watch EVERY single video brought most of the products hair and all BABYYY Im convienced its you hands like they say God gives gives everyone a gift now HONEYYY this is your..#blessings ##1slayer..hand up
RiRi Wade: What kind of blow dryer are you using?
IAMBEAUTIFULHUSTLERTV: Here’s the update Hair info guys❤️ MarchQueen Hair Use Coupon code: Smith15 to save $15 off(No limit) ***Hair Details ⇀Hair in the video: https://bit.ly/2oaYelj ⇀HAIR INFO: 13x6 Lace Front Wig Deep Wave 24'' ⇀MarchQueen Official Store: https://www.marchqueen.com/
Lola Tijani: YouTube be a little late with your notifications sometimes, love the video tho
Ayuana May: Can you do a video on how you put the wig cap on
Malijah Serenity:
Octavia James:
April Clark: Slay Queen at again.
Dorisicia Boyd: Great tutorial as always ‼️Are you ?
Deelkas Jones: Where can the she's Bomb gel can be purchased???
Shanika Holte: Hello I’m new to your channel and of course I had to subscribe... I don’t no if you answered this question already or not but where are you located?I would pay good money to have you bless this hair of mine
Visualking 420: Laidddd
Lucia Zhu: Click here to know more about another human hair wigs: https://amzn.to/32WWI4X
Wigged ByNu: Cute Afffffff
Kathia101:
austin gray: Laid
Princess Toyia: Notification gang!!!#1