Tropical Paradise | 360 Wig Lace Frontal Install
- Posted on 25 March, 2020
- Full Lace Wig
- By Anonymous
Hey Slayers! I have this amazing video for you guys I really hope you enjoyed! If you like this video don’t forget to give this video a thumbs up & subscribe to my channel for more installs! ❤️ Catch ya later! ✨
Direct Wig Link: https://m.wigginshair.com/613-color-fu...
Check out my last 360 Wig install video: https://youtu.be/46GZUQWrA4g
Instagram: @teetheslayer
Facebook: Tee The Slayer
Snapchat: @tvria
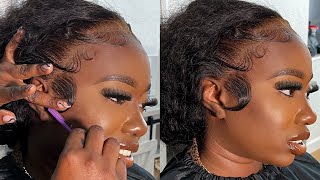
Hey y'all welcome back to my channel and if you are new here to my channel, please make sure you hit that subscribe button. So you will not miss out all these exclusive videos that I have coming for you guys in this particular video. I'M actually pretty excited to be showing you guys. This install because I dish is custom color, and this is my first exclusive like bright multi-coloured color and I'm linked all the colors that I've used to create this look in the description box below so make sure you guys check that out cuz. I will list everything that I use in the description box below so without further ado. Let'S get into this videos, so she purchased her wig from our Aliexpress and she purchased a 6:13 blonde wig and I will link all her information down in the description box below. As well on the exact link to this hair company - okay, so right now, I'm just moisturizing her hair with my pink luster moisturizer and I'm making sure that is all on her ends. Although her roots are everywhere, because this is a week that we're installing and we want to make sure that all of her hair is moisturized and nice and healthy okay, like you, do not want to draw hair underneath that wig like know so I'm just about to Be doing some regular straight cornrows to the back and you don't need really really small ones. Her hair is quite kind of fine, it looked thick, but her hair is very, very soft and fine. So I really didn't need that many braids and, as you can see, I'm gon na zoom in closer as I connect the braids, as I'm done with one I'm gon na, be adding the end to the of the other. Braids took the new braids that I'm starting. If that'll make sense, don't worry it's about to come up in just a few okay. This is what I'm about to do it so pay close attention. So you see how I'm taking the end of the first braid that I braided and adding it in you want to make sure that you pull that braid as tight as possible, not as tight, not to the point where it's causing any tension. In the back of your clients head, but you just want to make sure that it's flat enough. So it won't be bulky and you want to continue to braid down and make sure that you just add that basically you're just adding the braiding as you're braiding. But just pay close attention, okay, so I'm out to do it again right here, so pay close attention. So now I'm just taking some got to be free spray and I'm spraying that all throughout the front of her hair and also the back - and I also did forget that this is also a 360 quick install. And I didn't show all of the steps on how I did everything in the back. I basically just did everything the same. Exactly the I did, the exact same thing, what I did in the front to the back, but I also already have a 360 wig install video and on my channel. So if you guys want to go check that out to see a further detailed video on how to lay that lace in the back, you can go check that video out and that will give you everything. I did the exact same steps in the last. In the other, video of my 360 wig install, so everything is basically the same so right now. I'M just sewing then that braid, that last braid that I had from braiding her hair down and I'm making sure that's all nice and secure. So I'm gon na be taking the cotton balls with some alcohol on it and I'm gon na be cleaning off her hairline, really really good, because, as you can see, she's my client have on makeup and oh my gosh, her makeup is beat like. I just love the colors, the colors Gil's, giving me life, but I got to make sure that all of that makeup is from offering a perimeter because it will cause your legs to lift up any kind of makeup or or you will cause your legs to lift Up, if you forget this step like please, do not forget to wipe your client off with alcohol or yourself and you're doing it on yourself. You have to wipe it off with alcohol multiple times the more the better me personally. I never have just a strict amount on how many cotton balls I use it's all different for each client. Some people have oily skins. Some people don't work like it is all different. It'S used as much as until you don't see no residue coming from off that alcohol pad, but right now, I'm just cutting some holes on her ears to make the cap lay down flatter, because this part right here I had a hard time like trying to lay In the beginning like when I first started doing these installs and this method right here just helps to work for me when I cut the holes around the ears, because somebody also asks me that as well, it just makes it easier for the cap to lay and For the front to lay so then I'm just taking my blow dryer and I'm blow-drying, all of that and then after all of that is drying. I'M gon na be taking some makeup. Bye, Ruby kisses and I'm gon na be applying that the same exact skin tone to all of her on all of the cap on all of her head and I'm gon na be cutting the cap off. So I also cook the rest of the cat from off the back as well, and I'm not going in with some more alcohol to clean off the back, because I didn't do it to the back yet so now, I'm just taking it and just cleaning off everything. To get all of them may come off her skin. So now I'm just measuring her wig and cutting off her ear tab, so it won't be over her ear ting. You don't want to miss this stuff either, because that would be very uncomfortable for you or your client. If you forget that stuff, it would start to make your ear hurt. So I already put the makeup on the frontal and I sprayed it with like three layers of got to be free spray. Just so the makeup won't transfer on back onto her skin after I clean it, it just helped. You know protect the makeup from sneaking into the glue, but I'm just taking another alcohol pad and I'm clearing off your hairline one more time just to make sure that all of that makeup is all from right there and then I'm gon na be taking my boat Home active and I'm gon na be applying three layers to her hair and I only use three layers for all of my clients and I'm smeared out really really even and good until it's clear and you want to make sure that the width of the glue is At least one one to two inches, depending on how big your client for it is, some people have low hairline. Some people have, you know far hair, like you know, like big foreheads, where you know like me, I have a big forehead, so it just all depends on how you want your friend relate, but though, what the width of the size of the glue should at least Be one inch on the cap and on the skin, so it can lay properly because your legs will lift if it's just a little bit of glue. You know it doesn't matter how much you use. It all depends on how wide the glue is spreaded there. That'S the word for it: yeah, it all depends on how wide the glue is spreading, but you don't want to be messy with it. You want to stay nice because this gets messy and sticky. So, as I'm putting in a lace down, I don't use my fingers to really push it in so hard. I kind of just tap it like really lightly, just to kind of like apply a little bit of pressure. But after I laid I go in with my comb and that's what I use to like, really press the lace in because it prevents the hair from sticking to the glue. And once the hair is like, once the glue stick through the lace and go on to the hair, it up the whole install like I'm sorry like it messes it up like it's no like trying to fix it and trust me. I did that and it's not pretty so I just use the teeth of the comb and that's very important to me as well, because it just prevents your fingers from getting sticky because you don't want the glue just to get all over the place like it's. Just this stuff is just too messy, so just be careful and try to stay clean and neat. I also go in with my blow dryer on high on the highest heat and I blow dryer for like just a couple minutes just to make sure that all of that glue is nice and dry and melted into that lace. And then I take my red elastic band and tie it around, and I keep that on there for about like a good 10 to 15 minutes, just to make sure that everything is thickened evenly as well, but wait. I forgot I got to do the back, so I'm just doing the same steps that I did in the front to the back. I use three layers and I make sure that the width of the glue is at least one inch and it's wide enough. So the lace would stick and yeah, and after that, after I lay the legs down, I just take my blow dryer and I blow it on high heat and I will show a clip a closer clip on when I'm done. You know laying the lace in the back, so y'all can see how I did it. Some of my client is getting some sexy-ass curls today. That'S what she wanted to do. She want to get glammed up. Cuz today is her birthday and she got ta get on fleek, so I'm gon na be showing you guys how to curl, and you want a dedicated super lean video. I already got one on my channel already as well, so I will also link that as well too, if you wan na, learn how to curl and do these Pacific girls, but I'm just gon na be showing y'all like just a fast motion on how I do These curls, not too in-depth, but just showing guys how I do we so now we're about to just cut that lace off, and I like to do it in section so I'll. Do it in four sections total, so it'd be four pieces, and I like to cut as close to the hairline as possible. I don't want, I don't like leaving no extra lace on there because you will see it but yeah. So I just like to be careful and cut as close to the clients hairline as possible and as you can see, as I'm like cutting I'm doing it in zigzag motions and you can see like my hand, rocking back and forth and that's how you want to Do it you never want to cut straight across because it will, you will see like the lace like it's just, not a pretty look so make sure you do a zigzag and get as close as possible. You! So now, I'm just taking that same Ruby, kisses makeup. In the number nine and I'm just taking that on my little small brush and dabbing it on her hairline after I part her baby hairs, and this is a new technique that I that I found out about by Hera by Erika J on Instagram and on YouTube. I'M pretty sure everybody know about her. She is my idol. I swear everything that I know now is because of her, but she showed me this method and when I tell you that it changed up the game like when I do it on the other side, you will see the color change. You know how well it's blended like right now it looked white, but I'm telling you like weights after I do it. It is like my holy girl, so I really want y'all to pay close attention right here when I do it this time. So, as you can see, you can see that it looks kind of white and razz beat, but as I'm dabbing that makeup on there it's blending in and it's making it look like it's coming from out her scalp like do you see the difference? Do you see the difference like? Do you see that, like it's just amazing and after you put that on after you spray that free spray and put that red band back on there, your elastic band or your scarf or whatever you have to lay it down? I'M telling you it will be melted duh, so I already cut the lace off from the nape of her neck and now I'm just trying to pull out some little baby hairs and I'm not gon na fall, no baby hairs back there, I'm just parting out a Little thin layer of hair and just cutting it to make it look like it's a baby hair, it's okay and then I'm gon na be showing you guys a closer clip on after I'm done, because, as you can see, my big ass hair just blocking everything like. Oh, my gosh, it was blocking everything, so I decided to record a closer clip for you guys so now I'd like to just put that red elastic band back on her hair to lay it down after I didn't cut everything and put that makeup bag on there And we bought the finished curling her hair you, so I like to cut my baby hairs about 1 inches away from their head. The shorter you cut them, the better will mow the longer. They is the harder it would be for you to mowed them. That'S just my opinion and I like to mow them with my narrow B moose, and that's the only thing that I like to use and when I am molding my baby hairs, I'd like to be very lightweight and light handed, so your legs won't live up cuz. If you be heavy-handed with this step, it will cause your legs to lift up. You want to be very lightweight and just smooth and just kind of just you just go like I don't even I would post a dedicated interview for you guys so y'all won't experience. No listing or no nothing like completely just sealed and um yeah, so we want to just finish them: holding them baby hairs and giving them to get there, and then I'm gon na finish, curling her hair, so yeah, please do not be mad at me. I swear like I am going to get me a camera ASAP, okay, my storage kept like getting for my camera kept cutting off. So while I was doing this side, I did not realize that the camera cooked off so basically damn near when I was done with her installed. That'S when I realized that it stops recording - and I was so pissed like I was so freakin pissed, but don't worry it's okay, because all I did was just take her scarf off call my baby hairs out and finished pressing out the top of her hair. With my hot corn, I used a hot comb from off the stove, and I also have a video already on my page on how to do it. So you're really not missing anything. Just go watch my other videos, I'm telling you like just watch all of my videos and you will see the process and the steps and everything so with that being said, thank you so much for watching. I hope you enjoyed and stay tuned for my next video. Oh my gosh yeah I spin around for me. Oh my god, Jesse your makeup is on point. Yes Perry. Yes, oh my gosh! Yes,

Comments
Tya Turner: That color looks amazing on her. Blends in with her complexion.
Mom Of Many: Love Love Love the color!! You are so talented! Keep pushin girl!!
Shala Sirls: keep up the good work! Thank you for staying strong and continuing to do what you like to do. You are definitely an inspiration and its only up from here for you.
Shalina: stay strong and keep going... it will be worth it... you are the light at the end of the tunnel... i'm just 16 and an introvert... just like to stay closed and reserved...we're all going through sum and we gotta come out strong baby girl just stay strong... as your story progresses it's helping inspire me and it's most likely or will help inspire other young girls as well... get up and wipe your self off and leave those negative people behind... stay positive and continue to find yourself... you gon make it...we gon make it... start writing down your goals and make shit happen... you're very beautiful and i amire you already.... i was just looking at some cute hair videos cause i'm considering getting a frontal... but anyway... you got this love... stay strong and pray in jesus name... to always guide you to follow you and lead you down the right path ❤ stay strong much love - shalina
Pretty Molly: BABY THIS COLOR IS EVERYTHING I LOVE IT
Faithsoobrazzy: Good job!!❤️❤️
Athena Aphrodite: Good job BEAUTIFUL!
Kyra: Straight slayed
Au Gust: That color is poppin!
latanya s: you should make videos on how you colored the hair
Sherriah Ramnarine: This rhellll sweet I love it❤❤
Yesenia Ochoa: This Is So Cute
L. B: ... Gorgeous
IceyyDopeGirl: How much do you charge for a frontal
Medusa Lives: But honeyyyyyy This color is life ☺️☺️ She ready for her hot gurl summer already ☺️
I Am Ari: Her Hair is LAAAAIDT yassss
jaelyn d: i've been watching all your videos & ima need you to come do my hair , like deadass !
Fɛiىty Aʐʐ ċɦaռtɛʟ: This so I love it I need you in St Louis ugh
THAT'S SO CAITLIN: why haven’t i been subscribed to you
deseraymiles87:
Andressa Crouch: Brazilian colors.
ciera miles: OMG what state you live in I so want you to do me a custom lace front
isis Malone: Bomb!
ybyb R: can you do mom colors red & Blue. how much is it going be
LALA BOSS:
Paris Da French BullDog & Poe Da Shih Tzu: You did that