Close Up Tutorial: How To Ventilate Closure/Lace Fronter Using Ventilating Needle
- Posted on 02 July, 2021
- Full Lace Wig
- By Anonymous
How to make wig closure, step by step guides for beginners
#closure #wigmaking #howtoventilatefronter #howtoventilate
#howtoventilate #wigmaking #lacefronter #closure #wigs #hairstyles
#bonestaightwig #ventilating #howtomakeawig #naturalhair #slaysquard
#howtoslaywig
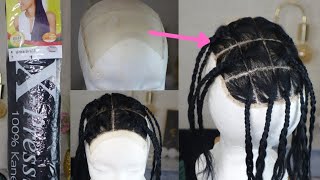
Hello, there welcome back once again to james the home of flux and bricks um. Today, i'm back with another tutorial, and this time is way how to create your weight from scratch to finish. But today i'm going to be doing the half part of ventilating stuff how to ventilate your closure, um like this to get the knit front before installing the rest of the way face is ventilated by me with an expression, don't mind the face of my face of The baby she's redesigned by my daughter, she actually looked pretty nummies anyway, so back to page, does it and i'm going to be showing you how to achieve this? First of all, the things you needed for these is your your ventilator pain or needle. It comes this way and set this way order from other hairsprays uh take away to come, but towards the time those pins actually have a different set like numbers. By number. They have one two three and four uh. I accidentally broke one. So i'm left with three number one, two and four. So the number is like. I don't know how to explain this cut it to the number and one doesn't pick much of the hair and two pick more, the higher the number the higher the the volume should. I say volume the quantity of hair it peaks, so we are going to insert this first, you open it. Oh sorry, we are going to insert the pin into this. So you just open this way. Uh like this and drop. It then pick the number of the pain you want for my the inside, i use a three and two and under finishing i use one number one to pick a lesser hair. The lesser hair show it look more realistic and more original there is it. This high. Does the paint this i look, i don't know if you can see this, but there's a sharp edge like a seven, just like the normal crusher we use on here, but there's a little bit smaller. Let me show you it's very tiny, very, very tiny. He said like number seven: is it very tiny? This is number one you can see under the pain that they open. Then you insert it right inside does hold, and then you cover it up again with this there's the cup. So let's go right. So i just pick it and insert it right inside, like this use your hand to like push it in and then insert the the cover the cap. This will secure it to make it very intact, so it doesn't fall out make sure you tighten the knot very tight. This is it. This side looks very sharp edge and then the less material or the nesting is your brush. My brush is mixed because i just finished using it on the expression that is it. This is your brush and the expression, and what i'm going to be needing is your scissors, if needed, hair, and this, how you go about it, you just pull up a little hill. That depends on you. As a starter. You don't need much hair, then you hold it this way, just like this and pass this through the paint, the and pull it out just like that, so we are going to the practical section right now, that's here to die. Just like this! Oh, you can use your hand this way to secure the remaining hairs for the case, you pick it okay, whichever way works for you, so we are going to go right down to the video so guys this is it i've done almost half part of it. I just reminded a little so this is how you do it. You insert the pin right through the ventilating net or cap, whatever you call, it make sure you don't pick or you don't pass the the hook more than two to three holes because they are very tiny and then you just pass it and pick pick the hair With it and try to lock it the way you do your crochet. This is a little bit easier when you are used to the crochet pane, the crochet needle, like you are used to crochet brace, but if you haven't, then you have a lot to work. To learn you have to learn that first, because this is way easier when you are used to that or if you haven't, then it would be very difficult for you to get a neat uh closure or be able to do it fast. So when you are used to that, then this becomes very easy just that these take a lot of time than that, and also because of the net is invisible. The horse, the gap in between you pass, the pin and the hair is not that visible. They are tiny, tiny little holes, so you, if you are a learner, you have to practice with the other crunches first before doing this purchase your tracks today, jimmy on the track. So you nicely bye bubble boy. Bye, bye, so purchase your tracks today, jimmy on the track. So you nicely bye, bubba boy, so purchase your tracks today, so jimmy boy, so this is the guys us finish is is turned by me now this is it i'm gon na do a video on how i installed the wrist, but this is just the basic part Of it - and it takes a lot of time to be able to get to this volume - my beautiful dummy here - is it thanks for watching? Okay, guys, don't forget to keep it real by subscribing like and leaving your comment below and hit the notification button. So you get notified anytime, i upload a new video. The next video will be on the full weight yeah bone straight hair. Okay. This is just the base for the the frontal, so the main video is coming out, don't forget to hit the die


Comments
Home & Car Review: Very well detailed and demonstrated like a Top-Notch professional should.. Job well done
Too PRECIOUS: You're amazing and talented Thanks for sharing this tutorial ❤️
Nzewi SarahAda: The wig looks beautiful, good job .
Vikisha Knight: Wow you have skills girl It came out looking amazing
Mahtilda Chimaobi: This is really great, you did a good job with the hair. Nice one
Together TV: This is so fantastic and amazing, Thanks love for the good job
KITTY: Wow! Amazing work
Patrizia Motta: Thanks for sharing this nice tutorial
alisha ranjane: Its fantastic and nice tutorial !!! keep sharing to watch more
Frances Chuks: Wow this requires lots of patience and time. Nice one sis
OMOJULIET& FAMILY channel: Wow this is amazing
5J1K Family: Thanks for sharing great content as usual
Gh Martino: You're such an amazing, You always do different things love you more keep it up
Benita Ebuka: Very useful tips Thanks for sharing
OMOJULIET& FAMILY channel: U did a great job sis
Keoh: Love the video shoooorrdy keep em coming
Nell & Tee: Beautiful Job
Liziwe Masha: The wig looks so beautiful hey
Mimmacula's Lounge: Oh Woow this was so nice to watch.. You did great.. Nah so much work goes into makeup wigs worth the price tbh
tessy osas: Nice
Life With Odi: Nice hair
Jane Jojo: Good job dear
Queen of Vibe: Your hands are blessed☺️
Tega Fred: Damnnnnn this is work ooooo
Divinelove Benjamin: The energy u use in videoing urself before and after, put it into practicing, ur ventilation not neat and so undefined.