Quick Easy Half Up Half Down Using A Upart Wig | 4B Natural Hair Ft. Niawigs
- Posted on 16 September, 2020
- Full Lace Wig
- By Anonymous
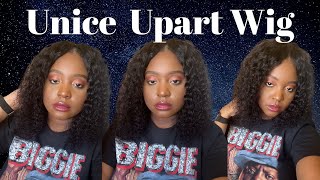
In today's video, I show you guys a super quick way to style your natural hair with a upart wig. Upart wigs are super versatile and they give you the look of a sew-in without the commitment of keeping the style in for too long. This Niawigs upart wig matches my natural hair very well without me having to apply any extra heat to it after blowdrying. I hope you guys enjoyed this video and try this style out on your natural hair. See you next week! xoxo
| W I G. D E T A I L S |
Niawigs U-part wig $175 https://www.niawigs.com/products/yaki...
x 18 inch
x yaki straight texture
x 1B Natural color
x Middle part
x Remy hair
x Medium cap size
USE CODE: ERICA15 for $15 off
| E X T R A S |
x XL wide tooth comb $4.24 https://amzn.to/2ZHrZdx
x Fine mist spray bottle $10 https://amzn.to/35Jq2kz
x Jam extra hold gel $6.44 https://amzn.to/2ZJM9nk
x style factor edge booster moisture-rich pomade $14.99 https://amzn.to/3c0p0Si
x curling wand set $36.99 https://amzn.to/2E4MAAR
| S O C I A L M E D I A |
x i n s t a g r a m @_ericaandrea
CONTACT MY MANAGEMENT [email protected] for all business-related inquiries.
| F A Q S |
Age: 25
Camera: Canon g7x mark ii https://amzn.to/2NvoEc7
Editing software: Final Cut Pro
Hometown: NYC
Hey guys, what's up and welcome back to my channel today, i have another exciting video for you guys today, i'm going to be showing you guys how i achieved this super cute: half a pack down hairstyle with a u-part wig from nia. Wigs don't forget to subscribe to my channel and give this video a big thumbs up if you like, hair tutorials, let's just get right on into the video. I have my you part wig here from nia wigs that you guys have seen in a previous review. If you haven't seen that go check it out, i have it in the cards, so i'm gon na section out literally just the front - the least amount of hair possible honestly and i'm gon na try to make it work like that. So this is all the hair that i'm gon na leave out and everything else is gon na go back into the bun, and i just do my. This is what it looks like. So, let's see try to adjust everything. So i'm gon na clip the first pieces right here where the parting i just made is so i'm basically trying to apply it the same way, i would like a half wig, so this is what we're working with so far. Now that we've clipped everything in so now we're gon na see how we can cover everything. So all the hair that i took out just gon na pull it forward. So this is about the size ponytail that i would do and i'm just going to go ahead and separate this from the rest of the hair and clip it out the way. So now i have this look at my edges. As you guys can see, it looks pretty bulky and it's not blending that well as of yet so that's what we're going to do right now, so i'm going to bring you guys in closer to my edges, not too close, though, because these edges child they need. Some help i'm going to take some jam and i'm not using this for hold as much as i'm just using it to kind of just moisturize the hair. A little bit jam is not like a long-term edge control for me, never has been so i'm just gon na go ahead and put that so because it is so sticky, as you guys can see like it's, not even melting into the hair. It'S sitting on top of the surface, i'm gon na go ahead and wet it a little bit, and this is just gon na help me blend it in brush it in nice and sleek, as well as soften up my hair a little bit, and i like to Do this instead of wetting my hair beforehand, because sometimes i feel like you can apply too much product that way, and i don't want my hair to be soaking wet, you know. So this is what you get not so bad. It is a little bit. There is a little bit of a bump right here where the clip is, i don't know if you guys can see, and you kind of can see the edge of the wig right there and i'm going to show you guys later, how i conceal that i'm going To use a bobby pin, but i think before i go ahead and slick this back all the way i'm going to adjust this comb further back, just like that and, as you guys can see now, it's laying much flatter. I'M going to do the same thing on this side, okay, so this is what we got right now and i'm actually going to secure the hair up. Just like this make sure you have a clean, a clean section, because when you tie it up, you don't want it to get tangled and then i'm just gon na clip the back of the hair out the way then you're gon na get a scrunchie to tie This up, i'm gon na use a pretty thick headband type scrunchie, because i want this to hold because the ponytail is what's going to keep this wig on your head more so than the clips. So i pull it nice and tight, but not so tight to where it gives you a headache, because i hate that just like this and i love these type of scrunchies because it gives your ponytail some height so that it's not so flat to your head. And you can go ahead and cover it later, but there we go. That looks really good. Okay, so now that you guys see what's going on, you guys see how you can see like the sides of the wig lifting up, i'm going to show you guys how to conceal that there's more fabric than we need. So it's kind of bunching up right here. So i'm going to flip it down where i need it to stay, and i'm gon na go ahead and bobby, pin it in place there and that conceals it very well, then you're just going to go ahead and do the same thing on the other side, as You guys can see it's that part of the wig cap sticking out fold it down where you need it to be and then bobby, pin it going backwards into the hair and that'll keep the wig down behind your ear. Okay, you guys, let me unclip the back. This is looking pretty good okay, so let's go ahead and do my edges, i'm gon na be using the style factor, edge, booster, extra strength, moisture, rich pomade for thick and coarse hair. I swear by these edge controls. I love them. This one is not as strong as the edge booster, but i'm going to use this today because we're not doing anything crazy, just going to do some quick swoops and try not to disturb the ponytail. Some people do their edges before they slick up their ponytail. I feel like i always have to do it afterwards. I just feel like doing it before it. Just never comes out right and also i never know exactly how i want my edges to lay until the pony is already slicked back. You know so do that quick little swoopy swoop, like that, i don't go too crazy with my baby hairs, because my edges are kind of thin already, so i don't have much to work with so now that the edges are done. Let me just show you guys: this is what it looks like looks nice and sleek. Your pony is sitting up nice and high and then to just kind of do the finishing touch. I'M going to take a small piece from the back of the pony and i'm going to wrap it around the base of the ponytail, and this is just gon na give it that really nice polished look so once your hair is slicked back and everything looks pretty Good, you can leave it just like this, but of course i'm gon na go ahead and be extra and throw some wand curls in it. So first thing i'm going to do is tie down my edges because, while i'm curling my hair, i do not want my edges to get messed up and i just want it to set in the gel and look really really nice. So i'm just going to tie my edges down so first, let's start with the back of the hair. This is going to be really easy. I have a bunch of different videos on my channel, where i show how i want curl, my hair, so this should be simple, but if you're new, you just wrap the hair around hold it for a little bit and let it go, i'm going to go ahead And fast forward, through this part and i'll, come back when i'm finished okay, so i'm about halfway through not about i am halfway through. I did. The whole bottom of the hair looks really really good. I just sprayed it with some hairspray and i took the um scarf off because i was sick of looking at myself with that scarf on and i feel like it just wasn't visually pleasing. So i'm just gon na go ahead and curl the ponytail and we're gon na wrap this video up. Okay, so the curls are done, i'm just going to go ahead and fluff them out. This is the final look you guys like come on. It literally looks like it's my hair, okay, you guys, so that's it for this video. This is how it turned out check out neo wigs down below, if you guys want to pick up this unit, i have a coupon code as well. I'Ll have all that information in the description box below. Let me know how you guys like this hairstyle. Did you like it better straight or did you like it better after i curled it, i'm always feeling the curls. I feel like curls, just really frame your face and they look really girly and cute so yeah, if you guys want to see more hair videos, give this video a thumbs up and comment down below what videos you want to see from me. Next, don't forget to subscribe to my channel if you haven't already and turn on those post notifications, so that you don't miss my next upload. I will see all of you beautiful people next week, bye


Comments
OurTruth: I’ve been looking for a video like that for ever!! Thank you !!!
Gisselle Lopez: I just found your channel because I'm looking for new hairstyles & I just love your content, your thumbnails are so cute! Now I'm going to binge-watch everything lol
Daphne Mcneal: Looks great!! I love how thorough you are!! ❤️❤️ #newsubbie
caro jo: youre so stunning sis this video was so helpful
krissyB: Curls looks good
Aliyah Jones: Super cute! How long did shipping take for you
K B: Excellent tutorial
rinaTHEchristina: I just followed based on your thumbnail. I thought it was myself at first glance lol I think we favor slightly. Hopefully thats not an insult to you. lol
Eric Kray-Z-E McC.:
W Pierce: I saw your initial video...would u say this wig held the wand curls for a long time. I would like to where the unit straight but also occasionally wand curl it
Shelby TheQT: Thank you
Jillian MacCormack: How do the tracks on the u part not show when u do the top ponytail?
Madame Monroe: Boom