Revamping My 4-Year-Old Wig| Installing A U-Part Wig| Hair Tutorial
- Posted on 19 March, 2020
- Full Lace Wig
- By Anonymous
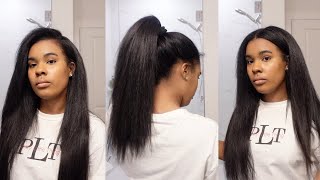
Hi Beauties! Welcome back to another video on my channel! You guys loved this short bob so much that I did a video on it! This is actually a u-part wig I made back in 2016! So join me in revamping this old wig into this cute little bob. This video shows you how I water color the wig jet black, install the u-part wig, and curl the wig to blend with my natural hair. This hair is from a company that no longer exists, so you wont be able to order this exact hair. BUT check out the hair that I usually wear at www.beyondluxehair.com. Use the discount code: Sonja10 to get 10% off of your next order! Hope you enjoy!
For more makeup and hair looks, follow me on Instagram @simplysonja_m. Email me for business inquiries only [email protected].
Background Music:
Feel Better by Roa Music https://soundcloud.com/roa_music1031
Creative Commons — Attribution 3.0 Unported — CC BY 3.0
Free Download / Stream: https://bit.ly/feel-better-roa-music
Music promoted by Audio Library https://youtu.be/u0dGUeJnB54
Track: Our Place — Iaio [Audio Library Release]
Music provided by Audio Library Plus
Watch: https://youtu.be/9EWnjpE12dU
Free Download / Stream: https://alplus.io/our-place
What'S up, you guys welcome back to another beauty, video on my channel. If you are new here, I am Sonia and tune into yet another hair video for today, are you guys, so I have been getting so many compliments on this hair that I have been rocking lately and let me just tell you: I really appreciate the compliments it. Thank you guys so much for loving this look on me. This is not my natural hair, even though my natural hair does look very similar to this. It is actually a 4 year old, u-part wig that I have had for it, that's right for years. So what I'm going to do in this video is show you how I have revamped this week over the process of four years to get what we have today so like. I said this is a u-part wig. So the top part - this bang right here and a little bit over here - is my hair and then the rest is a unit I made four years ago you guys so, if you're interested in seeing how I got this particular style with this week and let's go Ahead and get right into the video, so unfortunately, you guys the hair company that bought this hair from no longer exists. So I apologize you guys want to be able to order this specific hair. However, you can learn about the hair company that I have been rocking. Lately, which is beyond luxe hair, if you stay tuned towards the end of the video or check the description box below, you will get to see their website and my discount code to get 10 % off of your first order stay tuned. So the first thing I'm gon na do is watercolor this hair jet-black. This hair is a natural brown color, and so I want it to blend with my natural hair as best as possible. So it needs to be a pretty dark color, so I'm gon na. Do it jet-black so here you just see me waiting for my water and my sink to get super super hot. I have it all the way up to the hottest that you can get and I'm gon na watercolor it right in the sink. The kids are doing. This is to making sure that you have a really hot water. You can do this in a bucket. There are plenty of videos on YouTube about how to watercolor hair, but I just choose to do it in a sink, because I don't have an extra bucket and you'll see me right here, just pressing the sink stopper down in my sink, because I've done this plenty Of times where the water will end up draining out - and I don't want all of my hair color - to go down the sink so just make sure that you are putting your stopper in pretty Emily as you're waiting for the water to fill up. So now I'm getting ready to add the dye and the dye that I'm using is the Claire all beautiful collections, moisturizing, color and jet-black. I love this guy. This is the only guy that I use because it has a hobo oil and aloe vera in it, and it just makes it hair very fluffy. Don'T laughs that I'm using these gloves y'all, just the only gloves that I have, but I'm just gon na, pour that whole bottle right into the sink. The good thing about water coloring hair is you, don't need a whole bunch of color, so I literally go from using four of these bottles when I'm dyeing it directly on the hair, so just using one bottle in the water - and I just make sure that I Get all the dye out of the bottle as much as possible and I'm just gon na mix that into the sink so that it can blend in with the one water and now it's time to dye the hair. So I'm just gon na take this wig and I'm gon na put it directly into the sink and I'm just gon na dunk it several times over and over again and try my best to make sure all the hair is saturated. Like I said this, hair is a natural brown color, so I'm trying to take it from brown to jet-black, so this should be a fairly easy process, so I am just going to continuously dunking back and forth just kind of spread the hair out over the wig. So I can try to make sure that the water color gets all throughout the wig and I am gon na. Actually let it sit in the water for a few minutes just so it can soak up as much of that color as possible. You guys my apologizes. She didn't get to see me cutting the wig on camera, because I did that previously, but I did wan na at least show you how I water color the wig. So this is a fairly easy process. You can honestly just dunk it and take it right back out on shirt, static slide with the color, but I do let it sit in there, but just a little bit to try to soak up as much as that color as possible and the way it turned Out great, as you can see, it is now jet-black and I'm just using a t-shirt to dry the wig off. I am gon na use this t-shirt throughout the drying process, so I just bundle it up right in this t-shirt and take it over to the room to air dry. But this is how the week looks right out of the water and you can see the natural curl or wave pattern of the wig and one last thing I want to show you before we style this wig is the drying process. So I use that same t-shirt. I put it on the ground. I spread the wig out on that t-shirt. I do scrunch the curls up a little bit, so the curls can be more defined as they dry, and I actually have a fan back there that you can't see quite yet that I'm gon na turn on and let the curls dry a lot faster. So using the fan on its highest speed actually helps the wig dry and a lot less time if I was just actually letting it air dry. So this dries over a process of a couple of hours and I get to slap it right on. Are you guys, so you saw how I want to cut this hair jet-black, and this is the wig now that is all dry. So if you like really put it in the light, you can still see some brown in it. I could have left it in here. A little bit longer, but it's black for the most part, it will match my natural hair. So this is the hair texture natural, so I haven't curled it. I just you guys saw that. I just put it in front of the fan. I scrunched it up, and this is how it came out. What I'm gon na do now is. I have my hair braid it down up under here. I have my section of hair that I'm gon na use for the you pirate section out, and I actually just watched this top part up here, so I'm going to now blow-dry the top part of my hair and get ready for the blending process. You guys see. I already got my edges laid out and things like that. So this you guys are like first time seeing like my natural hair kinda in its natural state. It'S poufy, the threat of mother natural hair is heat damaged, so it doesn't curl that well, but I'm gon na spray this down a little bit more cuz, it's kind of air dried, so I can get ready for the blow drying practice. So I'm going to go ahead and blow-dry this front part of my hair and then I will be back all right. You guys, so I have blow dyed my natural hair and don't come for it because it needs to be cut and just it needs help. Okay, but yes, so I blow-dry my natural hair, so now this is the part where I usually just go ahead and install the new part on my leg. Look at these look it. This is what I mean, but my hair needs to be severely put okay. So I'm just going to go ahead and place for you part in position on my head, and I Section bought quite a bit of hair. As you guys can see. My hair is super thick, but essentially not quite a bit of hair, because I'd like to be able to switch up my part, so I want to make sure that either way I switch it up that it will have enough hair to accommodate that. And then I'm just gon na use some black bobby pins to catch this in place. So I just kind of put a couple bobby pins on each side. Now I would, I know a lot of people use clips and combs in their wigs. I feel like any kind of clip comb or a bobby, pin and shoot continuously putting your hair over and over again is going to strip or take out their hair. So I would just be cautious, based off of the character that you know about. Your hair was appropriate for you to wear. I know my hair doesn't like clips and combs. It doesn't necessarily prefer bobby pins either. So this is not a wig that you know. I try to wear all the time, but you know for the time being so, like I said, I'm just putting couple bobby pins each side at the top, so around the area where I hide it, the hair, so that the wig is going to sit securely on. My hair, so I believe idea for on this side about three on this side and then I am this and then I am gon na. Take one bobby, pin and secure it kind of like right here at the ear. So I just kind of pull it and secure it right at my ear so that it sits securely. Now you can do this on both sides. I'M not gon na. Do it on this side cuz. I might tuck this side behind my ear um. Let'S just go ahead and do it for now and then, if I want to tuck the this side behind my ear, then I can take it out. I usually won't do that bobby pin on this side. If I want to tuck it behind my ear, because once you put the hair behind your ear it, the bobby pin, will pool at your edges. So I you just take that part out. If I know I want to tuck it all right, so I'm gon na do my part on this side of my head. I have a little mirror over here that I'm looking at so I'm gon na kind of do like a semicircle. Might you kind of part on this side in my head, like so and then what I'm going to do now is I'm going to flat iron my hair and then I'm gon na use a curling iron to blend my hair to the Hartwig a little bit of This coconut milk from orx and my hair, like literally just like a little a little bit in here, and I usually like my hair whenever I first blow drying it and whatnot, it usually gets like stupid, stupid fluffy like to the point where it won't even cooperate. So I'd like to add some oil to it, because if I don't hey, it's just not gon na bling properly. Alright! So I'm going to section my hair in these little tiny little sections and a flat iron it so that I can begin the blending process. All right so now that my natural hair is flat ironed. I'M I'm gon na begin the blending process and I just want to make sure that I have like all the areas of the wig where the wig begins covered up, so that you don't see any tracks and you guys. I know that my hair needs to be severely clipped. Okay, my hair is usually up embrace under a full week. So if that all types of routines and unevenness and all types of stuff, I am waiting to do anything to it, because my sister, who is a professional hairstylist, is gon na come cut my hair into a style and I'm actually going to have rates really really Soon, anyway, so don't come from my my aunt's any other area just be patient. Alright! So now I'm going to use this 3/4 inch curling iron, it's just applying a color curling iron to curl, put a little bit of defined curls in the wig and curl. My natural hair to blend it all together and you guys will see the final style and I haven't put any products in the wig itself. It'S just been air-dried and that's it. I didn't put any products in it from me after I watched it or anything. So this is some pretty good hair and I'm sorry guys that I can't can't give you where the hair is from, because she no longer sells the hair, but I wished and she did possess his hair. His bottom is last me for a very, very long time. So I'm just gon na strive to go through and put some curls in his hair and then I'll show you what I do to actually blend my natural hair to make it look as natural and blended as possible. So sorry guys, the camera did not record. All of my curling process, but pretty much what I did to blend my natural hair is, I took pieces of my natural hair and the wig, and I curled them together at the same time so that it created one cohesive curl, so that when I blended everything Together and comb the curls out, it would just flow all together. So I hope that makes sense. Are you guys? So I got it curled on both sides. So now I'm just going to take a wide tooth comb and just start to distribute my natural hair around the weed. I kind of hold the wig and come some of the curls back and out so that we can get the fluffiness that we want the body that we want, and I like my hair, to be like big and fluffy. So I don't mind the bigness a little bit of phrasing edge. Now this is what I was saying. I could very much so tuck. This was the back like that and leave a little leave a little piece out. I would have to straighten it but leave a little piece out and it will look kind of like that or I can leave it out. So the time just really depends on what look you're going for today. I think today I'm going to leave it out, and this here is my playful here, so you can like really fluffy and make it like big. You know, curly, you can even straighten it out since I cut it in this Bob and yeah. I just love it. It'S perfect for those upcoming hot months. If you still want hair, but you don't want it to be like so so on your neck, this is a cute cute style. You guys seen the natural hair pattern of this hair. So if I just wanted to wet it and go, I could as long as I can blend my hair with it so yeah you guys. This is how I have revamped this league and kept this way. So this is really good here again, I'm so excited about it. We give you specs when they scarce part is where I got it from because Naomi's version here no longer exists, but I definitely encourage you to go and check out WWE Luke's hair calm, which is the hair that I normally wear on a regular basis. The hair that I recently cut bangs in my friends, new hair company, that she is slowly but surely getting off the ground, and if you are interested from ordering from her, you can definitely use my discount code at Sonya 10 to get 10 % off your upcoming Order you guys, so I hope you enjoyed this video. I will be trying to do more hair and makeup uploads, for you guys, the fashion videos will be back very very soon. You guys so hang in there with me. I hope everybody is being safe right now with this corona virus outbreak. You guys, I encourage you to keep your faith tonight, live in fear if you haven't checked out my transformation, Tuesday, video, if I'm this week in Destin, go and do so, because I have a prayer in our scripture for you during this tough time. So you guys definitely make sure you are subscribed to my channel. Follow me on my social media outlet at Instagram and simply silent, underscore em, and I will see you guys in my next video love. You bye,


Comments
The Lea Rae Show: That came out SO good. You natural hair blended so good!
Story of My Life 🖊: I never thought about an U - part wig, but now I want one . Do they sell them already made or do you have to install yourself?
SunshineBadu: Love this look on you, you did a great job. NEW SUBBIE!!!!!!!!!!
Ms. Shabria Gxo: Love it
Tashia Reed: Love it!!!!
Cajunn Blaze: I loved this video‼️ So cute
HOLLY JAI: Pretty
Kianna D: What wig caps to you use? I made a upart wig but it’s really loose in the back
Afro Sophisticated Beauty: How many bundles and length was it?
izzy: You are pretty Simply Sonja...!!
Elizabeth x: do you have to dye it or is it optional