How To Do A Flexi Rod Set On A V Part Wig *Very Detailed * Ft. Unice Hair
- Posted on 11 March, 2022
- Full Lace Wig
- By Anonymous
Hey y’all ❤️ In today’s video I’ll be showing you how I achieved a Flexi rod sat on a V part wig Thank you for watching this video don’t forget to like comment subscribe and share THANK YOU FOR 100k❤️ On the #Road to 200k
Using my Special Code: TYGI05 & TYGI10 (full $49-$5,$99-$10)
Ships from US/FR: 2-5 Days Fast Delivery
▬▬▬▬▬unice.aliexpress.com ▬▬▬▬▬
Same hair in the video ➤ https://s.click.aliexpress.com/e/_onsO...
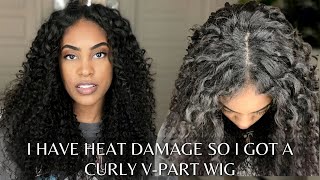
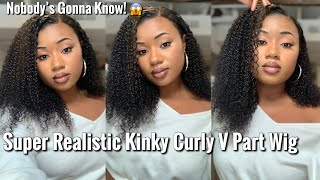
Hair info: Protective glueless V-part Curly wig 24 inch
UPS 2-days Delivery Service ➤ https://s.click.aliexpress.com/e/_oosA...
Affordable 4*4 & 5*5 HD Lace Body Wave Wig ➤ https://s.click.aliexpress.com/e/_oD6V...
TOP NO.1 Water Headband Wig ➤ https://s.click.aliexpress.com/e/_okdO...
*Other Protective Styles*
V-part kinky curly wig ➤ https://s.click.aliexpress.com/e/_opEh...
V-part Body wave wig➤ https://s.click.aliexpress.com/e/_oDyC...
U-part kinky straight wig ➤ https://s.click.aliexpress.com/e/_oB66...
UNice hair mall ► https://bit.ly/3CzC52n
Aliexpress UNice Hair ►https://s.click.aliexpress.com/e/_omp...
Contact to wholesale: +8613782365322
Customer Service Number/ Whatsapp: +16614809525
Contact to promote [email protected]
#UNicehairstyles #PROTECTIVESTYLE #UNiceHair
Business email: [email protected]
Instagram: Ty.marrah
Tiktok : Tymarrahgi
#Tymarrahgi
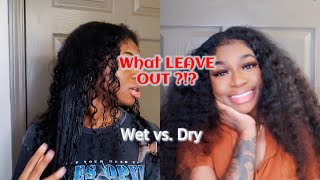
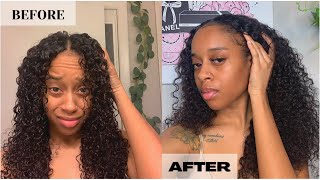
What'S up you guys so in today's video, if you guys want to see me achieve this bomb, flexi rod set on this v part unit, make sure you guys stay tuned and keep watching. What'S up you guys, it's your girl tomorrow gi and we are back with another install well. This install is going to be a little different, we're going to be doing something. I'Ve never done before. We are going to be working with a v part wig today, but today the company that we are working with is you nice hair. I have worked with unites hair in the past, but i haven't did no v-power wig, i haven't did a part type. You part b part i haven't, did this on my channel at all, so i'm really excited because we are going to add a twist to it. Of course, when i'm doing something, i'm not just going to do it the classic way, i've seen a lot of people, i'm doing the v part units as like having no leave out and like just putting it in the middle and kind of like skies in it. But today we're going to do something totally different, something that will give you a very, very, very natural look. So, let's just get into all of the details of what's inside the box first before we get started so inside the box. First of all, they gave us this milk band, we're not going to be using the milk ban in this video, but this milk band is just really cute, like it says: you're nice and it's red and black on both sides, and it's just really really cute wig Caps inside just in case anybody would need a wig cap. We kept inside scarf some clips and i'm going to need these clips. So i'm going to go ahead and put these to the side of some lashes and then we also have another wig cap. So now, let's get into the actual v part unit, so this unit is a 24 inch curly unit um. This is what the unit looks like it's just your basic curly hair, it's 24 inches and it's really really curly. So i'll show you guys what the inside looks like this is construction on the inside uh. Let me see how many clips we have we have, so we have two little just regular clips that you will have to secure the sides and then we have one two. Three four: five: we have five of these clips that you would normally see in like clip-ins, so these clips they do that we are going to be doing something really exciting. So if you guys haven't watched this video before um, i did a flexi rod set on my natural hair. So we are going to do a flexi rod set on this u-part wig. I'M gon na go ahead and blow-dry this i'm just going to use um. Just like a quick, regular blow, dryer just blow dry through to it kind of, looks like how my hair is. My hair is freshly washed and blow dry. So i'm going to go ahead and blow dry this and then we can go ahead and start with the braid pattern. Okay, you guys, so i just got done blow drying and literally you guys. This took me all of probably eight minutes to get it. This blow dry um this blow dryer, should be fine um, it's close to the texture, it's even more poofier than my hair, so this would be good and i would suggest using a blow dryer like this use a blow dryer like this. This will be linked down below so uh it'll just be easy, because all i did was just brush through and i got it exactly the way i wanted it in the way i'm looking at how it's blow-dried. I just know for a fact that this flex, where i say it's gon na, come off so long, so we're just testing this out real, quick, i'm gon na put it like a quick low ponytail just to see if i would want it in the middle just To kind of see, if there's something i would like to do, oh it swallowed my leg out. This is here, dang devour motherly, though. Okay, let's see what i wanted in the middle okay guys. So let's get this started. Okay, i think i'm more happy about me deciding to do the middle, because i feel like the middle, with the braid. It'S more convenient like so, okay, you guys, so we are starting with these braids now. The reason why i'm doing my braids this way is because i want it to be a really really firm hold and i am going to be actually sewing. This v part unit around the perimeter of my head, so it won't slip because i have some things that i was doing that i did not want my hair to slip or anything, but it is optional. You don't have to sew this on your head. You can just throw it right on that's why the unit has so many clips on there, but in the event that you are doing something where you want extra security, i would suggest sewing. Your hair sewing the unit on your head and, if you are doing that, i would suggest doing a braid pattern like this. Depending on what side. Your part is on so that you can actually sew the unit onto a good foundation and you won't have any problems with any slipping or anything. Now this is i'm not like you guys know when it comes to me with the braiding y'all i'll be trying my best, but i feel like i did a really good braid out for this unit in particular, and i feel like for me to not like to Cornrow my hair, a lot, i think i did. I gave myself a really good foundation. All right, you guys, so we are done with these braids. Don'T judge me! This is what the pattern is. Looking like it's this braid in front of my head for me. Okay, so we are going to just go ahead and sew these parts, so let me turn to the back, so you can actually see what i'm doing all righty y'all, so that is laced up. Everything feels really secure. I really feel like i'm ready for a sewing. This is really a sewing prep, no cap. So when i'm putting these clips on my head, one thing i want to say: if i don't mention it before - is um for the part where the t clips are. I did not sew those parts, i'm not sewing those parts, because these parts with the t-clips give me enough security. Only the parameter of my head is really what you guys see me doing. The sewing for yeah this part is safe. All right, you guys, so i'm feeling it everything, looks really good and it feels really good, and i know that nothing is going to move like everything feels really really good cool. This feels like it's a win. I think we might have to try another v part, and do it exactly this way, but with like a different, um, different texture. That would be really cute, because this feels, like a sun wing like if you do it this way. This is a sew-in for half at a time. I'M just like this looks super natural, like this looks so freaking natural. So before we start the whole process, um i'm going to this looks so natural y'all, i'm going to uh comb through i'm going to part my hair in sections part my hair in sections, no part they are in sections and then um, i'm just combing through each Section real quick so that i can ensure that everything is combed through before we get this started. Okay. So what i'm gon na do is just put this in two parts, so i'm just going to go ahead and put this up and we're gon na. Do this exactly the way i did it in my last tutorial, so i i'm just gon na, like kind of just go through it. So if you guys want like a thorough how-to, flexi rod just go ahead and check out that videos and the cards of me doing it on my natural hair, it's the same exact process, my box, full of flexi rods. I'M not sure how many i'm gon na use, because this hair is super long, so we're we're gon na see how many i use - and i think i'm gon na end up using these two, because these are about the same size yeah. These are actually the same size. I want to kind of keep them around this size and then we'll, probably you know, do some purple and you know you know. Actually i think i want to do purple for more towards the back, because this is longer hair. So let me get all of my purple flexi rods together, because this is kind of all around the same size. Okay, you guys. So, as you guys can see, i am all rolled up. I'M flexi rotted up like my mouth, might be a little blue because i just got today eating some some candy, but yeah. I'M excited to see how these turn out um at first i was gon na sit under the dryer. My mouth is so blue right now at first i was gon na sit under the dryer, but i'm not gon na sit under the dryer because i'm gon na just let it sit in my head because i'm not going to sleep right away anyway. So i'm gon na just let it sit overnight, but i'm gon na come back to you guys next time we are back and we're about to go ahead and take these out, i'm just going to use a light light bit of light light oil, i'm not going To do too much because this is not natural here so but first we're going to go ahead and start taking these out first um. I trimmed it just just a little bit. I didn't take off too much of the length, but i trimmed it a little bit and the hair is already curly. So of course it's like springing up, but it's still it's still pretty long. I'M trying to push that one back up, because i just stretched it, but i'm loving the way. It'S looking. It'S really really cute. I like the way my hair is kind of giving it that dimensional type of look, i feel like this is super duper cute, and then you guys, i took a shower and my hair puffed up, so i just had to go back over it with my little Wand curler, so if you guys do have your leave out my natural babies just keep that into consideration. Like you know our hair puffs up, so you might have to go back with a wand, curler or secure your hair so that the humidity wouldn't affect it. But i really hope you guys enjoyed this video. I love you guys so much stay blessed and i'm just going to just show you guys the ending of how everything came out all right, you guys, so i'm really really really really loving. I'M really loving the way. This came out, it's just so cute. You guys, like
Comments
Junior Chaves o Picasso de Yahushua: 0:11 Looking gorgeous. Love the hair
Zamoonaha A.: I just got a curly sewin, finna do this today
I’mJussTi: I really love this ❤️, This look so good
Mini DIOR: I love it
Sammy Da Goat: Third Comment This Wig Is Super Cuteee
Kaily’s Deon:
QyShondra Evans: How many inches
The Journey Of Lexii: Earlyy ganggg